
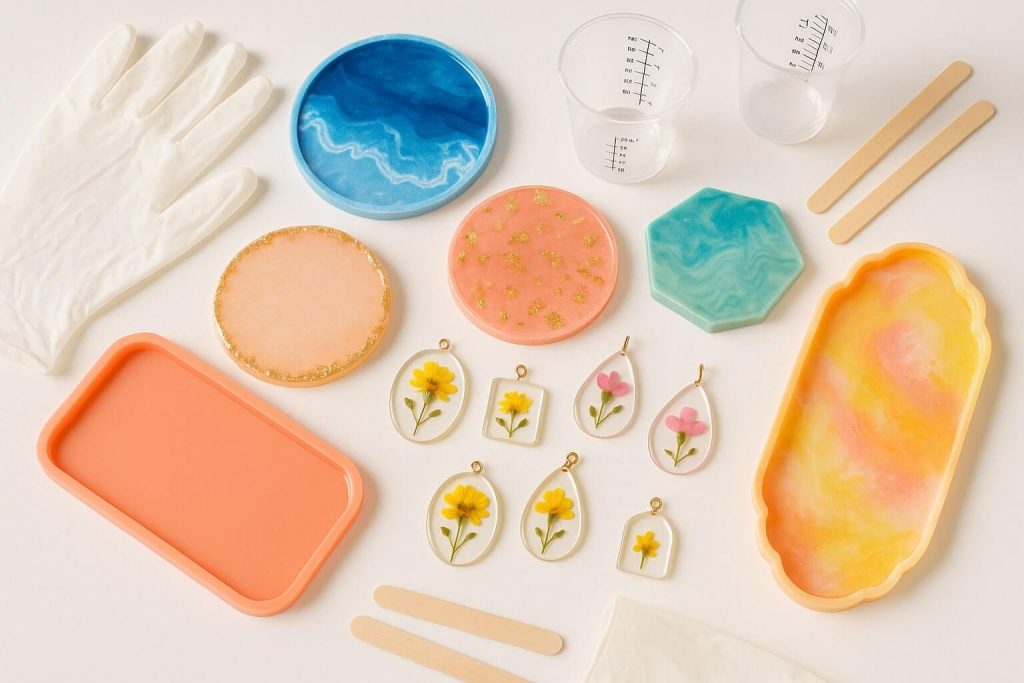
")
Why Is My Resin Sticky After Curing? (And How to Fix It)
Introduction
Finding your resin project still sticky after what should have been ample curing time is one of the most disheartening moments in resin crafting. You’ve invested time, materials, and creative energy, only to discover a tacky, soft, or gooey surface instead of the glass-like finish you expected. If you’re experiencing this frustration, you’re far from alone – sticky resin is one of the most common challenges artists face.
The good news is that most causes of sticky resin are completely identifiable, preventable, and often fixable with the proper knowledge. Whether dealing with a slightly tacky surface or a completely uncured mess, understanding what went wrong is the first step toward mastering resin crafting.
This comprehensive guide will explore the nine most common reasons your epoxy resin remains sticky after curing, explain the science behind each issue in simple terms, and provide clear, actionable solutions for prevention and remedy. By the end, you’ll have the knowledge to troubleshoot curing problems confidently and achieve consistently successful results. Remember, every resin artist has faced these challenges – what separates the experts from beginners is understanding how to identify and solve them.
Quick Summary Table: Top Reasons for Sticky Resin
| Cause of Stickiness | Brief Explanation | Key Prevention Tip |
| Incorrect Mix Ratio | Resin/hardener not measured per manufacturer’s specific instructions | ALWAYS follow manufacturer’s ratio AND method (volume/weight) |
| Insufficient Mixing | Components not thoroughly combined for recommended duration | Mix for full recommended time, scraping sides repeatedly |
| Temperature Issues | Workspace or materials too cold (below 70°F/21°C) | Maintain 70-75°F during mixing and initial 24hr cure |
| High Humidity | Moisture interfering with chemical reaction | Keep humidity below 60-85%, use dehumidifier if needed |
| Excess Colorant | Too much additive diluting or inhibiting cure | Limit colorants to 5-6% of total volume maximum |
| Contamination | Foreign substances interfering with cure | Clean all surfaces with isopropyl alcohol, wear gloves |
| Old/Degraded Resin | Components past shelf life or improperly stored | Check dates, store properly, inspect before use |
Detailed Breakdown: Top 9 Reasons Your Resin is Sticky (And How to Solve Them)
Cause 1: The Mix Ratio Mishap – Getting the Proportions Wrong
The Problem Explained
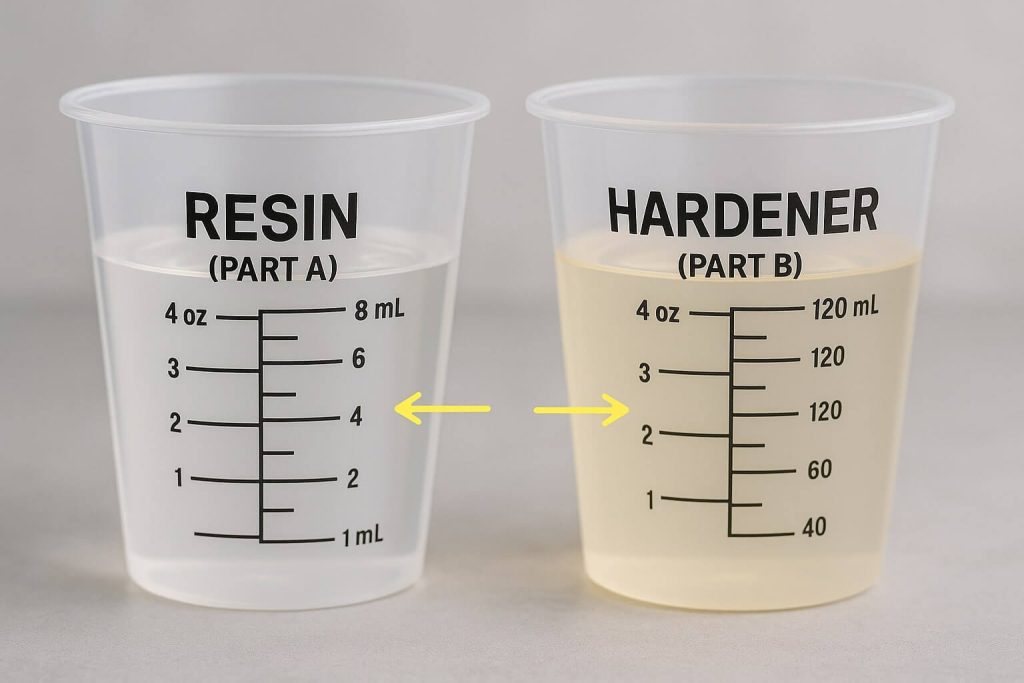
The most common cause of sticky resin is not adhering to your resin manufacturer’s precise resin-to-hardener ratio. Each epoxy system has a specific ratio that must be followed exactly—whether 1:1, 2:1, 3:1 or something else entirely.
Why This Leads to Sticky Resin (Consequences)
The chemistry behind epoxy curing relies on stoichiometry – a precise balance between resin and hardener molecules. When this balance is off:
- Too little hardener leaves unreacted resin components that never solidify.
- Too much hardener (contrary to popular belief) doesn’t speed curing but leaves excess unreacted hardener, creating soft or brittle spots.
- The result is liquid, gooey resin, soft patches, or a tacky finish that never fully hardens.
Many artists discover that measuring by volume versus weight can yield different results. A 2:1 ratio by volume is NOT the same as 2:1 by weight due to the various densities of the components.
How to Prevent This Mistake
- Always read the manufacturer’s instructions – check whether the ratio is by volume or weight.
- Use proper measuring tools: graduated mixing cups for volume digital scale (accurate to 0.1g) for weight.
- Measure components separately before combining them to ensure accuracy.
- Never “eyeball” measurements, especially for small batches with more noticeable errors.
- Debunk the myth: Adding extra hardener does NOT make epoxy cure faster or harder.
- Be extra precise with small batches – even tiny measurement errors can ruin the cure.
How to Fix Sticky Resin Caused by This
If very sticky/runny/gooey: The resin likely won’t cure. You’ll need to:
- Scrape off as much uncured resin as possible using a plastic scraper.
- Clean the surface thoroughly with isopropyl alcohol or acetone. (wear gloves and work in a ventilated area).
- Allow the surface to dry completely.
- Re-pour with correctly measured and mixed resin.
If slightly tacky after full cure time:
- Move the piece to a warmer area (75-85°F) with low humidity for several more days.
- For small tacky spots on otherwise cured pieces, lightly sand the cured regions, then apply a thin topcoat of correctly mixed resin.
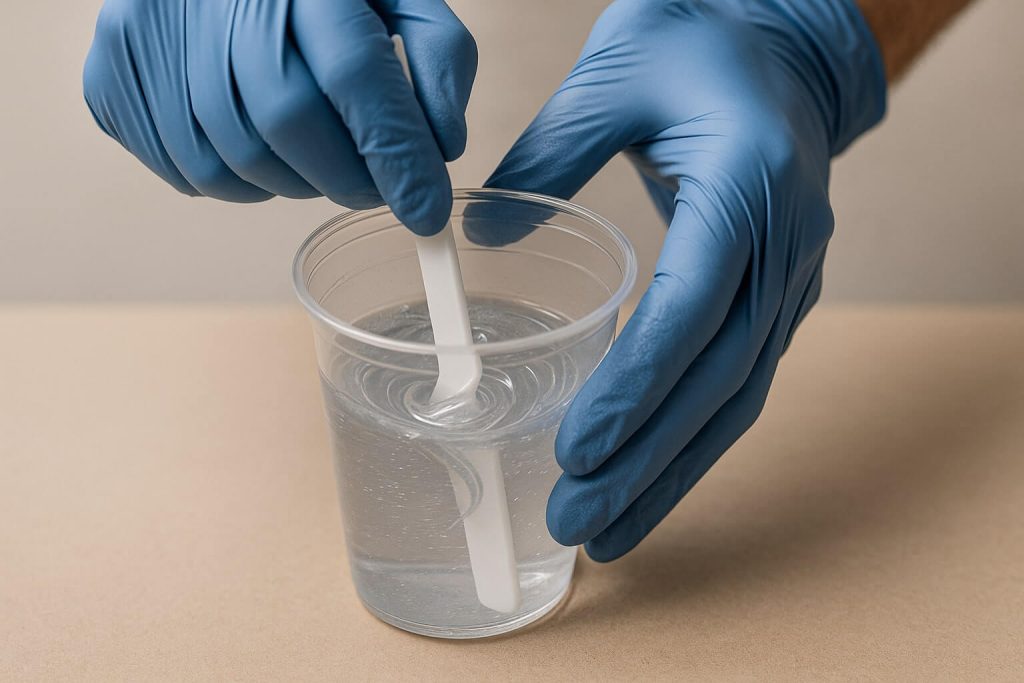
Cause 2: Insufficient Mixing – When Resin and Hardener Aren’t True Partners
The Problem Explained
Even with perfect measurements, failing to mix the resin and hardener thoroughly enough or for the manufacturer’s recommended duration will result in curing problems. Artists frequently puzzle over why some areas cure perfectly while others remain sticky.
Why This Leads to Sticky Resin (Consequences)
Incomplete mixing creates pockets or streaks where resin and hardener haven’t properly combined. This results in:
- Streaky or cloudy appearance in the cured piece.
- Soft or sticky spots scattered throughout.
- Uncured patches where components never met.
- Overall, it is a weak cure with poor structural integrity.
The sides and bottom of mixing containers are notorious for harboring unmixed material, which then gets poured into your project.
How to Prevent This Mistake
- Set a timer: Mix for the full recommended time (typically 3-5 minutes).
- Scrape, scrape, scrape: Repeatedly scrape the sides and bottom of your mixing container.
- Use proper tools: Flat-edged stir sticks work better than round ones.
- Mix deliberately: Slow, thorough movements to avoid introducing excessive bubbles.
- Try the two-cup method: Mix in one cup, pour into a second clean cup, and mix again.
- Check for uniformity: Ensure no streaks or swirls remain before pouring.
How to Fix Sticky Resin Caused by This
Unfortunately, widespread under-mixing is largely unfixable – prevention is key. If you have:
- Small isolated sticky spots: Try the solutions mentioned for incorrect mix ratios.
- Cloudiness from under-mixing: This is usually permanent once cured.
- Large areas of uncured resin: You must remove and start over.
Cause 3: Temperature Troubles – Too Cold (or Hot) for a Perfect Cure
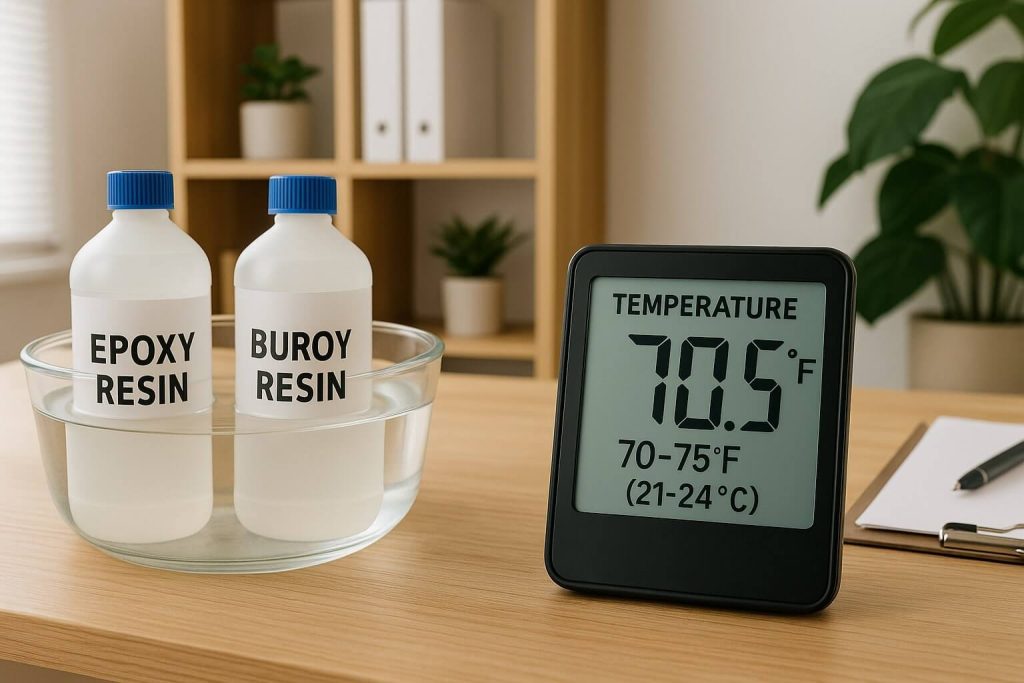
The Problem Explained
Temperature plays a crucial role in epoxy chemistry. When your resin, hardener, workspace, or molds are too cold (generally below 70°F/21°C), the curing reaction slows dramatically or stops entirely.
Why This Leads to Sticky Resin (Consequences)
Cold temperatures affect resin in multiple ways:
- The chemical reaction slows or halts, leaving the resin sticky.
- Increased viscosity makes proper mixing difficult, trapping air and creating unmixed pockets.
- It can result in a cloudy, weak, bendy, or permanently tacky cure.
- Cold conditions often contribute to amine blush formation.
- Extreme heat (less common) can cause flash curing and other defects.
Many discover that their garage workshop in winter isn’t suitable for resin work without supplemental heating.
How to Prevent This Mistake
- Check your workspace temperature: Maintain 70-75°F (21-24°C) minimum.
- Warm cold components: Place sealed bottles in a warm water bath, then dry thoroughly.
- Maintain consistent temperature: Keep workspace warm for at least 24 hours during initial cure.
- Pre-warm molds and tools: Cold molds will chill poured resin.
- Use space heaters if needed, but avoid direct heat or temperature fluctuations.
- Monitor with a thermometer: Don’t guess – know your working temperature.
How to Fix Sticky Resin Caused by This
If tacky due to cold:
- Move the piece to a warmer environment (75-85°F/24-30°C).
- Maintain this temperature consistently for several days.
- The cure may resume and can be completed.
Note: Bubbles or cloudiness from cold-thickened resin are usually permanent. Amine blush can sometimes be removed (see humidity section).
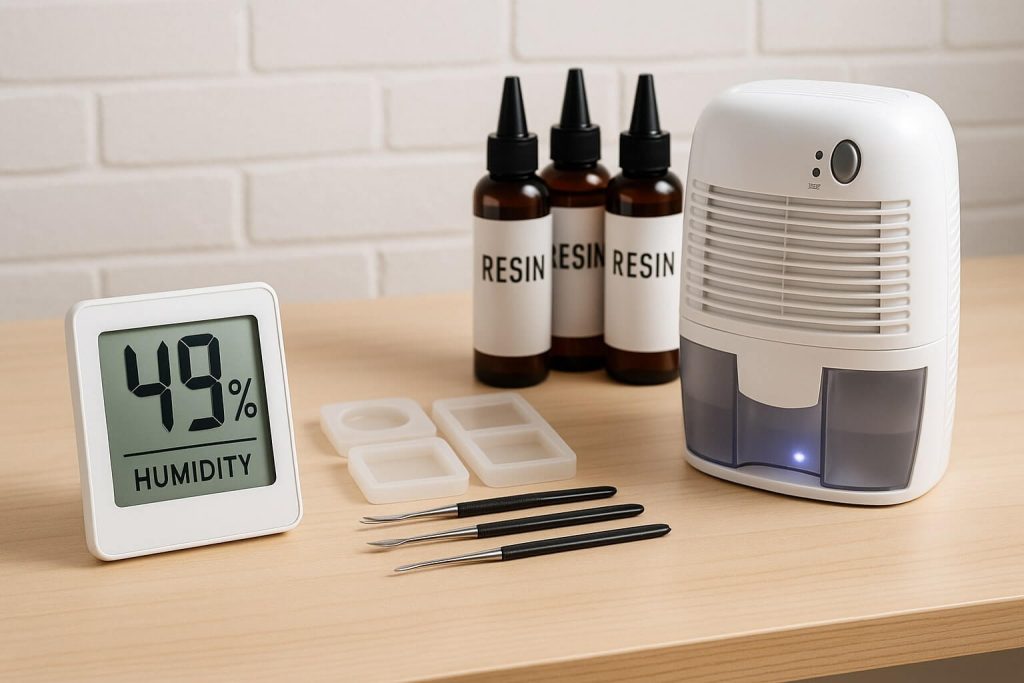
Cause 4: Humidity Hijinks – Moisture’s Impact on Curing
The Problem Explained
High ambient humidity during pouring and curing, or direct moisture contamination from tools, molds, or surfaces, can severely impact resin curing. This situation is especially problematic in combination with cool temperatures.
Why This Leads to Sticky Resin (Consequences)
Moisture interferes with epoxy chemistry in several ways:
- Creates amine blush – an oily, waxy, or cloudy film on the surface.
- Causes amine bloom – sticky patches where moisture reacts with curing resin.
- It can lead to general cloudiness or even foaming.
- The reaction between hardener components, CO2, and moisture creates surface defects.
- High humidity combined with cool temperatures amplifies these problems.
How to Prevent This Mistake
- Monitor humidity levels: Use a hygrometer; aim for below 60-85%.
- Use a dehumidifier: Essential in humid climates or seasons.
Avoid humid days: If the environment isn’t adequately controlled, wait until conditions improve.
Keep containers sealed
Moisture can contaminate stored resin/hardener.
- Ensure everything is dry: Tools, molds, inclusions, and work surfaces.
- Maintain temperature: Prevent condensation from temperature fluctuations.
How to Fix Sticky Resin Caused by This
For amine blush:
- Wash the surface with warm, soapy water.
- Rinse thoroughly and dry completely.
- If stickiness persists, light sanding and recoating may be needed.
For amine bloom or general humidity-related stickiness:
- Try moving to a warmer, drier environment first.
- It may require scraping affected areas, cleaning, and recoating.
- Severe cases might need complete removal and re-pour.
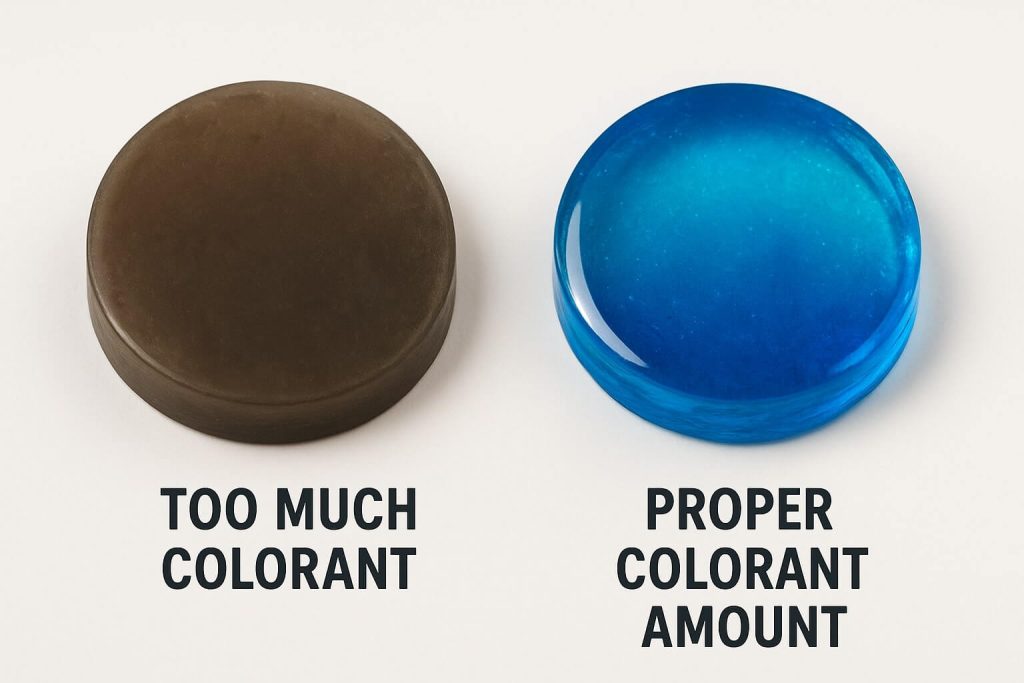
Cause 5: Colorant Catastrophes – Too Much or the Wrong Kind
The Problem Explained
Adding excessive amounts of colorant (pigments, dyes, inks, powders) or using colorants incompatible with epoxy chemistry – especially water-based ones – is a common cause of curing failures.
Why This Leads to Sticky Resin (Consequences)
Colorants affect curing in multiple ways:
- Excess colorant dilutes the critical resin/hardener ratio.
- Some colorants physically interfere with polymer chain formation.
- Water-based colorants (acrylic paints, food coloring) introduce moisture that inhibits curing.
- Oil-based products can prevent proper chemical bonding.
- Results in soft, sticky, bendy resin that never fully hardens.
How to Prevent This Mistake
- Follow the “less is more” rule: Never exceed 5-6% colorant by volume.
- Use resin-specific colorants: Products designed for epoxy compatibility.
- Avoid water-based colorants: No food coloring, watercolors, or regular acrylics.
- Add colorant after mixing: Mix resin/hardener thoroughly, then add color.
- Add gradually: It is better to build color slowly than overdo it.
- Test first: Always do a small test batch with new colorants.
How to Fix Sticky Resin Caused by This
Unfortunately, resin that’s soft or sticky due to excessive or incompatible colorant is unlikely to cure further:
- The affected resin must be thoroughly removed by scraping.
- Clean the surface thoroughly with an appropriate solvent.
- Redo the piece using the proper color type and amount.
If the color is muddy but the resin cured hard, it’s only an aesthetic issue.
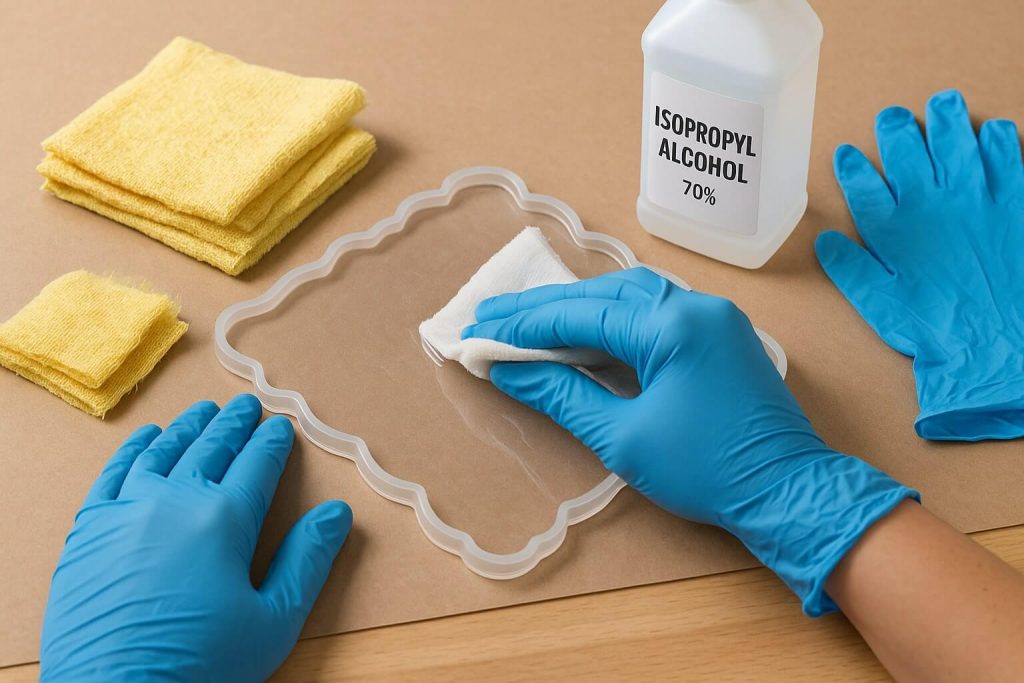
Cause 6: Contamination Culprits – Unwanted Guests in Your Resin
The Problem Explained
Foreign substances entering your resin or onto pouring surfaces can create localized or widespread curing problems. Common contaminants include dust, oils from hands, soap residue, uncured paint, or residue from dirty tools.
Why This Leads to Sticky Resin (Consequences)
Contaminants interfere with curing by:
- Creating chemical barriers that prevent proper bonding.
- Causing localized reactions that inhibit polymerization.
- Creating “fisheyes,” or areas where resin pulls away.
- Resulting in isolated sticky spots or patches.
- Sometimes, affecting the entire surface if contamination is widespread.
How to Prevent This Mistake
- Maintain pristine workspace: Cover surfaces to minimize dust.
- Clean meticulously: Wipe all tools and molds with isopropyl alcohol.
- Wear nitrile gloves: Prevent oil contamination from hands.
- Prepare surfaces properly: Clean, dry, and free of any residue.
- Cover during curing: Protect from airborne particles with a clean cover.
- Check inclusions: Ensure embedded items are clean and sealed if porous.
How to Fix Sticky Resin Caused by This
For localized contamination (small spots):
- If still wet, try to remove the contaminant.
- If cured sticky, carefully dig out the affected resin.
- Clean the void thoroughly with isopropyl alcohol.
- Fill the entire surface with fresh resin or sand it, and recoat it.
For widespread contamination:
- Requires complete removal of affected resin.
- Thorough cleaning of the substrate.
- Starting over with clean materials and environment.
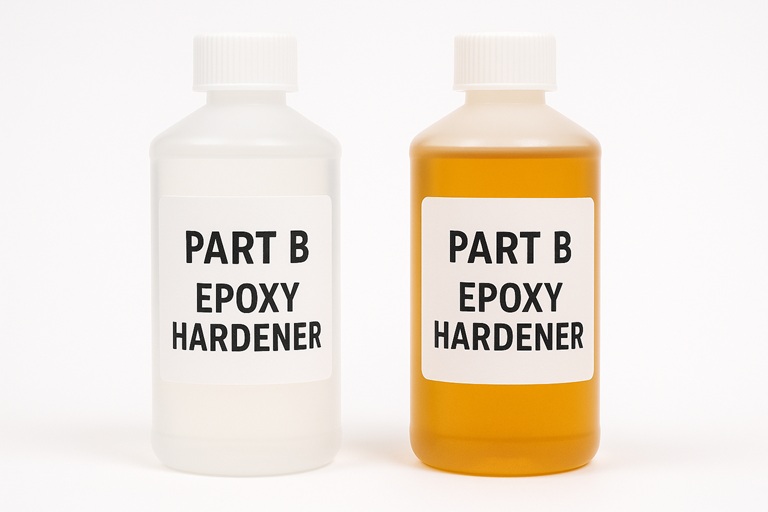
Cause 7: The Age Factor – Using Old or Improperly Stored Resin
The Problem Explained
Using epoxy resin or hardener past its shelf life or materials that have been stored improperly (exposed to extreme temperatures, moisture, or direct sunlight) can result in curing failures.
Why This Leads to Sticky Resin (Consequences)
Component degradation affects curing:
- Hardener absorbs moisture over time, reducing effectiveness.
- Oxidation changes chemical composition.
- Cold storage can cause resin crystallization (cloudy/milky appearance).
- Degraded components lose reactivity entirely.
- Old hardener often darkens significantly (amber to dark brown).
- Results are incomplete or no cure regardless of other factors.
How to Prevent This Mistake
- Check dates: Know your resin’s shelf life (typically 6-12 months).
- Store properly: Cool, dry place, tightly sealed, away from sunlight.
- Avoid temperature extremes: Don’t let resin freeze or overheat.
- Inspect before use: Look for crystallization, separation, or discoloration.
- Fix crystallized resin: Warm the bottle in a water bath until it clears.
- Buy fresh as needed: Don’t stockpile more than you’ll use within shelf life.
How to Fix Sticky Resin Caused by This
If old or degraded resin is the cause, it’s generally unfixable:
- The chemical potential for proper curing is permanently lost.
- Must scrape off all affected material.
- Clean thoroughly and redo with fresh resin.
- No amount of heat or time will cure the degraded resin properly.
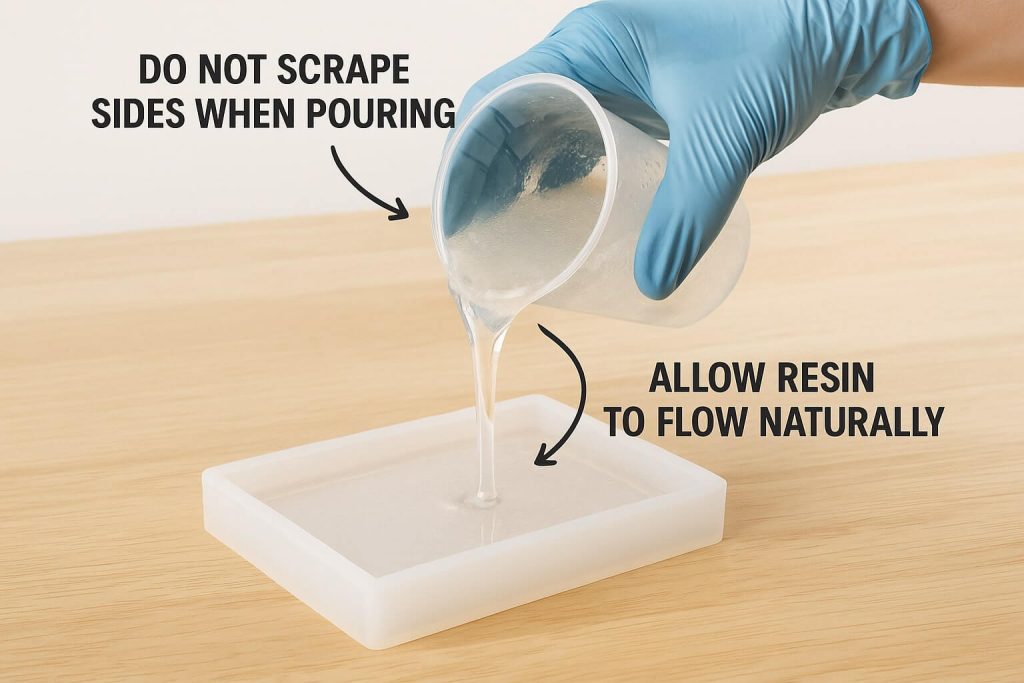
Cause 8: Scraping the Bowl Clean (And Into Your Project)
The Problem Explained
While thorough mixing requires scraping container sides during mixing, many artists make the mistake of scraping every last drop from the mixing container when pouring into their project.
Why This Leads to Sticky Resin (Consequences)
The problem with scraping during pouring:
- Thin film on container walls may be poorly mixed or off-ratio.
- This unmixed material gets scraped directly into your project.
- Creates isolated soft, sticky, or wet spots on otherwise perfect pieces.
- Often appears as sticky edges or corners where scraped material settled.
- It can ruin an otherwise flawless casting.
How to Prevent This Mistake
- Pour freely: Let mixed resin flow out naturally.
- Don’t scrape when pouring: Resist the urge to get every drop.
- Accept small waste: Losing a tiny amount is better than ruining your piece.
- Use the two-cup method: Reduces unmixed material on container walls.
- Mix slightly more than needed: Account for the small amount left in the cup.
How to Fix Sticky Resin Caused by This
Since this typically causes localized issues:
- Allow the rest of the piece to cure fully.
- Sand down sticky spots and surrounding cured area.
- Clean meticulously with isopropyl alcohol.
- Apply a fresh, thin coat over the affected area or the entire surface for uniformity.
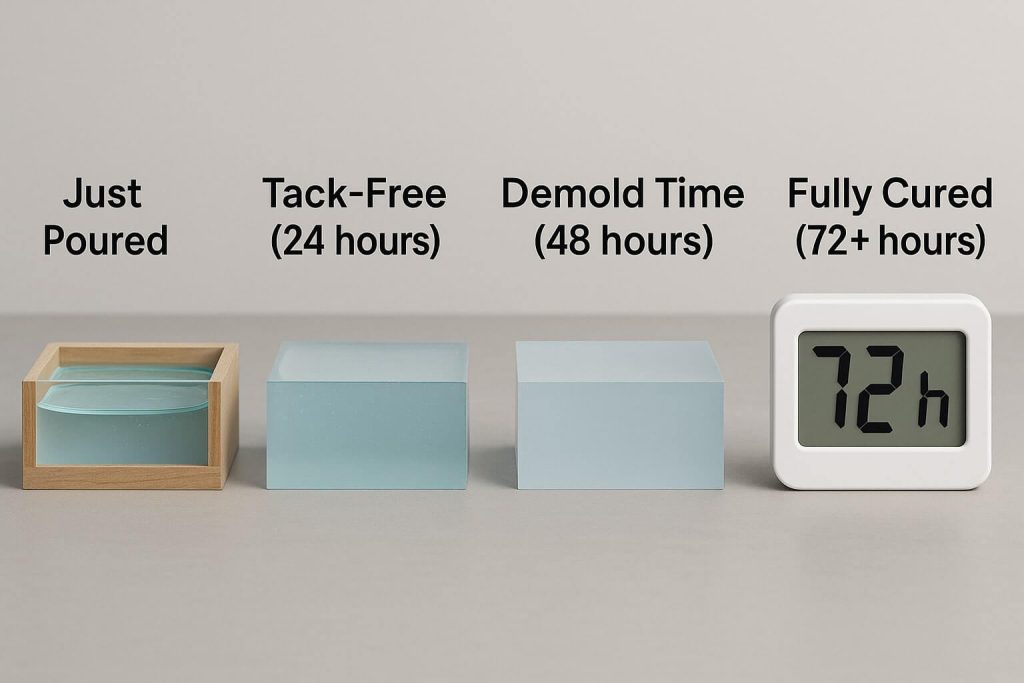
Cause 9: Impatience vs. Cure Time – Not Waiting Long Enough
The Problem Explained
Handling, demolding, or assessing resin before it has completed its recommended cure cycle is a common mistake, especially for beginners eager to see results.
Why This Leads to Sticky Resin (Consequences)
Resin curing happens in stages:
- Pot life: Working time before it starts to gel.
- Tack-free time: Surface no longer sticky to touch.
- Demold time: Firm enough to remove from the mold.
- Handling cure: Safe to handle without leaving marks.
- Complete cure: Maximum hardness and chemical resistance achieved
Handling resin during intermediate stages can leave fingerprints and dents or create a sticky appearance, even if it’s not fully cured.
How to Prevent This Mistake
- Know your resin’s timeline: Read the manufacturer’s cure time specifications.
- Understand the stages: Each serves a different purpose.
- Be patient: Full cure often takes 7-30 days, depending on the resin type.
- Maintain proper conditions: Temperature affects cure speed significantly.
- Don’t test too early: Premature poking creates permanent marks.
How to Fix Sticky Resin Caused by This
If impatience is the only issue, the solution is simple:
- Stop touching it!
- Leave the piece undisturbed in a warm, dry, dust-free location.
- Wait for the full recommended cure time plus a few extra days.
- If it is still genuinely sticky after an extended time, investigate other causes.
General Strategies for Dealing with Sticky Resin
Assessing the Stickiness
Understanding the type of stickiness helps diagnose the cause:
- Tacky (like tape): Surface cure issues, often environmental.
- Gooey/Runny: Major ratio or mixing problems.
- Soft Spots: Localized issues from contamination or poor mixing.
- Bendy/Flexible: Incomplete cure, possibly temperature or age-related.
The First Step: Can It Be Warmed?
Moving pieces to a consistently warm environment (75-85°F/24-30°C) can sometimes restart stalled curing:
- Maintain temperature for several days.
- Don’t exceed 85°F to avoid warping or yellowing.
- It works best for temperature or mild ratio issues.
- It won’t fix severely off-ratio or contaminated resin.
The Art of the Recoat: When and How
A fresh coat can sometimes save a tacky piece:
- When it works: Uniformly tacky surface, cleaned amine blush, sealed sanded areas.
- Surface preparation is crucial:
- Clean with isopropyl alcohol.
- Sand cured areas lightly for “tooth.”
- Remove all dust.
- Apply a thin, even coat.
- Remember: This is a surface fix only – it won’t correct deep structural issues.
Knowing When to Scrape It Off and Start Fresh
Some indicators that salvage isn’t possible:
- Very liquid/gooey after extended cure time.
- Known significant mix ratio error.
- Contamination throughout the piece.
- Aged or degraded resin was used.
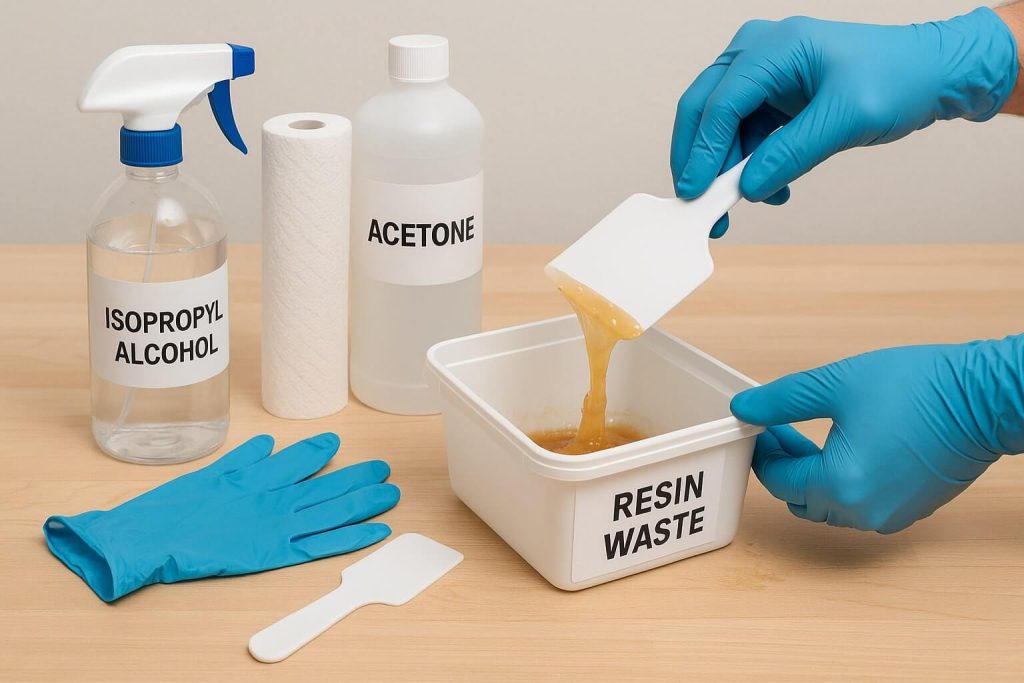
Safe removal process:
- Wear PPE: nitrile gloves, respirator, eye protection.
- Use plastic scrapers to remove bulk material.
- Clean residue with isopropyl alcohol or acetone.
- Ensure proper ventilation.
- Dispose of waste according to local regulations.
Conclusion
While frustrating, the sticky resin is rarely a mystery when you understand the main culprits: measurement errors, insufficient mixing, environmental factors, material issues, and impatience. Each category has clear indicators and, more importantly, clear solutions.
The key to consistent success with epoxy resin lies in meticulous attention to detail and faithfully following your specific resin manufacturer’s instructions. Every resin system is unique, and what works for one brand may not work for another.
Remember that every sticky mishap is a learning opportunity. Even experienced artists occasionally face curing issues – the difference is they know how to identify and address the problem quickly. With practice and understanding, you’ll develop an intuition for working with resin that helps you avoid these pitfalls.
Take heart in knowing that achieving flawless, glass-like resin finishes is within your reach. With this knowledge, you can tackle any sticky situation and bring your vision for beautiful, durable resin art to life. Happy creating!
Other Articles
")
How to Get Rid of Bubbles in Resin: Your Complete Guide
Common Resin Art Mistakes and How to Fix Them
")