

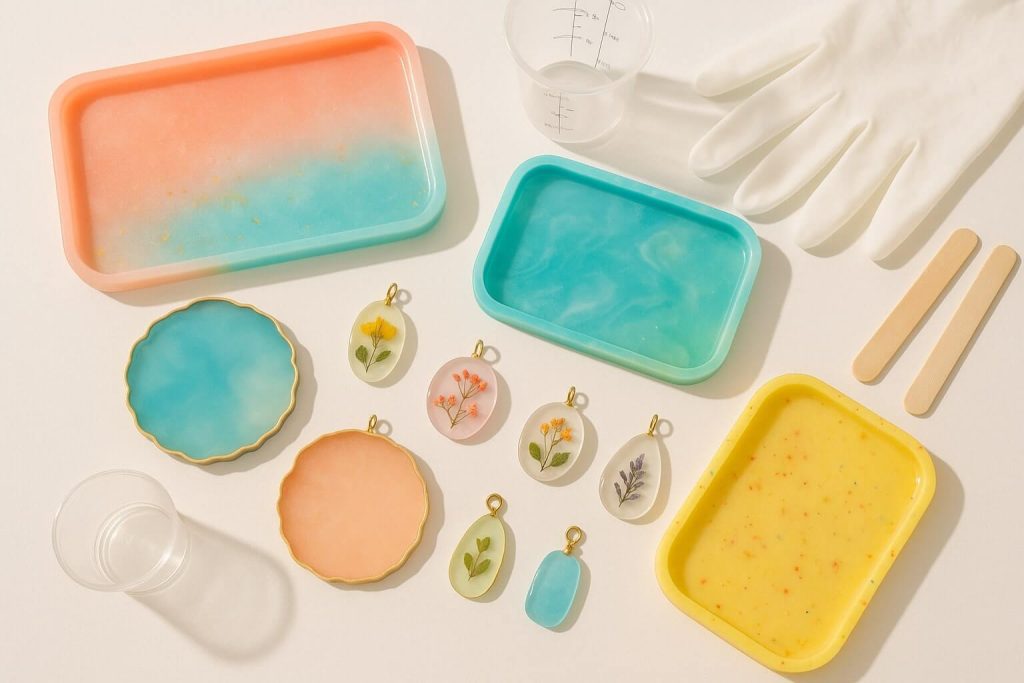
How to Get Rid of Bubbles in Resin: Your Complete Guide
Resin bubbles are one of the most common and frustrating problems for resin artists. They can mar an otherwise perfect piece. Whether you’re creating jewelry, coasters, or intricate art pieces, achieving a bubble-free resin finish is crucial for professional-looking results and the overall aesthetic appeal of your work.
If you’re struggling with bubbles in your resin projects, take heart—while bubbles are indeed common, they are manageable with the proper knowledge and techniques. This comprehensive guide will cover everything from understanding why epoxy bubbles form to detailed strategies for preventing resin bubbles, removing resin bubbles from wet resin, and even addressing them in cured pieces.
Understanding the Enemy: Why Do Bubbles Form in Resin?
The Science of Trapped Air: How Bubbles Get In
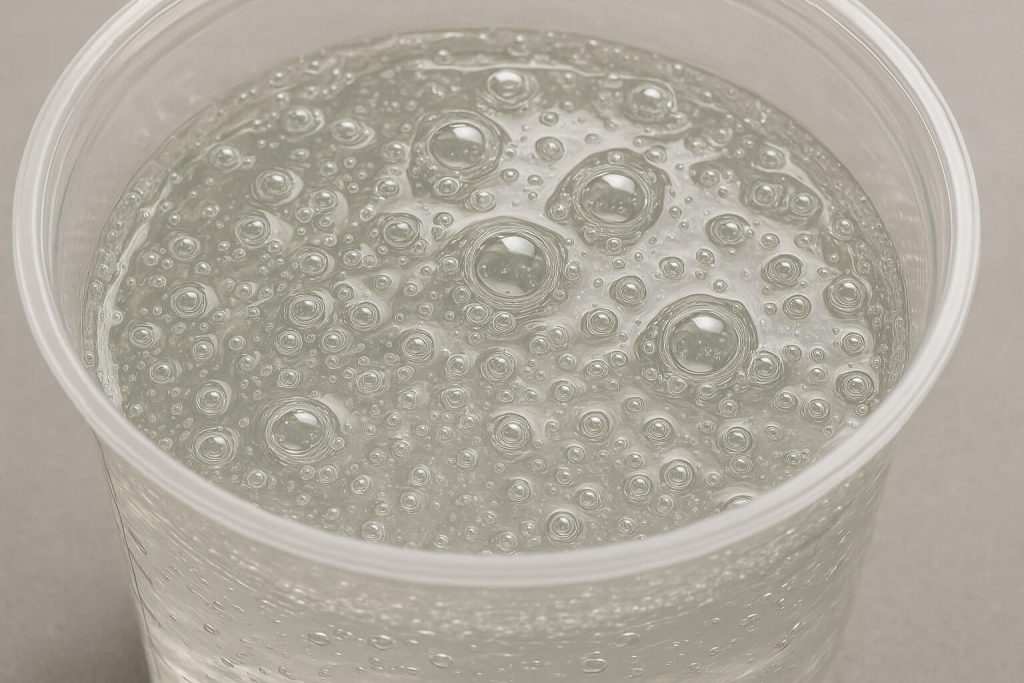
Bubbles are essentially pockets of trapped air or other gases within the resin. Air can be introduced during the mixing and pouring process, and once trapped, these air pockets become the dreaded bubbles we see in our finished pieces.
The resin’s viscosity (thickness) is crucial in how easily bubbles are trapped or escape. Thicker resins tend to trap more bubbles because the air has a harder time rising through the dense material. Additionally, the exothermic (heat-releasing) reaction during curing can sometimes cause trapped moisture or air to expand, forming visible bubbles that weren’t apparent when you first poured.
Common Culprits: Identifying the Main Causes of Resin Bubbles
Understanding why my resin is bubbly is the first step to achieving clear resin without bubbles. Let’s explore the leading causes:
Mixing Mishaps:
- Mixing too vigorously or quickly is a primary cause, as it whips air into the mixture, like beating egg whites.
- Improper mixing tools: Some tools (like rough wooden sticks) can introduce more air than smooth plastic or silicone stirrers.
- Not scraping sides/bottom properly: This can result in uneven mixing, which may contribute to problems—though it’s less likely to cause bubble formation than vigorous stirring directly does.
Pouring Problems:
- Pouring too quickly or from too high: This can trap air as the resin falls and splashes.
- Pouring over unsealed porous materials: Wood, paper, fabric, some ceramics, or even poorly sealed molds can release trapped air (off-gassing) into the resin as it cures.
- Air trapped in/around embedments: Items like dried flowers, beads, glitter, or stones can carry air with them or have air trapped in their crevices.
Environmental & Material Factors:
- Cold Temperatures: Cold resin is thicker (higher viscosity), making it harder for bubbles to rise and escape. Cold ambient temperatures and cold resin components are significant factors.
- High Humidity/Moisture Contamination: Moisture in the resin, on tools, in molds, or in embedments can react with components of some resins (mainly polyurethane, but also can affect epoxy) to create CO2 bubbles or cause cloudiness. Ensure resin containers are sealed tightly during storage to prevent moisture absorption.
- Resin Viscosity: High-viscosity resins naturally trap bubbles more easily and release them slower than low-viscosity or “thin” resins
- Age/Storage of Resin: Old or improperly stored resin might have absorbed moisture or started to crystallize, affecting its properties and potentially leading to more bubbles.
Mold Issues:
- Complex mold shapes: Intricate details or sharp corners in molds can trap air during pouring.
- Surface tension with the mold material.
Proactive Strategies: Preventing Resin Bubbles Before They Start
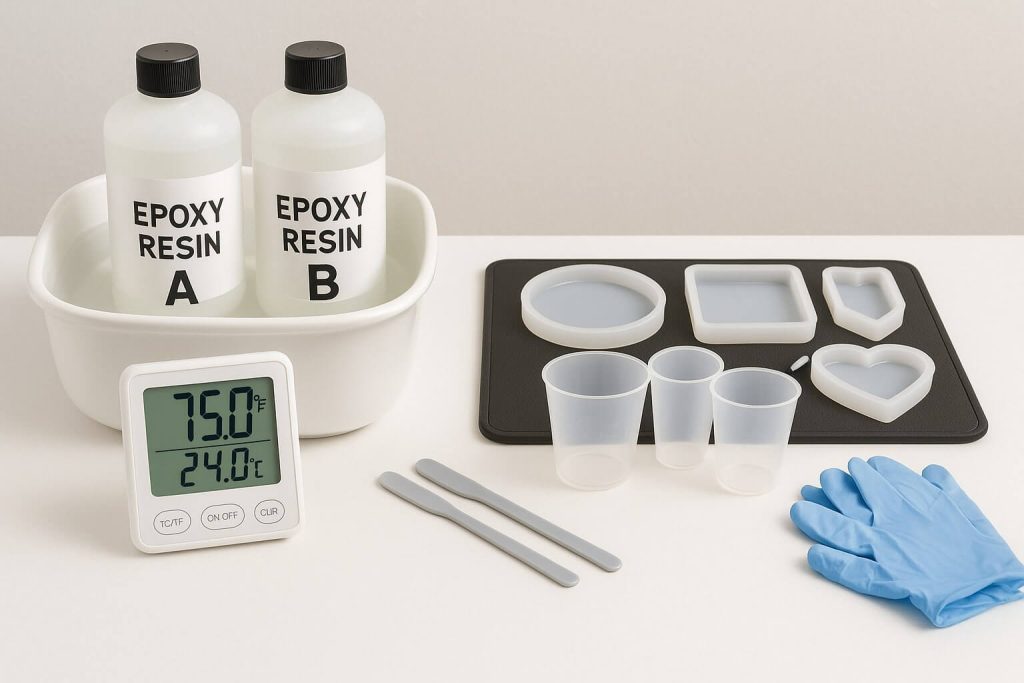
Setting the Stage: Workspace and Material Preparation
The foundation of bubble-free resin work starts with proper preparation:
Optimal Temperature: Work in a warm room (ideally 72-78°F or 22-26°C) and ensure your resin components are also at this temperature. Temperature control is one of the most effective resin bubble prevention techniques.
Warming Resin Components: Safely warm resin and hardener bottles in a warm water bath (sealed tightly) to reduce viscosity. Caution: This can reduce working time and pot life, so plan accordingly.
Choosing the Right Resin: Lower-viscosity resins are generally better at preventing resin bubbles, especially for casting or deep pours. Consider deep-pour-specific resins for thicker projects—they’re formulated to minimize bubbles in deep-pour epoxy.
Low Humidity: Work in a low-humidity environment. Use a dehumidifier if necessary, especially in humid climates.
Mastering the Mix: Techniques for Mixing Resin Without Bubbles
Mixing resin without bubbles requires patience and proper technique:
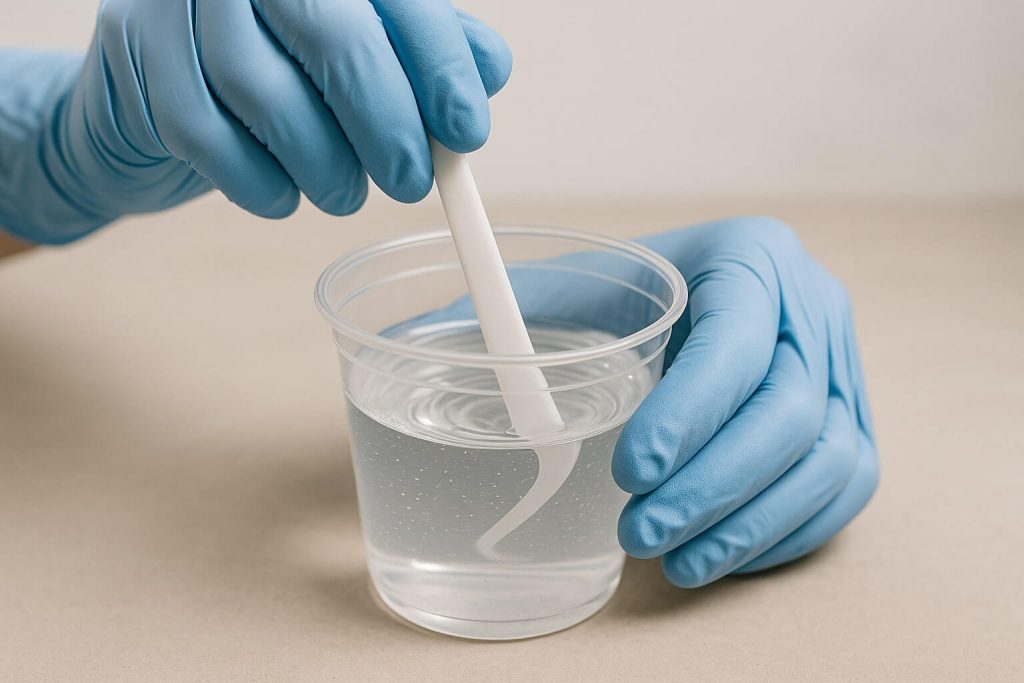
Slow and Steady Wins the Race: Mix resin and hardener slowly and deliberately. Avoid whipping or lifting the stir stick in and out of the mixture—this is like inviting bubbles to a party you don’t want them at!
Proper Stirring Technique: Stir gently, scraping the sides and bottom of the mixing container thoroughly and repeatedly to ensure all material is incorporated without introducing excess air. Think of it as folding rather than beating.
Choice of Mixing Stick: Use smooth plastic or silicone stir sticks over wooden ones. The softer surface creates less turbulence.
Letting Mixed Resin Rest (Degassing): Let the mixed resin sit in the mixing cup for 5-15 minutes (depending on pot life). This allows many bubbles to rise to the surface and pop naturally—it’s like letting bread dough rest!

The Two-Cup Mixing Method (Optional but Recommended): Pour the initially mixed resin into a second, clean cup and mix again with a clean stick to ensure no unmixed resin from the first cup’s sides is included. This extra step can significantly improve the achieving of bubble-free resin.
The Perfect Pour: Pouring Methods to Minimize Air Entrapment
Pour Slowly and Close to the Surface: Pour the resin slowly and as close to the surface of the mold or piece as possible or down the side of the mixing cup/mold. Think of it as pouring honey rather than water.
Pouring in Thin Layers: For deeper projects, pour in multiple thin layers (allowing each to partially cure or at least degas) rather than one very thick pour. This technique is essential for preventing bubbles in deep-pour epoxy.
Preparing Porous Surfaces and Embedments:
- Seal Porous Materials: This is crucial—seal porous surfaces (wood, canvas, paper, dried flowers, etc.) with a thin coat of resin, PVA glue, or a suitable sealant and let it dry completely before the main pour. This sealing prevents off-gassing bubbles.
- Ensure Embedments are Dry: All embedments, especially organic ones like flowers or wood, must be thoroughly dry.
- Coat Embedments: Dip embedments in a bit of mixed resin before placing them to dislodge any trapped air.
Warming Molds: Gently warming silicone molds (e.g., on a warming mat or with a heat gun on low from a distance) can help resin flow better and release bubbles.
Active Duty: Techniques for Removing Resin Bubbles from Wet Epoxy
Applying Heat: The Go-To Method for Popping Bubbles
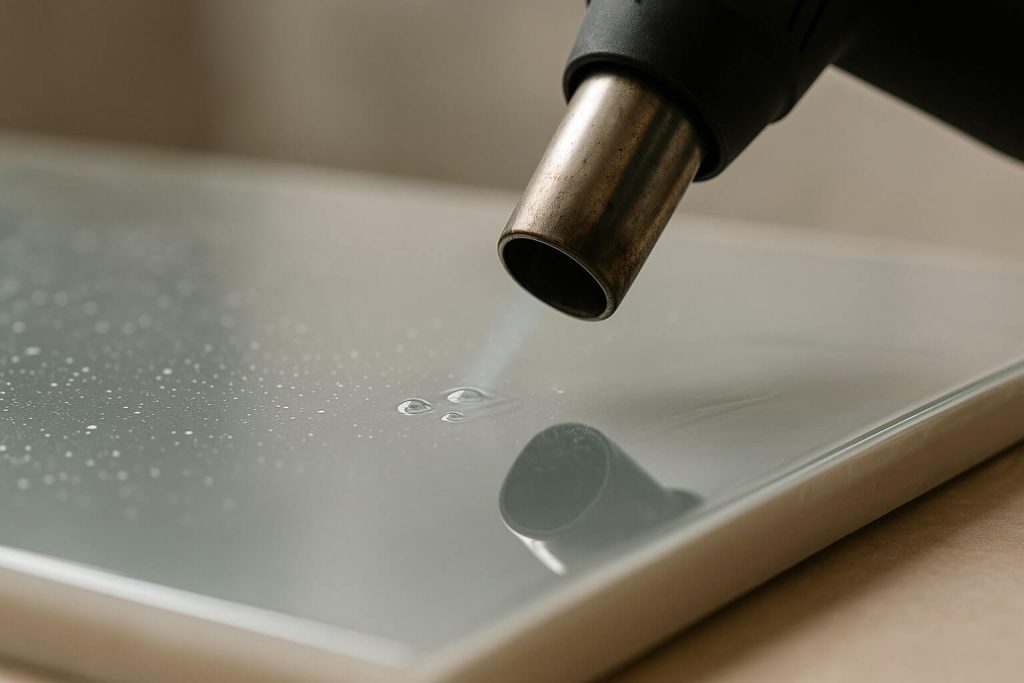
Applying gentle heat to the surface of freshly poured resin temporarily lowers its viscosity, helping bubbles rise and pop. This is one of your arsenal’s most effective resin bubble removal tools.
Using a Heat Gun for Resin Bubbles:
- It is best for beginners (safer than open flame), creating effects like cells or lacing, and used when alcohol inks are present.
- Technique: Hold the heat gun 6-8 inches away, use a low heat setting, and keep it moving slowly and sweepingly. Do not concentrate heat in one spot for too long, as it can scorch the resin or damage silicone molds.

Using a Propane/Butane Torch for Resin Bubbles:
- It is best for quickly and effectively popping surface bubbles, achieving a glass-like finish. Many pros prefer it for its intensity.
- Technique: Hold the torch several inches from the surface, with the flame tip “kissing” the resin. Keep the torch constantly moving in swift, sweeping motions.
- Critical Safety: Never leave unattended. Keep away from flammable materials. Be extremely cautious if alcohol inks are present (a heat gun is safer). Point away when igniting. Over-torching can cause yellowing, ripples, or burn marks and damage molds.
When to Apply HeatIt’s generally best to apply heat within 15 to 60 minutes after pouring, as this is when bubbles naturally rise to the surface; multiple quick passes with the heat source may be necessary to eliminate all surface bubbles effectively.
Safety First: Always wear safety gear (gloves, respirator, glasses) and be aware of flammables in your workspace.
Manual & Mechanical Methods: Other Tools in Your Arsenal
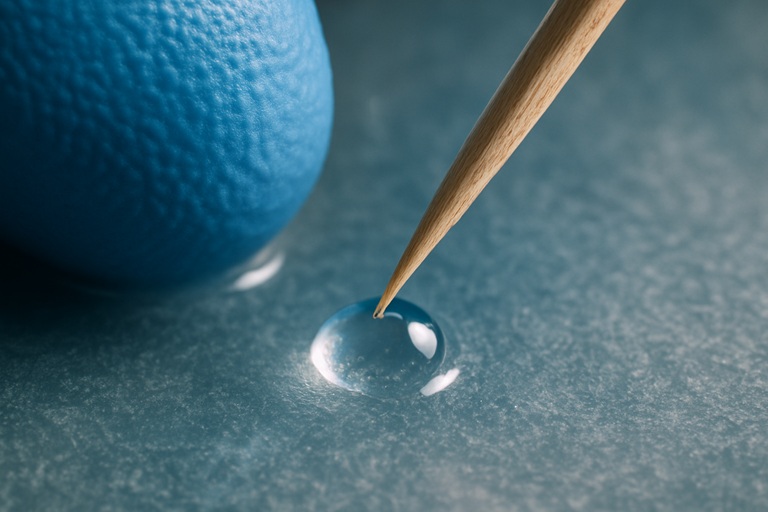
Toothpick or Pin: These are perfect for gently poking and popping individual stubborn bubbles or guiding them to an edge. They are best for small numbers of bubbles or those near edges/embedments.
Blowing Through a Straw (Use with Extreme Caution or Avoid):
- Some artists blow gently through a straw; the CO2 can help pop bubbles.
- I strongly advise attempting this ONLY while wearing a proper respirator to avoid inhaling resin fumes. Many experts advise against this due to fume risk.
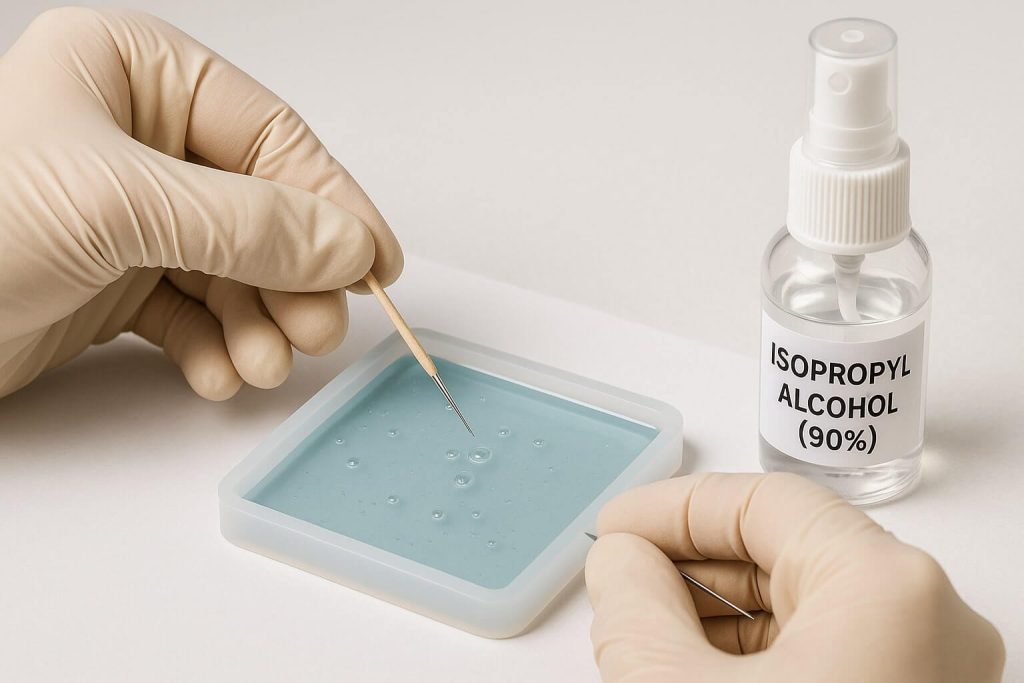
Bubble Release Sprays (Isopropyl Alcohol):
- A fine mist of high-percentage (90%+) isopropyl alcohol can be spritzed lightly over the surface to break surface tension and pop bubbles.
- Caution: Use sparingly; too much can cause pitting or other surface defects. Due to its flammability, do not use a torch immediately after spraying alcohol. Allow the alcohol to evaporate entirely.
Advanced Options (Brief Mention for Awareness):
- Vacuum Degassing Chamber: This chamber removes air from resin before pouring. It is excellent for achieving ultra-clear, bubble-free resin, especially for intricate castings. However, it is more of an investment for serious hobbyists or professionals.
- Pressure Pot: This tool is used after pouring, putting the resin under pressure and causing bubbles to shrink until they are virtually invisible. It’s an excellent choice for resin casters.
- Vibration Table (or Tapping): Gently vibrating the mold/piece can encourage bubbles to rise. Effectiveness varies; the simpler alternative is gently tapping the sides of the mold.
A Note on Chemical Additives (Defoamers/Air Release Agents)
While manufacturers sometimes incorporate industrial defoamers or air release agents into resin formulations, adding unknown chemicals is generally not recommended for hobbyist resin art, as it can interfere with curing, clarity, or other properties. Focus on technique and proper resin choice. Avoid adding solvents like acetone to thin resin for bubble release, as it compromises resin integrity and safety.
After the Cure: Addressing Bubbles in Hardened or Partially Cured Resin
Dealing with Bubbles in Fully Cured Resin
Fixing bubbles in cured resin requires different approaches depending on their location:
Surface Bubbles (Shallow Craters/Voids):
- Sanding and Recoating: The most common and effective method
- Sand the affected area or the entire surface (e.g., with 120-220 grit sandpaper) to remove the bubble/level the surface and create a tooth for the new layer.
- Clean thoroughly with a tack cloth or isopropyl alcohol to remove ALL dust.
- Apply a fresh, thin flood coat of properly mixed resin. Ensure it’s level.
- Filling Individual Voids: For isolated, deeper surface bubbles:
- Carefully open the bubble with a craft knife or drill bit to expose the void.
- Mix a minimal amount of fresh resin.
- Use a toothpick or syringe to fill the void carefully. Try to avoid overfilling.
- This may require a subsequent whole surface recoat for a perfectly even finish. UV resin can sometimes be used for quick spot fills on edges.
Internal Bubbles (Trapped Deep Within): These are much harder to fix without significant rework. Prevention is key!
- Aggressive Sanding/Grinding: If the bubble is not too deep, you can sand or grind it down, remove it, fill it, and recoat it as above. This is labor-intensive and risks altering the piece’s shape
- Drilling and Filling (Advanced): For distinct internal bubbles, some advanced users drill a tiny hole into the bubble, try to clear it, and then inject fresh resin. This is very tricky and often leaves a visible repair.
- Acceptance or Camouflage: Sometimes, minor internal bubbles might be accepted as part of the handmade character, or if the piece is opaque, it may not be visible.
Bubbles in Partially Cured or Tacky Resin: What Are Your Options?
Crucial Safety Warning: DO NOT SAND partially cured (“green” or tacky) resin. The dust is more hazardous and can clog sandpaper instantly. Wait for a complete cure if sanding is needed.
If the Resin is Gelled but Still Soft, gently remove a bubble with a clean toothpick if it’s close to the surface. The resin may self-level. Work carefully to avoid making it worse.
Heat Application Window: If bubbles appear within the first 1-2 hours of curing (while still fairly fluid), a very gentle pass with a heat gun might still be possible. However, use extreme caution, as excessive heat on curing resin can cause other issues like ripples or amine blush. The window for this is tiny.
Tacky Surfaces (General, not just bubbles): If the entire surface is tacky (not due to bubbles but improper cure), applying another properly mixed coat is sometimes suggested, but the underlying cause of tackiness should be addressed. If there are wet, uncured spots, they usually need to be scraped off before any attempt to recoat.
Troubleshooting Guide: Common Bubble Scenarios and Solutions
Issue: Persistent Micro-Bubbles Throughout the Resin
Possible Causes: Cold resin/room, mixing too fast (whipping in tiny air pockets), moisture contamination.
Solutions: Ensure resin and room are warm. Mix slowly and deliberately. Let the resin rest after mixing. Use a heat gun (torches can sometimes be too aggressive for microbubbles in resin). Ensure low humidity and dry components.
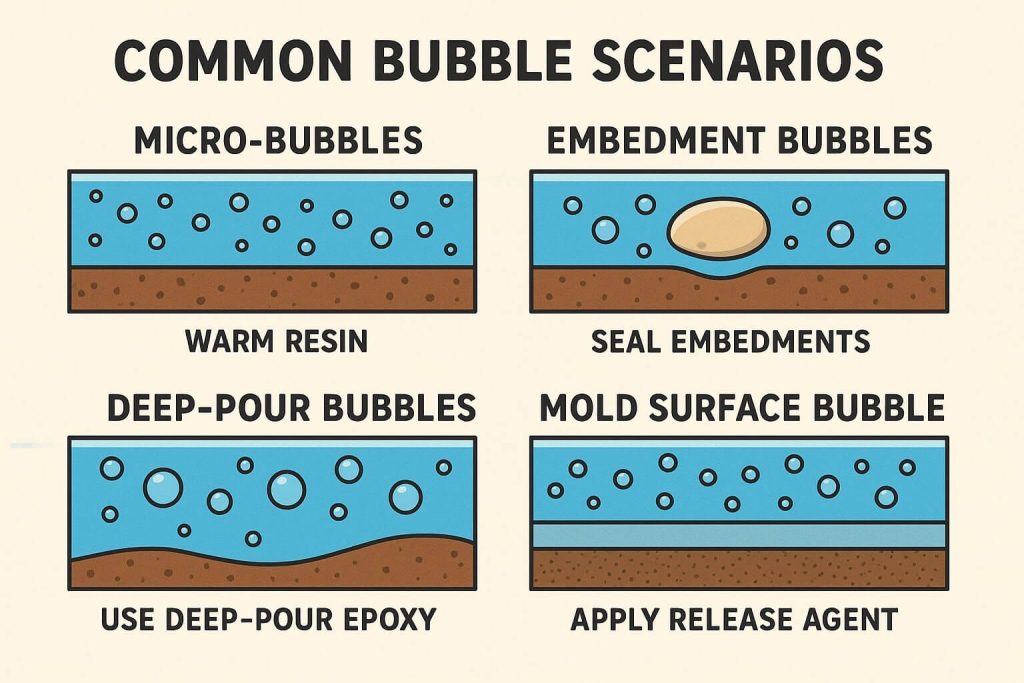
Issue: Bubbles Clustering Around Embedments (e.g., Flowers, Glitter)
Possible Causes: Air trapped on/in the embedment, moisture in organic materials, off-gassing from porous embedments.
Solutions: Thoroughly dry and seal ALL embedments (especially organic or porous ones) with a thin coat of resin or sealant before embedding. Dip embedments in resin before placing. Pour in layers if needed.
Issue: Bubbles Appearing in Deep Pours
Possible Causes include resin overheating during the exothermic reaction, the standard resin’s high viscosity, and air trapped under significant elements (like wood in river tables).
Solutions: Use a specialized low-viscosity, slow-curing deep pour epoxy. Pour in thinner layers as per manufacturer instructions. Ensure adequate sealing of any large porous embedments. Work in a temperature-controlled environment.
Issue: Bubbles Coming from the Mold or Surface Being Coated
Possible Causes: Porous mold material (e.g., unsealed wood, some 3D prints) or porous substrate (e.g., unsealed wood, canvas) off-gassing
Solutions: Always seal porous molds or surfaces with a sealant or a thin coat of resin before the main pour. For silicone molds, ensure they are clean. Bubbles might be from the pouring technique or trapped in details—pour slowly and use a toothpick.
Issue: Resin Cures Cloudy with Tiny Trapped Air/Bubbles
Possible Causes: Moisture contamination (high humidity, wet tools/inclusions), cold temperatures making resin too thick to release fine bubbles.
Solutions: Control workspace humidity and temperature. Warm resin. Ensure all items are dry. Mix gently.
Top Beginner Mistakes Leading to Bubbles (And How to Avoid Them)
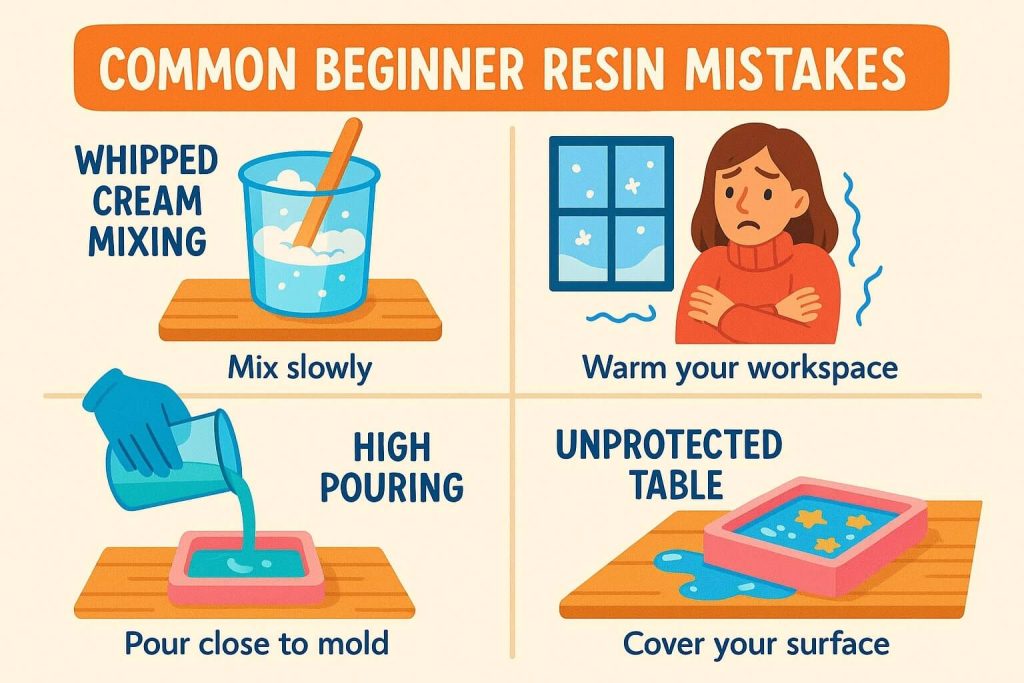
- Mistake: Mixing like you’re making whipped cream
- Consequence: Bubbles galore!
- Prevention/Fix: Mix slowly and gently, like folding cake batter
- Mistake: Working in a cold garage in winter
- Consequence: Thick resin traps bubbles
- Prevention/Fix: Move to a warm space or use a space heater (safely!).
- Mistake: Pouring from a foot above the mold →
- Consequence: Air gets trapped on impact →
- Prevention/Fix: Pour close to the surface, slowly.
- Mistake: Embedding unsealed dried flowers →
- Consequence: Off-gassing creates bubbles →
- Prevention/Fix: Seal all porous items first.
- Mistake: Using yesterday’s leftover mixed resin
- Consequence: Partially cured resin won’t flow properly
- Prevention/Fix: Always use freshly mixed resin.
- Mistake: Over-torching in one spot
- Consequence: Ripples, burns, or damaged molds Prevention/Fix: Keep heat tools moving constantly.
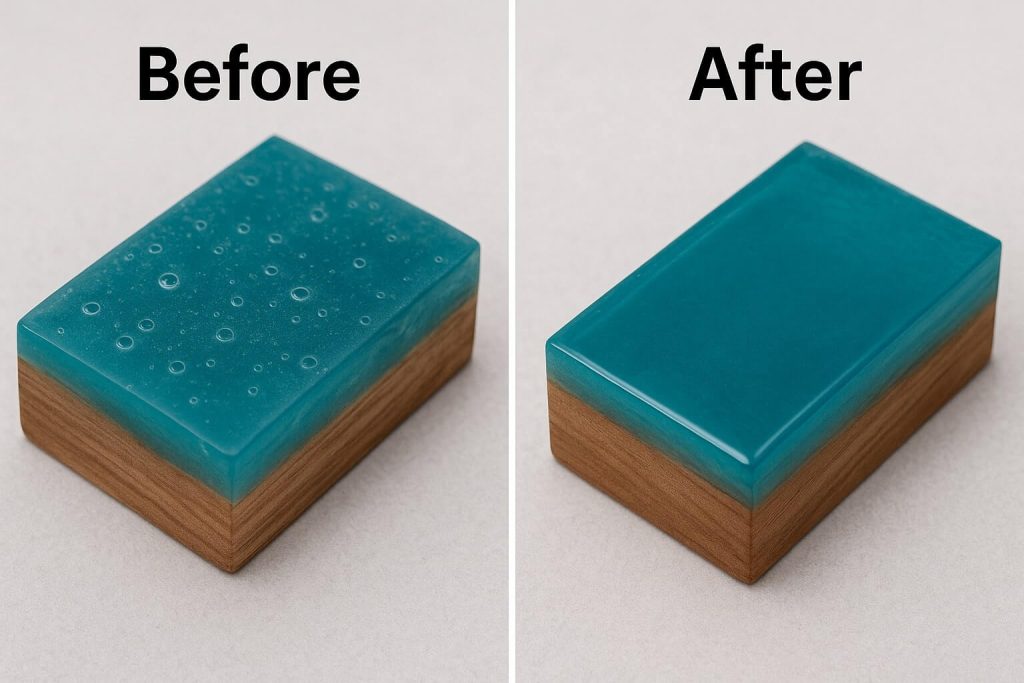
Conclusion
While resin bubbles can be a nuisance, they are a conquerable challenge with the proper understanding and techniques. Remember the key pillars: preventing resin bubbles through careful preparation and mixing and having effective methods for removing resin bubbles from wet resin when they do appear.
Mastering bubble-free resin art takes time and practice, so be patient with yourself. Every artist has dealt with bubbles—it’s part of the learning journey! With the tips and techniques in this guide, you’re now equipped with comprehensive bubble troubleshooting resin art knowledge.
Apply these strategies to your next project, and watch as you achieve those coveted crystal-clear, professional results in your epoxy resin projects. Remember, each bubble-free piece is a testament to your growing skill and attention to detail. Happy creating!
Other Articles

Best Resin for Jewelry Making: Epoxy vs. UV Resin
Why Is My Resin Sticky After Curing? (And How to Fix It)
