

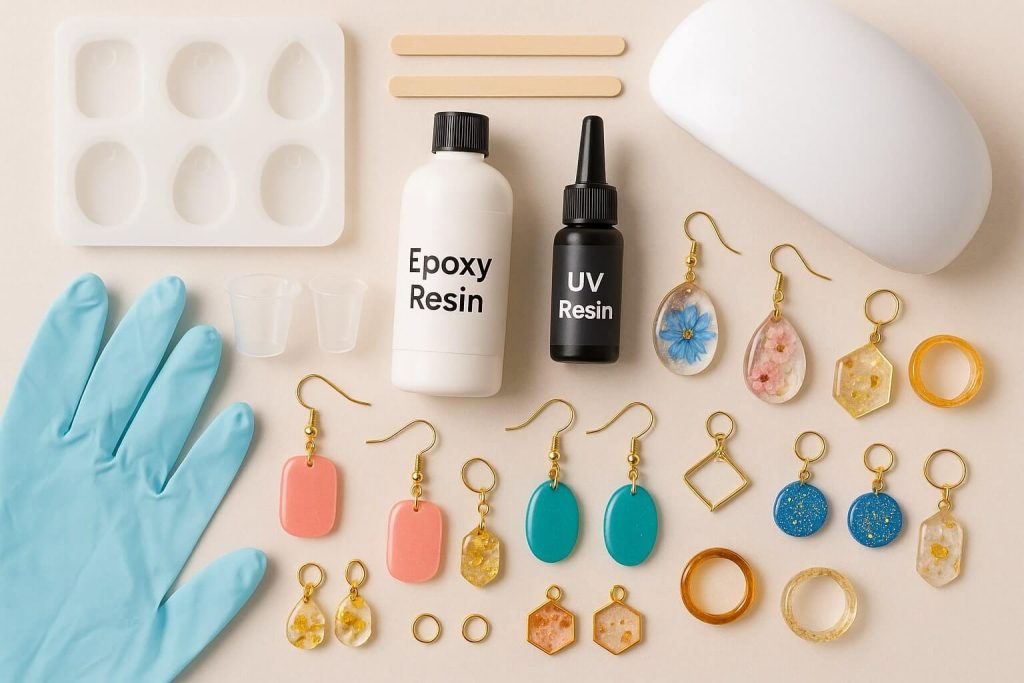
Creating your DIY resin jewelry opens many possibilities—from encapsulating delicate flowers and treasured mementos to crafting crystal-clear pendants that rival store-bought pieces. The appeal lies in crafting unique, professional-quality jewelry that showcases your style and creativity.
This comprehensive guide will help you navigate the sometimes overwhelming world of resin choices and select the best resin for jewelry making based on your specific needs and projects. Whether you’re drawn to epoxy resin for jewelry or curious about UV resin for jewelry, we’ll compare both options to help you make an informed decision.
Don’t worry if you’re feeling overwhelmed – choosing jewelry resin becomes much simpler once you understand a few key factors. By the end of this guide, you’ll have the confidence to select the perfect resin for your first jewelry-making adventure.
Understanding Resin Types for jewelry-making
What is Resin, and Why is it Great for Jewelry?
In the crafting world, resin is a liquid compound that transforms into a hard, glossy solid through a chemical process called curing. Think of it as liquid glass, which you can shape, color, and embed objects into before it permanently hardens.
Jewelry making with resin has become incredibly popular for several compelling reasons:
- Exceptional durability – properly cured resin creates jewelry that withstands daily wear.
- Crystal clarity – high-quality resins cure to a glass-like finish.
- Incredible versatility – mix in colors, glitters, or embed small objects.
- Professional results – achieve the look of glass or gemstones at a fraction of the cost.
- Creative freedom – make one-of-a-kind pieces impossible to find in stores.
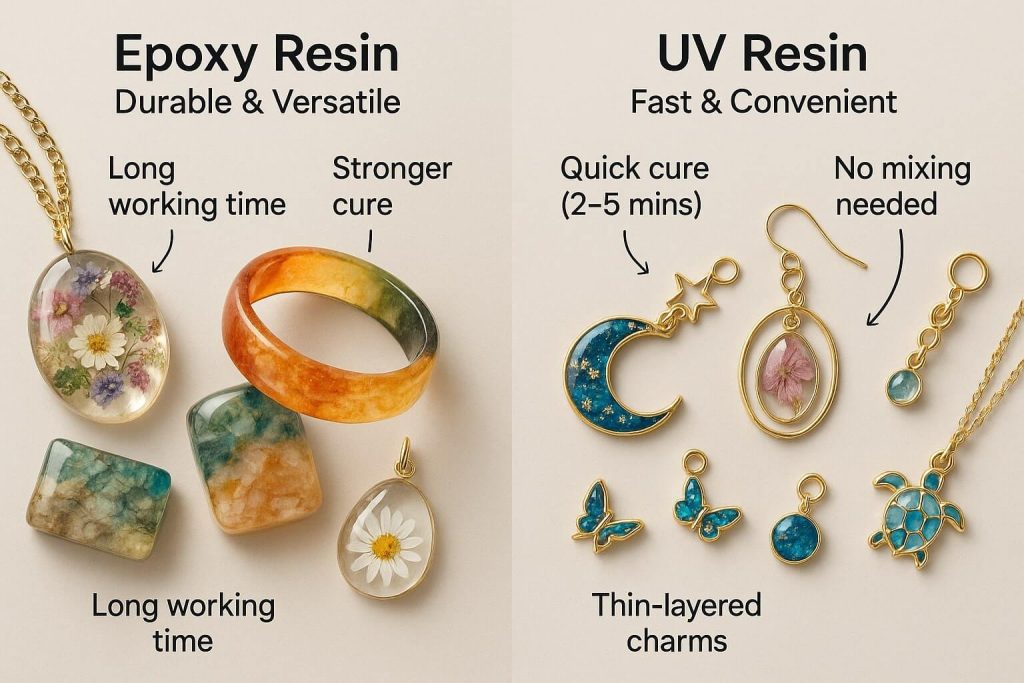
Epoxy Resin for Jewelry: The Versatile Workhorse
Epoxy resin for jewelry consists of two components: the resin itself and a hardener. When mixed in the correct ratio, these components undergo a chemical reaction that transforms the liquid into a solid.
Pros for Jewelry:
- Strong and durable once fully cured – perfect for pieces that will see regular wear.
- Cost-effective for larger batches or multiple projects.
- Longer working time (pot life) – typically 30-45 minutes, giving you time for intricate designs.
- Excellent adhesion to jewelry materials (metal bezels, wood, fabric).
- Available in multiple viscosities to suit different project needs.
- Deep pour capability – can create thicker pieces without issues.
Cons for Jewelry:
- Mixing required – precise ratios are crucial for proper curing (can be intimidating at first).
- Longer cure times – typically 24-72 hours for full hardness.
- More pungent odors during the curing process indicate the need for excellent ventilation.
- More supplies are needed – measuring cups, stirring sticks, and mixing containers.
For beginners, look for epoxy resins with a 1:1 mix ratio by volume—these are the most forgiving and easiest to measure accurately, making them excellent beginner resins for jewelry.
UV Resin for Jewelry: The Speedy Specialist
UV resin for jewelry is a single component that cures when exposed to ultraviolet light. No mixing is required—pour and cure under a UV lamp or in direct sunlight.
Pros for Jewelry:
- Extremely fast curing – typically 2-5 minutes under a UV lamp.
- No mixing is required, which eliminates measurement errors and saves time.
- Lower odor than many epoxies (though ventilation is still necessary).
- Perfect for clear resin for jewelry applications.
- It is ideal for small, delicate pieces and quick repairs.
- Great for layering – cure each layer quickly before adding the next.
- Less waste – use only what you need.
Cons for Jewelry:
- It requires a UV lamp or strong direct sunlight, which is an additional equipment investment.
- It is more expensive per volume than epoxy resin.
- Limited depth – best for thin layers (usually under 3mm per cure).
- Smaller working window – must work quickly before exposure to UV light.
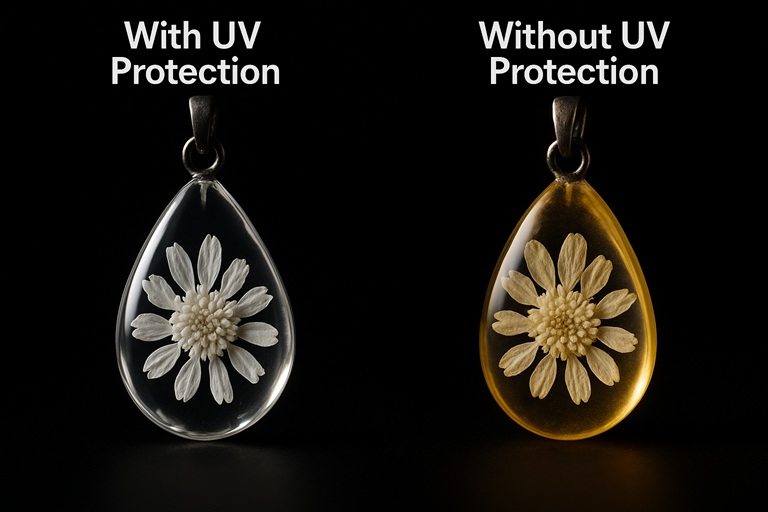
- Some formulations are prone to yellowing, if not specifically UV-resistant.
Epoxy vs UV Resin for Jewelry: Which is Best for a Beginner?
When comparing epoxy vs UV resin for jewelry, consider these key factors:
| Factor | Epoxy Resin | UV Resin |
| Ease of Use | Requires mixing but more forgiving timing | No mixing but requires quick work |
| Cure Time | 24-72 hours | 2-5 minutes |
| Cost | More economical for volume | Higher cost per ounce |
| Equipment | Basic supplies only | UV lamp required |
| Best For | Larger pieces, deep pours, batch work | Small pieces, quick projects, repairs |
| Durability | Excellent when fully cured | Good for jewelry applications |
For absolute beginners:
- Choose UV resin if you want immediate gratification, plan to make small charms or pendants, or prefer minimal fuss.
- Choose Epoxy resin (especially 1:1 ratio types) if you’re patient, want to make multiple pieces, or need maximum durability.
Remember, the best resin for jewelry making depends on your specific projects and working style!
Key Factors in Choosing Your Beginner Resin for Jewelry
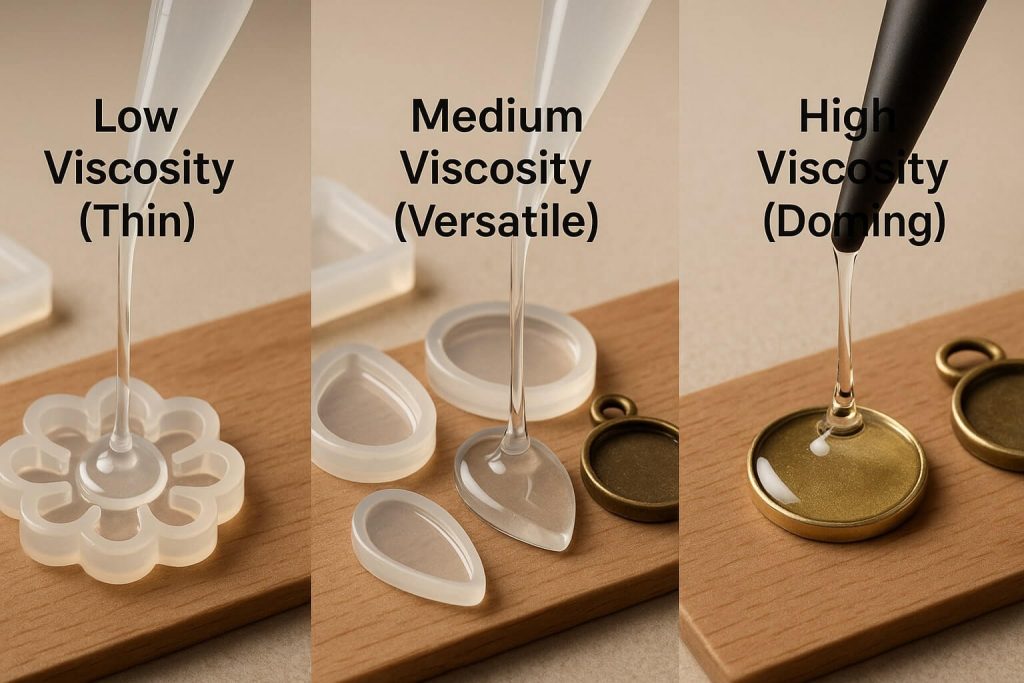
1. Viscosity: Flow and Detail
Viscosity refers to how thick or thin your resin is, and it dramatically affects the results of your resin jewelry casting.
- Low Viscosity: Thin, water-like consistency.
- Flows easily into intricate resin jewelry molds.
- Minimizes bubble formation.
- Perfect for detailed work and small spaces.
- It may require containment for open bezels.
- Medium Viscosity: Honey-like consistency.
- Versatile for most jewelry projects.
- Good balance of flow and control.
- Ideal starting point for beginners.
- High Viscosity (Doming Resins): Thick, syrup-like consistency.
- Stays put without running.
- It creates beautiful domed effects.
- Perfect for coating surfaces.
- It is less suitable for molds with fine details.
Beginner recommendation: Start with low to medium viscosity for general jewelry making, or invest in a specific doming resin if that’s your primary goal.
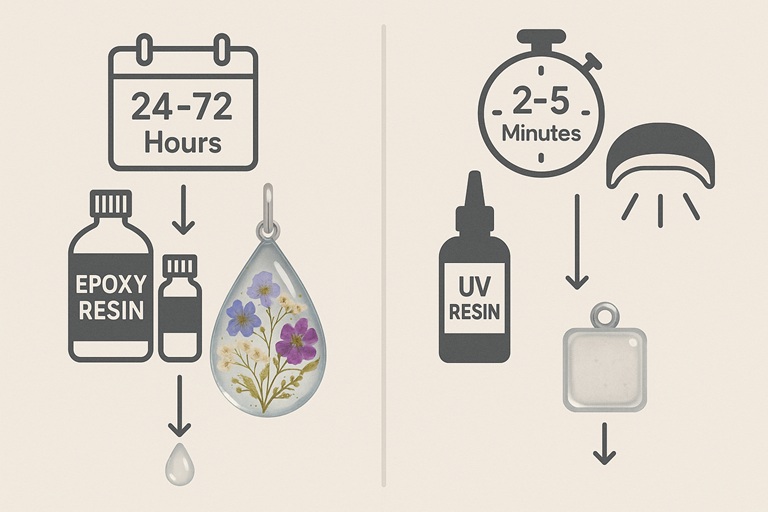
2. Working Time (Pot Life) and Cure Time: Patience vs. Speed
Understanding timing is crucial for successful DIY resin jewelry:
- Working Time: How long do you pour, position items, and remove bubbles
- Epoxy: Usually 20-45 minutes, depending on brand and temperature.
- UV: Unlimited until exposed to UV light.
- Cure Time is the time required for your resin piece to harden and fully reach its maximum strength and durability.
- Epoxy: 24-72 hours for complete cure.
- UV: 2-5 minutes under the lamp, but may need additional time for full hardness.
Consider your project’s complexity. Intricate color work or multiple embedments benefit from epoxy’s longer working time, while simple pieces suit UV resin’s speed.
3. Clarity and UV Resistance: Keeping Your Jewelry Beautiful
Nothing ruins a beautiful piece faster than yellowing! Look for:
- A crystal-clear formulation for transparent pieces.
- UV inhibitors or stabilizers to prevent yellowing.
- High UV resistance ratings from the manufacturer.
- Clear resin for jewelry specifically formulated for long-term clarity.
This is especially crucial for pieces featuring white, light colors, or botanical elements where any yellowing would be immediately noticeable.
4. Hardness and Durability: Jewelry That Lasts
Your resin jewelry supplies should create pieces that withstand daily wear:
- Look for resins that cure to a hard, scratch-resistant finish.
- Check for Shore D hardness ratings if provided (higher numbers = harder cure).
- Both epoxy and UV resins can achieve jewelry-appropriate hardness.
- Proper mixing and curing are essential for maximum durability.
5. Safety: Always a Priority (Resin Safety Tips)
When searching for non-toxic resin for jewelry, understand that this typically refers to the fully cured state. Important safety considerations:
- All liquid resins are skin and respiratory irritants.
- “Non-toxic” often means low-VOC or BPA-free formulations.
- Always check the manufacturer’s Safety Data Sheet (SDS).
- Even “safe” resins require proper protective equipment.
- Cured resin is generally safe for skin contact in jewelry.
6. Mix Ratio (for Epoxy Resin): Simplicity for Beginners
For epoxy resin for jewelry, the mix ratio can make or break your success:
- 1:1 by volume ratios are the most beginner-friendly.
- Avoid complex ratios (like 100:42 by weight) initially.
- Invest in graduated mixing cups for accuracy.
- Some resins offer more forgiving ratios than others.
7. Bubble Release: For That Flawless Finish
Professional-looking clear resin for jewelry requires minimal bubbles:
- Some resins are formulated for superior bubble release.
- Low-viscosity resins typically release bubbles more easily.
- Temperature affects bubble formation (warmer = fewer bubbles).
- Consider resins marketed as “self-degassing” or “bubble-free.”
Essential Safety Precautions for Resin Jewelry Making
Understanding the Risks with Jewelry Resins
Before diving into your first project, understand these resin safety tips:
- Liquid resin components can cause skin sensitization and allergic reactions.
- Vapors may irritate respiratory systems, even from “low-odor” formulations.
- Once sensitized to resin, reactions become progressively worse.
- Fully cured resin is generally inert and safe for jewelry wear.
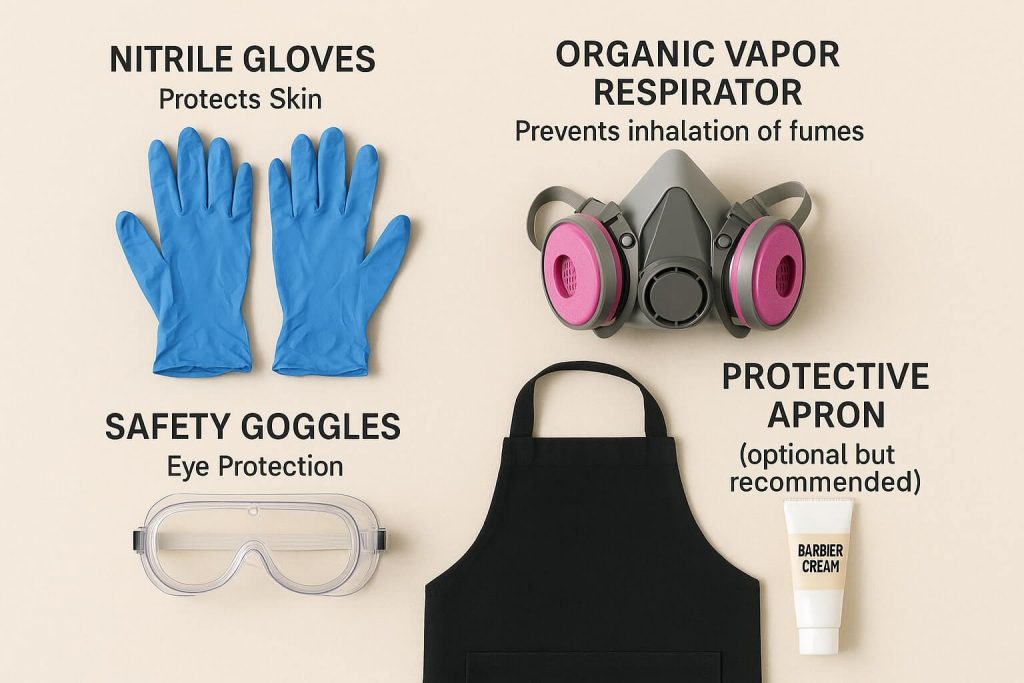
Your Must-Have Safety Gear for Resin Jewelry
Never compromise on safety equipment:
- Nitrile Gloves: Non-negotiable – latex won’t protect you.
- Respirator: Organic vapor cartridge type for epoxy work.
- Safety Glasses/Goggles: Protect from splashes and fumes.
- Protective Clothing: Apron or dedicated craft clothes.
- Barrier Cream: Extra protection for exposed skin.
Setting Up a Safe Jewelry-Making Workspace
Create a dedicated space for resin jewelry casting:
- Well-Ventilated Area: Open windows with an exhaust fan or outdoor space.
- Protected Surface: Silicone mat or disposable plastic sheeting.
- Level Work Surface: Essential for even curing.
- Temperature Control: Most resins work best at 70-75°F.
- Keep Away: No pets or children in the work area.
- Fire Safety: Keep away from open flames and heat sources.
Top Features to Look for in Beginner-Friendly Jewelry Resin
The ideal beginner resin for jewelry should have the following:
For UV Resin:
- Excellent clarity that won’t yellow.
- Quick cure with a standard 36W UV lamp.
- Medium viscosity for versatility.
- Good hardness rating for durability.
- Built-in UV resistance.
- Low-odor formulation.
For Epoxy Resin:
- Simple 1:1 mix ratio by volume.
- Crystal clarity with UV stabilizers.
- 30-45 minute working time.
- Self-leveling properties.
- Good bubble release.
- Reliable 24-48 hour cure.
Look for starter kits in resin jewelry supplies that include small amounts of resin – perfect for testing before committing to larger quantities. Read reviews specifically from jewelry makers to ensure the resin performs well for small-scale projects.
Common Mistakes to Avoid When Choosing & Using Resin for Jewelry
Learn from others’ experiences to ensure success:
- Choosing the wrong viscosity – thick resin won’t fill detailed molds; thin resin may overflow bezels.
- Ignoring UV resistance – save yourself the heartbreak of yellowed pieces.
- Underestimating cure times – patience prevents sticky, uncured disasters.
- Forgetting the UV lamp – UV resin is useless without proper curing equipment.
- Skimping on safety gear – your health is worth more than any piece of jewelry.
- Improper mixing ratios – even slight errors can prevent appropriate curing.
Quick Tips for Your First Resin Jewelry Projects

Set yourself up for success with these beginner-friendly strategies:
- Start Small and Simple: Master basic pendants before attempting complex multi-layer pieces.
- Read All Instructions: Every resin brand has unique requirements.
- Protect Your Workspace: Cover everything – resin finds a way to drip.
- Do a Small Test Batch: Verify curing and clarity before using expensive inclusions.
- Invest in Basic Safety Gear: Consider it part of your essential resin jewelry supplies.
- Work in Good Lighting: Helps spot bubbles and ensure even coverage.
- Keep Notes: Document what works for future reference.
Conclusion
Choosing the best resin for jewelry making as a beginner doesn’t have to be overwhelming. By understanding the key differences between epoxy resin and UV resin, along with essential resin characteristics, you’ll be well-equipped to make an informed decision.
Both resin types can create stunning DIY resin jewelry. Your choice ultimately depends on your project goals, patience level, and comfort with mixing. UV resin offers speed and convenience for small projects, while epoxy provides versatility and economy for larger endeavors.
Remember, following proper resin safety tips isn’t optional – it’s essential for enjoying this craft for years to come. With the right beginner resin for jewelry and safety precautions in place, you’re ready to embark on an exciting creative journey.
Soon, you’ll create beautiful, unique pieces that reflect your style and creativity. Whether you work with clear resin for jewelry to showcase notable inclusions or experiment with colors and effects, the world of jewelry making with resin offers endless possibilities. Happy creating!
Other Articles

How to Get Rid of Bubbles in Resin: Your Complete Guide
