

How to Make Resin Coasters for Beginners: A Step-by-Step Guide to Stunning Results
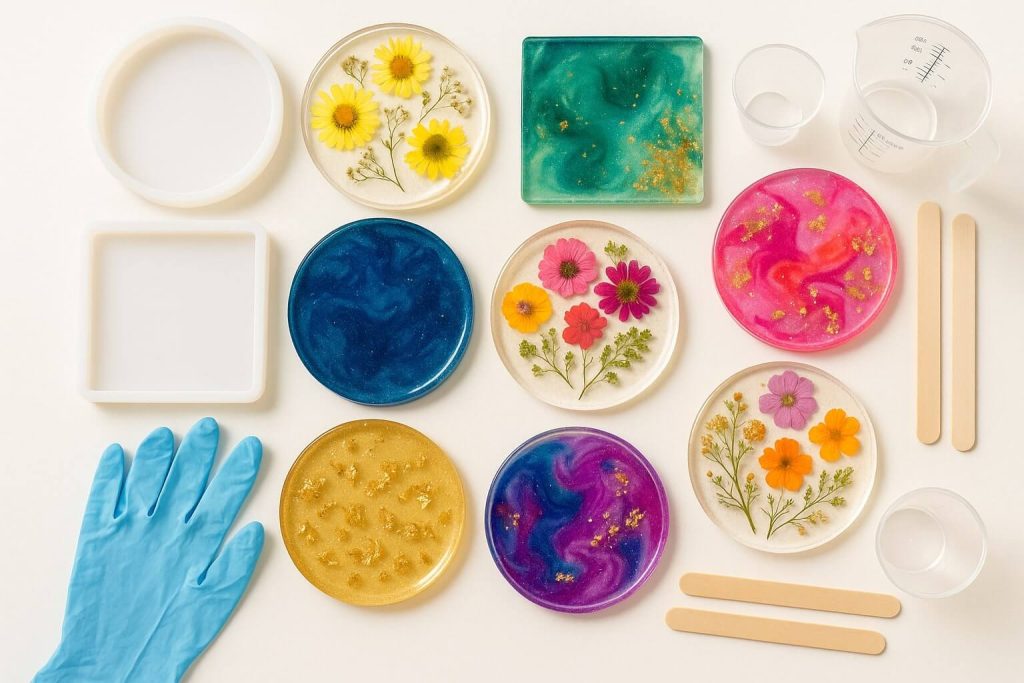
Creating beautiful DIY resin coasters is an incredibly rewarding craft that combines artistic expression with practical functionality. Whether you’re looking to make unique home decor pieces, personalized gifts, or explore a new creative outlet, resin coasters offer endless possibilities for customization through colors, patterns, and embedded treasures.
This comprehensive guide is designed for beginner resin coaster enthusiasts who have never worked with resin. We’ll walk you through every aspect of how to make resin coasters, focusing on epoxy resin for coasters since it’s the most suitable and beginner-friendly option. Don’t worry if you’ve never touched resin before – by following these step-by-step resin coaster instructions, you’ll be creating professional-looking pieces that will amaze your friends and family.
Why Make Your Resin Coasters?
The Allure of Handmade Resin Coasters
Making your handmade resin coasters offers numerous benefits that store-bought options can’t match. You have complete control over colors, designs, and embedments, allowing you to create pieces that perfectly match your decor or personality. These coasters are incredibly durable, water-resistant, and, when made correctly, can withstand the heat from hot beverages. Plus, there’s immense satisfaction in creating something both beautiful and functional with your own hands.
Resin art coasters have become increasingly popular as thoughtful gifts and stylish home decor items. They’re conversation starters that showcase your creativity while protecting your furniture – a perfect combination of form and function.
What Exactly is Craft Resin?
In the crafting world, resin is a two-part liquid compound consisting of resin and hardener. When mixed in the correct ratio, these components undergo a chemical reaction that transforms the liquid into a hard, glossy solid. This transformation opens up incredible possibilities for resin art coasters, allowing you to capture colors, objects, and designs in a crystal-clear, durable finish.
Choosing the Right Resin for Your Coasters
Why Epoxy Resin is Best for Coasters
For several reasons, epoxy resin is the most common and recommended coaster type. Unlike UV resin, which might seem appealing for its quick curing time, epoxy resin offers superior heat resistance—crucial for items that hold hot mugs. UV resin also tends to be more brittle and cost-prohibitive for the volume needed for coasters, and it has cure depth limitations that make it unsuitable for the thicker pours required for sturdy coasters.
Key Characteristics of the Best Epoxy for Coasters Beginners
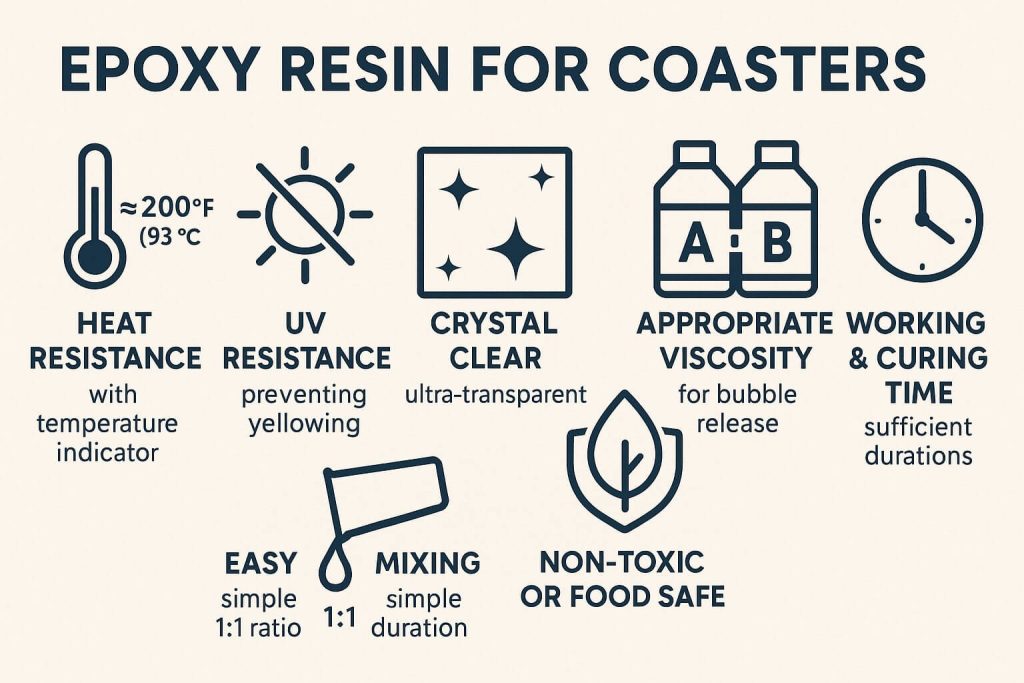
Heat Resistance: This is crucial when choosing resin for coasters. Coasters must withstand hot coffee mugs without leaving rings, warping, or softening. Look for heat-resistant resin for coasters rated at least 90°C (194°F) or higher. Some premium resins can handle temperatures up to 120°C (248°F), providing extra peace of mind.
UV Resistance: UV-resistant resin is essential for clear resin coasters or light-colored designs to prevent yellowing over time, especially if your coasters are exposed to sunlight. Look for formulas specifically labeled with UV inhibitors or stabilizers.
Clarity: Crystal-clear transparency is vital for showcasing colors, glitter, or embedments. High-quality resins will cure water-clear without any cloudiness or amber tinting.
Viscosity (Thickness): Low- to medium-viscosity resins work best for coasters. They flow well into resin coaster molds and naturally help bubbles rise to the surface for easier removal. Thick resins can trap bubbles and make pouring difficult.
Mix Ratio: I strongly recommend choosing a resin with a 1:1 mix ratio by volume for beginner resin coasters. This means equal parts resin and hardener, making measurement simple and reducing the chance of curing issues. Avoid complex ratios like 2:1 or 3:1 by weight when starting.
Working Time (Pot Life): A decent working time of 30-60 minutes gives beginners enough time to mix, color, and pour without feeling rushed. Shorter pot life can lead to mistakes and stress.
Cure Time: Most epoxy resins require 24 hours for initial demolding and 72 hours or more for full hardness and maximum heat resistance. Don’t rush this process – patience leads to better results.
Bubble Release: Some resins are formulated for better self-degassing, meaning bubbles naturally rise and pop more easily. This feature is beneficial for beginners.
“Non-Toxic” / “Food Safe” Considerations for Coasters: When you see “non-toxic” on resin packaging, this typically refers to the cured state being inert. Some resins also have low or no VOCs (Volatile Organic Compounds), making them more pleasant to work with. Remember: liquid resin components are always irritants and require proper safety equipment.
Some resins are labeled “food safe” (FDA compliant for incidental food contact once fully cured according to manufacturer’s instructions). While coasters aren’t typically for direct food serving, this designation often indicates a high-quality, inert cured product. Note that adding certain colorants can affect this status. Always check the manufacturer’s Safety Data Sheets (SDS) for complete information.
Essential Resin Coaster Supplies and Tools
Gathering Your Coaster-Making Supplies
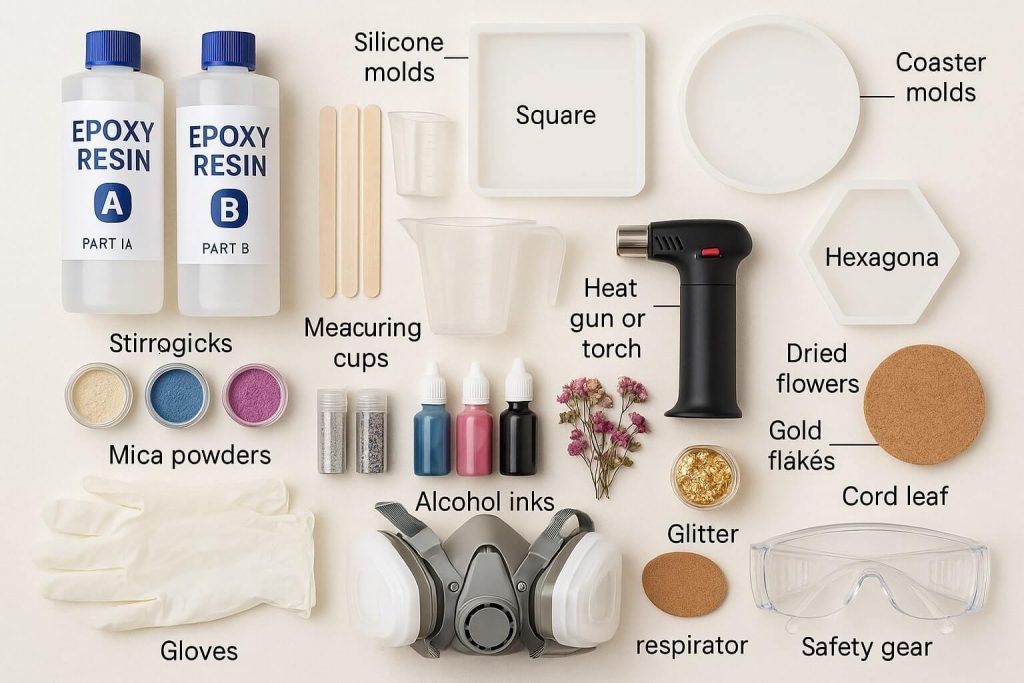
Building your resin coaster supplies collection doesn’t have to break the bank. Here’s everything you need for successful coaster-making supplies:
Epoxy Resin and Hardener: Choose a product specifically formulated for art or casting with the abovementioned characteristics. Buy from reputable suppliers and check expiration dates.
Resin Coaster Molds:
- Silicone Molds: These are the most popular choice – reusable, flexible for easy demolding, and available in countless shapes
- Common shapes include round, square, hexagonal, and trendy agate/geode styles.
- Typical sizes range from 3.5-4 inches (9-10 cm) in diameter.
- Look for molds designed explicitly for coasters with smooth, polished interiors.
Measuring Cups: Graduated plastic or silicone cups ensure accurate resin and hardener measurement. Multiple sizes (1oz, 2oz, 4oz) provide flexibility for different project sizes.
Mixing Cups: Use larger disposable plastic cups or reusable silicone cups to combine and mix your resin and hardener. Choose cups with smooth interiors for easy mixing.
Stirring Sticks: Wooden craft sticks or silicone stirrers work well. Avoid using metal, as it can sometimes react with resin.
Colorants for Resin:
- Mica Powders: Perfect for pearlescent, shimmery effects and metallic finishes
- Resin Dyes (Transparent or Opaque): Create vibrant solid colors or maintain transparency
- Alcohol Inks: Produce vibrant, transparent colors and interesting cell-like effects (use very sparingly)
- Opaque Pigment Pastes/Powders: For solid, non-transparent colors with excellent coverage
Embedments (Optional):
- Glitter: Available in fine, chunky, or shaped varieties for different effects
- Dried Flowers/Leaves: Must be completely dry to prevent moisture issues
- Gold/Silver Leaf Flakes: Add luxury and elegance
- Small Beads, Shells, Photos: Ensure photos are sealed to avoid bleeding
Heat Gun or Small Butane Torch: Essential for bubble removal resin surfaces. Both work well, though torches require more caution.
Level: A small spirit level ensures your workspace is perfectly flat for even curing – this tool is more important than beginners realize!
Workspace Protection:
- Silicone mat (ideal for easy cleanup)
- Plastic sheeting or parchment/wax paper
- Painter’s tape for protecting mold edges if needed
Timer: Track mixing time and pot life to work efficiently.
Paper Towels & Isopropyl Alcohol (90%+): For cleaning spills and tools before resin cures. Lower concentrations won’t work as effectively.
Optional Finishing Supplies:
- Fine-grit sandpaper (220, 400, 800, 1000+ grit) for sanding edges
- Polishing compound and soft cloth
- Cork backing sheets or pre-cut circles
- Strong adhesive (like E6000) for non-adhesive cork
- Craft knife or scissors for cutting cork
- Small rubber feet as an alternative to cork
Your Must-Have Safety Gear (Resin Safety for Coasters)
Resin safety for coasters isn’t optional – it’s essential for protecting your health. Never skip these items:
- Nitrile Gloves are necessary to protect your skin from resin contact. Latex gloves aren’t suitable, as resin can penetrate them.
- Respirator Mask: An organic vapor respirator is highly recommended, especially when working with larger quantities or in less-than-ideal ventilation
- Safety Glasses/Goggles: Protect your eyes from splashes and fumes
- Protective Clothing: Wear an apron or old long-sleeved clothes you don’t mind potentially ruining
Setting Up Your Safe and Effective Workspace
Preparing Your Coaster Crafting Zone
Creating the right environment is crucial for successful DIY resin coasters. Here’s how to set it up correctly:
Well-Ventilated Area: This is crucial! Open windows, use fans to create cross-ventilation, or ideally, work in a dedicated workshop with proper extraction. Good ventilation protects your health and helps the resin cure properly.
Level Surface: Use a spirit level to check your work surface. Non-level surfaces lead to uneven coasters with resin pooling to one side – a common beginner frustration.
Protected Surface: Cover your table or work area thoroughly. Cured resin is nearly impossible to remove from most surfaces.
Temperature Control: The ideal room temperature is usually 20-25°C (68-77°F). Colder temperatures can thicken resin and hinder proper curing, while hotter temperatures can dangerously shorten pot life. Always check your specific resin manufacturer’s recommendations.
Low Humidity: High humidity can affect curing and cause surface issues. If possible, aim for moisture below 50%.
Keep Away: Ensure pets and children cannot access your workspace during the entire process, including the curing period.
Organize Supplies: Have everything within reach before you start mixing. Once you begin, you won’t have time to search for missing items.
How to Make Resin Coasters: A Step-by-Step Tutorial for Beginners
Let’s dive into this resin coaster tutorial and create your first set of stunning coasters!
Step 1: Preparation is Key
Before handling any resin components, put on all your PPE (gloves, respirator, safety glasses). Ensure your workspace is clean, level, and fully protected. Prepare your resin coaster molds by ensuring they’re spotless and dry – any moisture or debris will show in your finished pieces. If you plan to use embedments like dried flowers, arrange them nearby and plan your design.
Step 2: Measuring Your Epoxy Resin
Read the manufacturer’s instructions for your specific resin carefully – this cannot be emphasized enough! If using a 1:1 ratio resin, measure equal amounts of resin (Part A) and hardener (Part B) into separate graduated cups. Precision is crucial – even minor measurement errors can result in sticky, uncured resin.
Pro Tip: In cooler weather, gently warm your resin by placing the bottles in a warm water bath for 10-15 minutes (ensure no water gets into the bottles). This reduces viscosity, helps bubbles escape, and makes pouring easier.
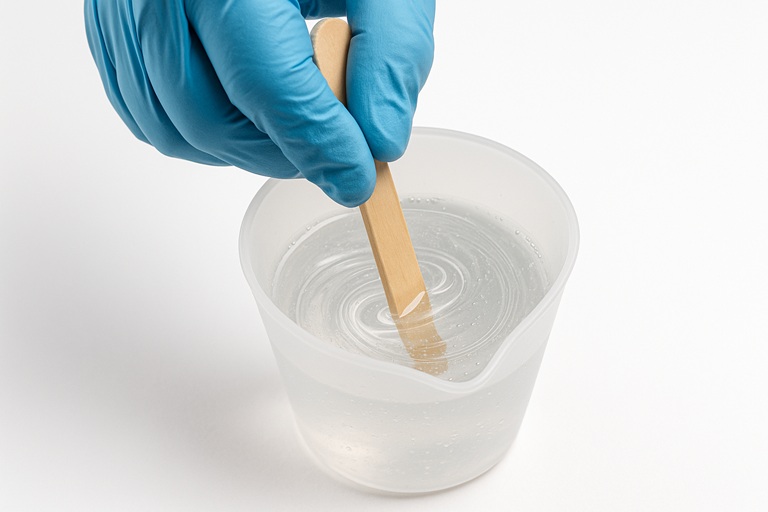
Step 3: Mixing the Resin and Hardener
Pour the measured hardener and resin into a larger mixing cup. Mix slowly but thoroughly for the time specified by the manufacturer (usually 3-5 minutes). This is where many beginners make mistakes – scrape the sides and bottom of the mixing cup multiple times to ensure everything is fully incorporated. Improper mixing is the primary cause of curing issues like sticky spots or soft areas.
Mix in a figure-8 pattern rather than a circular one to ensure thorough blending. Avoid whipping air into the mixture – slow and steady wins this race.
Step 4: Adding Colors and Embedments
If creating multiple colors, divide your mixed resin into smaller cups. Gradually add your chosen coloring resin for coasters—whether using mica powder, dye, or alcohol ink—mixing well after each addition. Remember: a little colorant goes a long way! Start with tiny amounts and build up. Never exceed the manufacturer’s recommended percentage (usually 5-6% of total resin volume), as too much can interfere with curing.
For embedding objects in resin coasters, you have the following options:
- First, pour a thin transparent base layer and let it become tacky (about 30-60 minutes). Then, place objects and pour the remaining resin.
- Mix lightweight objects like glitter directly into the colored or transparent resin.
- For flowers or paper items, ensure they’re sealed with a thin coat of resin or sealant first to prevent bleeding.
Step 5: Pouring the Resin into Molds
Carefully and slowly pour the resin into your resin coaster molds. Pour from a low height to minimize bubbles, and pour in a thin stream rather than dumping. Avoid overfilling – aim for a thickness of about 1/8 to 1/4 inch (3-6mm) for sturdy, functional coasters.
For your first project, try these simple resin coaster techniques for beginners:
- Single solid color for elegant simplicity
- Clear with glitter for sparkle
- Two-color swirl by pouring colors side by side and gently swirling with a toothpick
Step 6: Bubble Removal Techniques
After pouring, let the resin sit for 2-3 minutes. Many bubbles will rise and pop naturally. Quickly pass a heat gun or butane torch flame 3-4 inches above the resin surface for remaining surface bubbles. Keep the heat source moving constantly to avoid overheating, which can damage the resin or mold.
Move in smooth, sweeping motions rather than focusing on one area.
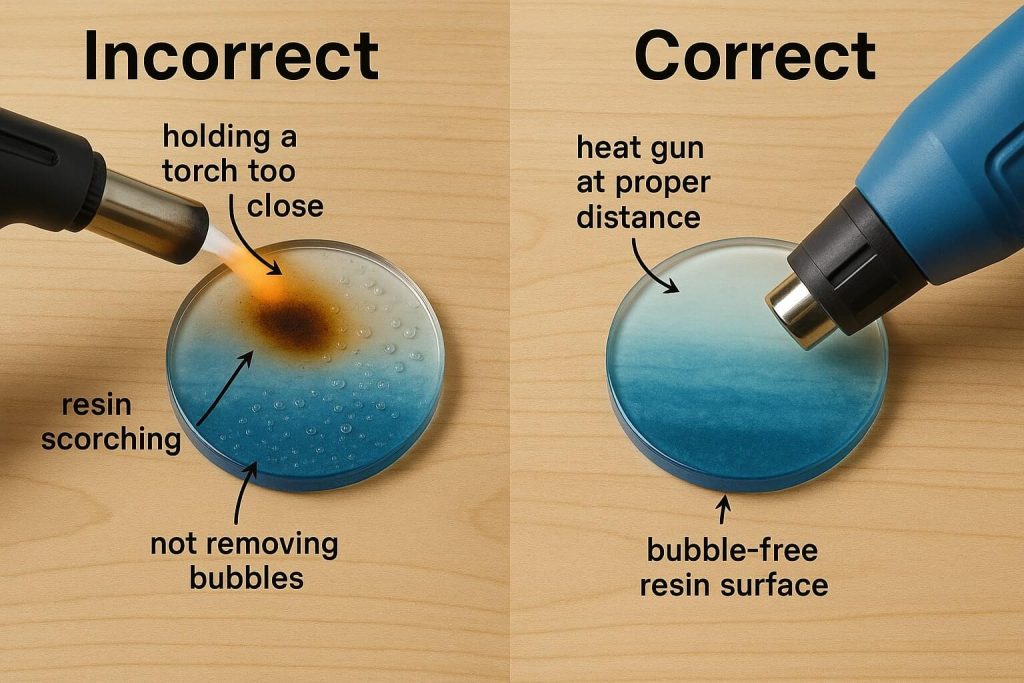
If using a torch, a quick pass is all that’s needed – the carbon dioxide from the flame breaks the surface tension and pops bubbles. Alternatively, a fine mist of isopropyl alcohol can help pop surface bubbles (test on a small area first).
Step 7: Curing Your Resin Coasters
Cover your molds with a clean plastic tub or cardboard box (propped up on supports to avoid touching the resin) to protect from dust, pet hair, and curious fingers while curing resin coasters. Place them on a level surface in your temperature-controlled space and let them cure undisturbed for the manufacturer’s specified time.
Typically, you can demold after 24 hours, but full hardness and heat resistance develop over 3-7 days. Maintain the recommended room temperature throughout curing – fluctuations can cause curing issues.
Step 8: Demolding Your Masterpieces
Once fully cured (hard to the touch with no tackiness), gently flex the silicone mold to release your coasters. Start at one edge and work around, avoiding sharp pulls that might damage edges. If a coaster seems stuck, flex the mold rather than pulling harder.
Step 9: Finishing Your DIY Resin Coasters (Optional but Recommended)
Sanding Edges: If you notice any sharp edges or minor imperfections, wet sand them smooth using progressively finer grits (start with 220, move through 400, 800, to 1000+). Wet sanding reduces dust and gives better results—sand in circular motions with light pressure.
Top Coat (Flood Coat): To achieve an ultra-glossy, professional finish or to cover any sanded areas, apply a thin layer of freshly mixed clear resin as a top coat. This step can transform good coasters into spectacular ones. Mix a small batch of resin and carefully pour a thin layer over each coaster, allowing it to self-level. Use a torch or heat gun to remove bubbles and let the resin cure completely.
Polishing: After the top coat has fully cured, use a resin-specific polishing compound and soft cloth to achieve a glass-like shine. Work in small circular motions.
Attaching Cork Backing:
- Place your coaster face-down on the cork sheet and trace around it.
- Cut the cork slightly smaller than the traced line (about 1/8 inch inside the line)
- Apply a thin, strong adhesive layer (like E6000) to the cork or coaster back.
- Press the cork firmly onto the center of the coaster back.
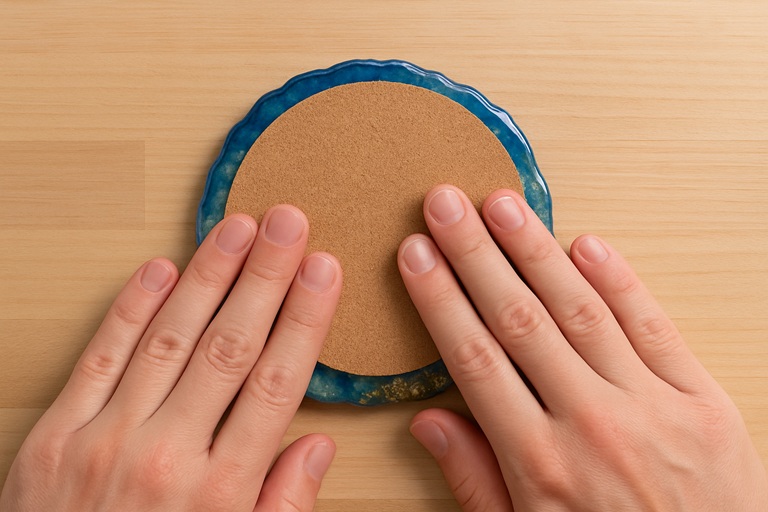
- Place a heavy book on top and let the adhesive cure for 24 hours.
Beginner-Friendly Resin Coaster Design Ideas
Simple Techniques for Stunning First Coasters
Start with these resin coaster techniques for beginners to build confidence:
Solid Color Coasters: Elegant in their simplicity, these showcase the beauty of color and shine. Use opaque pigments for bold statements or mica powder for pearlescent elegance. They are perfect for matching specific decor schemes.
Clear Coasters with Embedments: Create windows into miniature worlds by embedding dried flowers, glitter, gold leaf, or meaningful small objects. Ensure all embedments are completely dry and sealed if porous to prevent moisture issues or bleeding.
Mica Swirls: Pour two or more colors (often combining mica-infused resin with clear or complementary colors) next to each other. Use a toothpick to create gentle swirls – less is more with this technique. The mica creates beautiful depth and movement.
Basic Color Blocking: Pour one color into a section of the mold and let it partially cure until tacky (about 45-60 minutes). Then, pour another color adjacent to create clean, defined color boundaries. This technique creates modern, geometric designs.
Glitter Bomb: Mix various sizes of glitter into clear or lightly tinted resin for maximum sparkle. Combine fine glitter for overall shimmer with chunky glitter for a dramatic effect. This is perfect for celebrations or adding glamour to any space.
Subtle Alcohol Ink Drops: Pour clear resin first, then add just a few drops of alcohol ink for bursts of transparent color. Be very cautious – too much alcohol ink can interfere with curing and create flammability issues. Less is more with this technique.
Troubleshooting Common Resin Coaster Mistakes
Help! What Went Wrong with My DIY Resin Coasters?
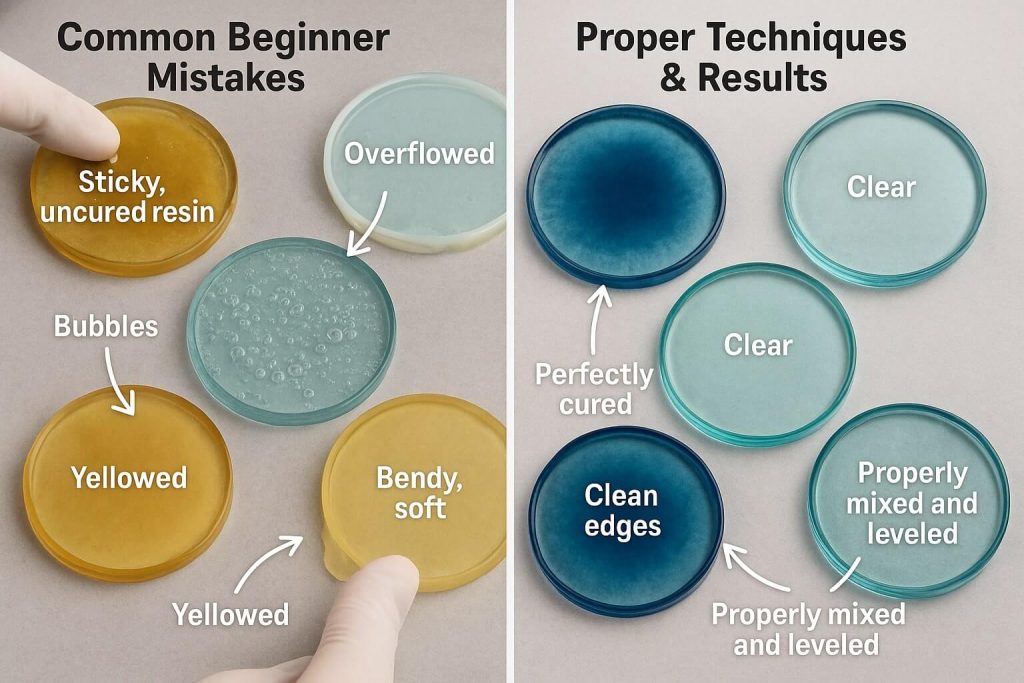
Don’t worry – even experienced crafters encounter issues. Here’s how to identify and fix common resin coaster mistakes:
Sticky or Soft Spots (Uncured Resin):
- Cause: The most common culprits are incorrect resin/hardener ratio or insufficient mixing. Cold temperatures, excessive colorants, or moisture contamination can prevent proper curing.
- Solution: Always measure precisely and mix thoroughly, scraping sides and bottom multiple times. Maintain proper temperature (68-77°F). If you notice small sticky spots, limit colorants to 5-6% of the total volume. Clean with isopropyl alcohol and apply a proper top coat. Unfortunately, widespread uncured areas usually mean starting over.
Excessive Bubbles:
- Cause: Mixing too vigorously, cold resin or room temperature, pouring from too high, or air released from porous embedments
- Solution: Warm the resin before mixing, stir slowly in the figure-8 patterns, and pour it close to the mold surface in a thin stream. Use a heat gun or torch correctly. Pre-seal porous items like flowers or paper
Bendy or Flexible Coasters (Even After Full Cure Time):
- Cause: Resin poured too thin, not allowing full cure time (some resins need 7+ days for maximum hardness), incorrect mix ratio, too much colorant, or using a naturally flexible resin formula
- Solution: Ensure coasters are at least 1/8 to 1/4 inch thick. Be patient and allow the full manufacturer-recommended cure time. Double-check your measuring accuracy. Consider adding a rigid top coat or switching to a more complex resin formula.
Uneven Surface or Resin Flowed Out of Mold:
- Cause: Workspace not level or mold overfilled
- Solution: Always check your surface with a level before starting. Fill molds to just below the rim, accounting for the slight doming that occurs naturally.
Color Issues (Muddy Colors, Bleeding, or Separation):
- Cause: Overmixing multiple colors together, using incompatible colorants, or adding too much colorant
- Solution: When creating multicolor designs, mix colors separately and combine gently. Use only resin-specific colorants. Start with tiny amounts of colorant and build up gradually.
Yellowing Over Time:
- Cause: Using non-UV resistant resin or prolonged exposure to direct sunlight
- Solution: Invest in quality UV-resistant resin for coasters from the start. Even with UV-resistant resin, keep finished pieces out of constant direct sunlight to maintain clarity.
Caring for Your Handmade Resin Coasters
Keeping Your Coasters Looking Great (Resin Coaster Care)
Proper resin coaster care ensures your creations stay beautiful for years:
- Hand wash with mild soap and warm water. Never put resin coasters in the dishwasher – the high heat and harsh detergents can damage the finish
- Dry immediately with a soft, lint-free cloth to prevent water spots
- Avoid abrasive cleaners, scouring pads, or anything that could scratch the surface
- While quality heat-resistant resin for coasters can handle hot coffee mugs, avoid placing extremely hot items (like pots straight from the stove) directly on them
- Keep out of prolonged direct sunlight to prevent potential yellowing, even with UV-resistant formulas
- For stubborn stains, use a paste of baking soda and water, gently rubbing with a soft cloth
- Refresh the shine periodically with a coat of resin-specific polish
Quick Tips for Your First Resin Coaster Project
- Read All Instructions: Both for your specific resin AND any colorants you use. Different brands have different requirements
- Start Simple: Master basic techniques before attempting complex designs. Your skills will build quickly with practice
- Measure Accurately: This is the single most critical step for success. Consider using a scale for even more precision once you’re comfortable
- Work Clean: The resin is messy and sticks to everything! Protect all surfaces and have cleanup supplies ready
- Do a Small Test Piece: If unsure about color combinations or resin behavior, mix a tiny batch for testing
- Patience is a Virtue: Allow proper mixing, working, and curing time. Rushing leads to disappointment
- Safety First, Always: Never skip PPE, even for “quick” projects. Your health is worth more than any coaster.
Conclusion
Congratulations on taking the first step in learning how to make resin coasters! This rewarding craft combines creativity with functionality, allowing you to produce beautiful, professional-looking pieces that showcase your style. Following this step-by-step guide and prioritizing resin safety can create stunning results, even for a beginner.
Remember, every expert crafter started exactly where you are now. Don’t be discouraged if your first attempts aren’t perfect – each project teaches valuable lessons. As you gain confidence, experiment with different colors, embedments, and resin coaster techniques for beginners. Soon, you’ll develop your signature style and techniques.
Your handmade resin coasters will protect furniture, add beauty to your home, and serve as meaningful gifts that show thoughtfulness and creativity. Each coaster tells a story—whether it’s flowers from a special garden, colors that match a friend’s decor, or glitter that captures someone’s sparkle.
Gather your supplies, set up that workspace, and start creating! Your journey into resin art’s wonderful world begins with your first pour. Happy crafting!
Other Articles

Resin Art Safety Guidelines: Your Complete Guide
Best Resin for Jewelry Making: Epoxy vs. UV Resin
