

Easy Resin Projects for Beginners: 10+ Ideas Without Molds
Have you been scrolling through gorgeous resin art on social media, wishing you could create such beautiful pieces yourself? Here’s some fantastic news: you absolutely can – and you don’t need expensive molds or years of experience to get started! The world of resin art is incredibly versatile and welcoming to beginners, offering endless possibilities for creativity right from your first project.
If you’ve been hesitant about diving into beginner resin art because you thought you needed fancy equipment or complex molds, this guide is here to change your mind. We’ll explore over 10 delightful resin projects without molds that are perfect for absolute beginners. These simple resin ideas for beginners are designed to be fun, achievable, and confidence-building—no prior experience is required!
Throughout this comprehensive guide, you’ll discover easy resin projects that use everyday items and simple techniques. We’ll walk through each project step-by-step, explain any technical terms in plain English, and share essential tips for success. You’ll also learn about basic resin safety for beginners – not to scare you, but to empower you to create confidently and safely.
Ready to unlock your creativity with no-mold resin crafts? Let’s dive into this exciting world together!
Getting Started: Your Essential Toolkit for No-Mold Resin Magic
Choosing Your Resin: Beginner-Friendly Options
Before we jump into the fun projects, let’s talk about the star of the show: resin itself. Epoxy resin consists of two parts you mix – the resin (the main component) and the hardener (which makes it solid). Think of it like mixing cake ingredients–magic happens when appropriately combined!
For your first DIY resin no mold adventures, look for “beginner-friendly” or “art resin” products with a 1:1 mixing ratio by volume. This means equal parts of each component, making it easy to get right. Brands often mark these clearly on their packaging.
You might also encounter UV resin, which cures (hardens) under UV light instead of over time. While UV resin works great for very small, thin projects like tiny jewelry pieces, epoxy resin is generally more versatile for the beginner-friendly epoxy resin projects we’ll explore today.
Basic Supplies for Your First No-Mold Resin Crafts
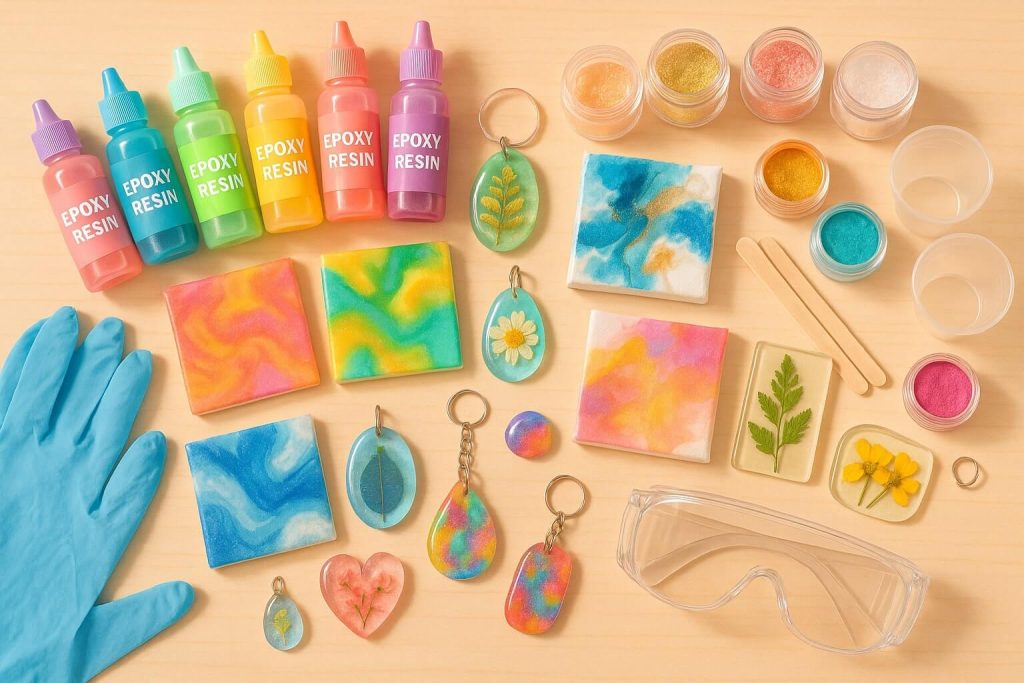
Here’s your shopping list of resin supplies for beginners:
Essential Items:
- Mixing Cups: Graduated plastic cups (disposable work fine, or invest in reusable silicone ones)
- Stirring Sticks: Wooden craft sticks or silicone stirrers work perfectly
- Protective Gear (Non-Negotiable Minis!): Nitrile Gloves: These are your best friends for beginners who want basic resin safety. Always wear them!
- Safety Glasses/Goggles: Protect those peepers from any splashes
- Respirator (Optional but Recommended): A respirator with organic vapor cartridges for epoxy resin is ideal, especially if your workspace isn’t ventilated. At a minimum, ensure excellent ventilation – open those windows!
- Work Surface Protection: Silicone mat, plastic sheeting, or even parchment paper
- Level Surface: This is crucial! Resin self-levels, so a wonky table means wonky projects. A trim spirit level can be your helper here.
Fun Additions:
-
- Colorants & Sparkle: Mica powders (for shimmer)
- Alcohol inks (for transparent, jewel-like colors)
- Acrylic paints (use just a tiny bit for opaque colors)
- Glitter (because who doesn’t love sparkle?)
- Embedding Materials: Dried flowers
- Small beads
- Paper cutouts
- Tiny charms
- Cleaning Supplies: Paper towels and isopropyl alcohol (90% or higher) for cleanup
- Heat Tool (Optional): A mini torch or heat gun for popping bubbles – use with caution!
Setting Up Your Creative Space: Quick Tips
Creating the perfect workspace sets you up for success:
- Choose a well-ventilated area – near a window is ideal
- Ensure your work surface is perfectly level and protected
- Keep curious pets and little ones away from your workspace and curing projects
- Gather all your materials before mixing – you’ll want to work efficiently once you start!

Project Idea 1: Dazzling Resin-Coated Tiles (DIY Coasters & More!)
Why Tiles Are Perfect for Beginner Resin Art
Ceramic or stone tiles are absolute gems for getting started with resin art! They’re inexpensive (check your local hardware store) and readily available, and their flat surface makes them ideal for resin projects without molds. Plus, you can transform plain tiles into stunning coasters, trivets, or decorative pieces that look like they came from a fancy boutique!
Materials You’ll Need
- Ceramic or stone tiles (4×4 inches work great for coasters)
- Prepared epoxy resin
- Colorants of your choice (optional)
- Painter’s tape (optional for creating clean edges)
- Cork or felt backing (optional for finishing coasters)
- Small plastic cups or blocks (to elevate tiles while curing)
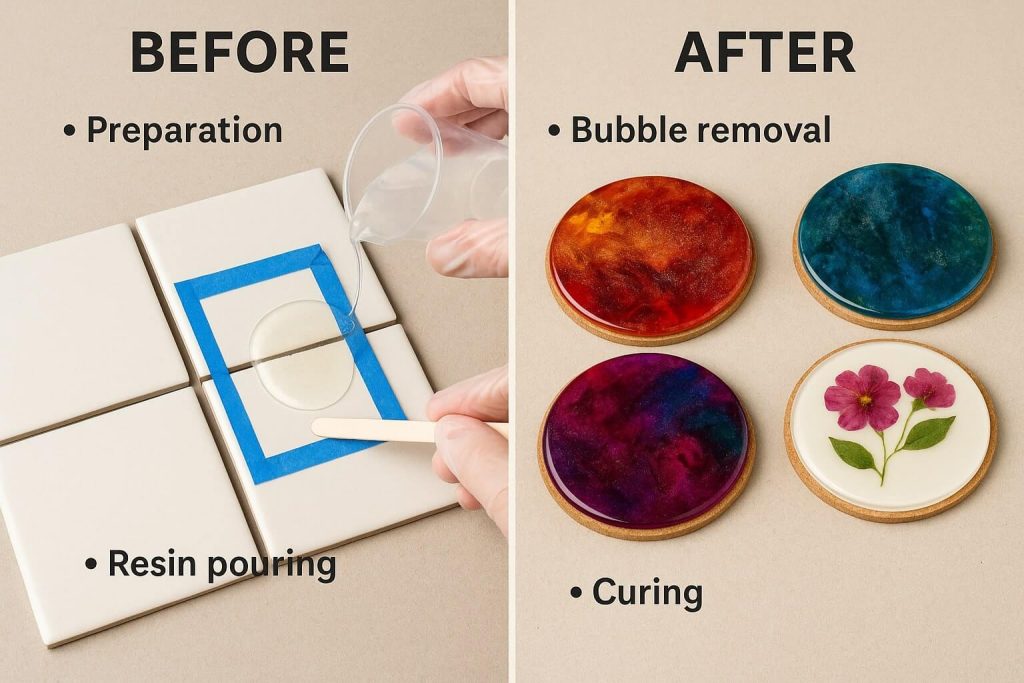
Step-by-Step: Creating Your Tile Masterpiece
- Prepare your tile: Clean it thoroughly and let it dry completely. If you want super-clean edges on the back, apply painter’s tape around the bottom edge.
- Mix your resin: Follow your manufacturer’s instructions exactly. Mix it in now if adding color – a little goes a long way!
- Pour with confidence: Pour a small amount of resin onto the center of your tile. Don’t dump it all at once – start small!
- Spread the magic: Gently tilt the tile to let resin flow to the edges, or use a stir stick to guide it. For a “drip-over” effect, let it flow over the sides. Use that painter’s tape as a barrier for a neat top-only coat.
- Bubble patrol: Use your heat tool in quick passes (like you’re waving a wand) or exhale gently over the surface for small areas. Those bubbles will pop like magic!
- Patience time: Let your creation cure on a perfectly level surface. This typically takes 24-72 hours – check your resin instructions. No peeking or poking!
- Finishing touches: Once fully cured, remove any tape and add cork or felt backing if making coasters. Voilà – you’ve created beautiful resin coasters without molds!
Tips for Terrific Tiles
- Elevate your tiles on disposable cups or blocks – this lets drips fall freely and prevents sticking
- Less is more – a thin, even coat looks more professional than a thick, gloopy one
- Get creative with “dirty pours” (mixing colors) or swirling effects
- Experiment with embedding small items like pressed flowers or glitter between layers
Project Idea 2: Charming Freeform Resin Pendants & Keychains
Unleash Your Creativity with Freeform Resin Jewelry
Freeform resin art is where you get to play! Instead of pouring into defined molds, you create organic shapes onto flat, non-stick surfaces. It’s perfect for making unique DIY resin jewelry with no mold pieces and adorable resin keychains with no mold. Each piece will be one-of-a-kind—just like you!
Materials You’ll Need
- Prepared epoxy resin (or UV resin for super-quick results)
- Silicone mat or parchment paper (your resin won’t stick to these!)
- Colorants, glitter, tiny dried flowers, beads, or sealed paper cutouts
- Toothpicks or fine tools for shaping
- Jewelry findings (pendant bails, keychain rings, jump rings)
- Small hand drill or awl (for making holes after curing)
- Masking tape or specialized resin tape (for creating barriers)
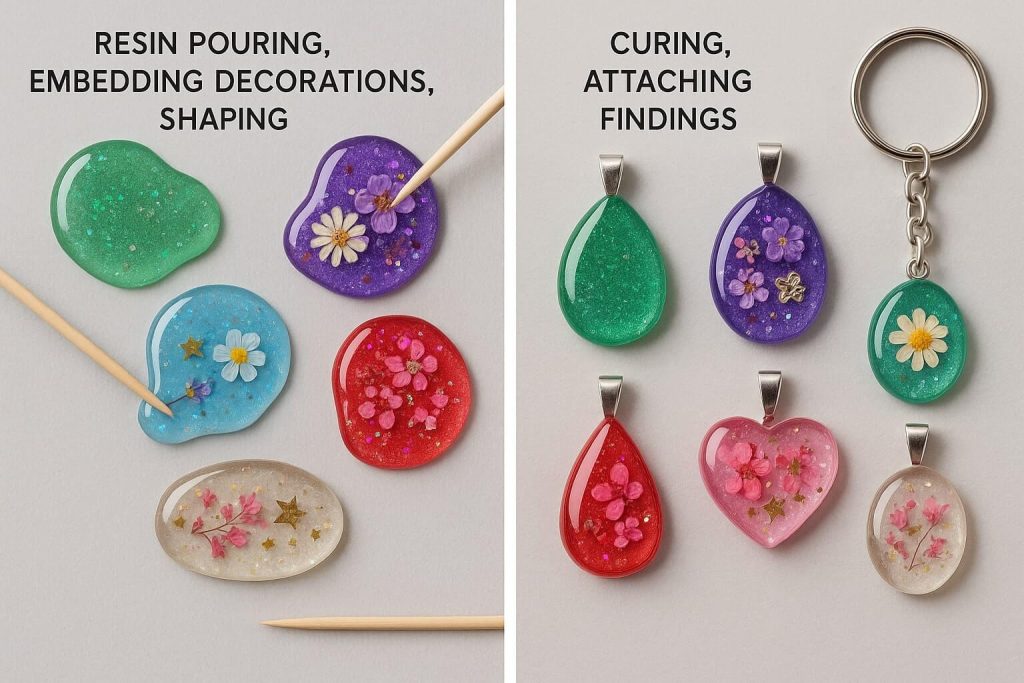
Step-by-Step: Crafting Your Unique Pieces
- Prepare your resin according to the instructions.
- Choose your method:
- Method A (Puddle & Shape): Pour small puddles of resin onto your silicone mat. Add your colors and embellishments. Use a toothpick to gently nudge the resin into shapes – circles, hearts, abstract blobs – whatever speaks to you!
- Method B (Tape Barrier): Create small shapes on your mat using tape for resin barriers. Press the tape down firmly to prevent leaks. Pour resin inside your tape “walls.”
- Add the pretties: Gently place your embellishments into the resin, ensuring they’re covered. A toothpick helps position tiny items perfectly.
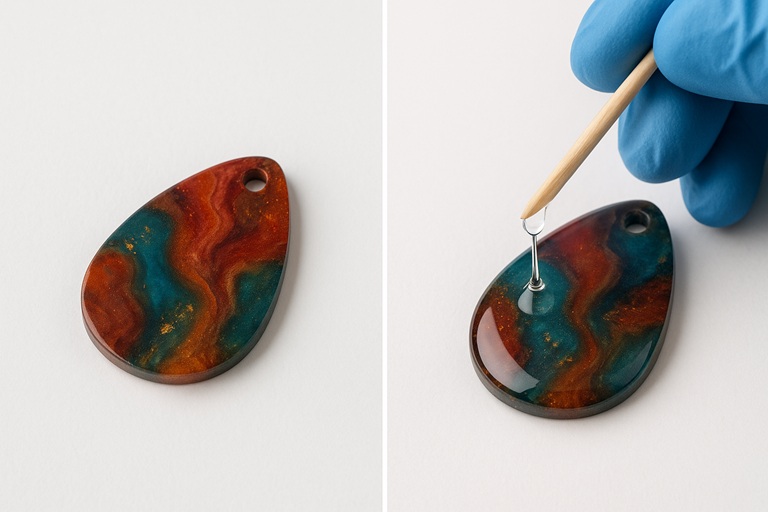
- Master the dome: For professional-looking pieces, try the doming resin technique. Add a small drop of resin to the center after your piece has partially cured (tacky but not liquid). It will naturally come up, creating a gorgeous, rounded top!
- Cure completely according to your resin’s instructions.
- Finishing time: Peel your creations from the mat and remove any tape. Attach findings using strong jewelry glue or drilling a small hole for jump rings.
Tips for Fabulous Freeform Fun
- Work in thin layers when embedding thicker items – build up gradually
- Size matters – don’t make pieces too large or too thin, or they might be fragile
- Sand with love – use fine-grit sandpaper to smooth any rough edges
- UV resin bonus – if using UV resin, you can cure in layers for dimensional effects
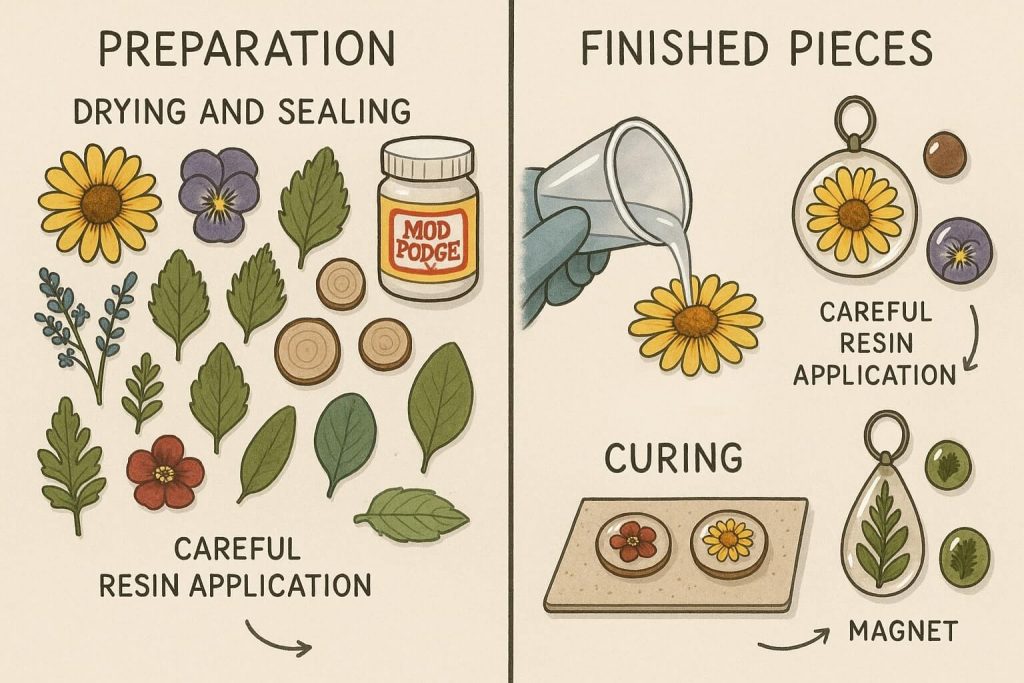
Project Idea 3: Nature’s Beauty Preserved – Coating Leaves, Flowers & Wood Slices
Capturing Natural Elements with Resin
There’s something magical about preserving nature’s delicate beauty forever! Embedding objects in resin, no mold style, lets you create stunning keepsakes. This technique works beautifully for beginners using resin on wood or small wood slices to preserve your favorite flowers and leaves.
Materials You’ll Need
- Prepared epoxy resin
- Dehydrated pressed leaves or flowers (moisture is resin’s enemy!)
- Small, thin wood slices (sanded smooth)
- Silicone mat or parchment paper
- Tweezers for precise placement
- Disposable brush or stir stick for application
- Mod Podge or similar sealant (for very porous items)
Step-by-Step: Encasing Nature’s Treasures
- Prep is key: Ensure all-natural items are bone dry. For paper-thin or porous items, seal them with Mod Podge first and let dry completely. This prevents resin from soaking in and darkening them.
- Mix a small batch of resin – you won’t need much!
- Position your treasure: Place your leaf, flower, or wood slice on your protected surface.
- Apply with care: Using a brush or carefully pouring, apply a thin coat of resin. Think of it like painting – cover all surfaces evenly. For leaves and flowers, you might coat one side, let it partially cure, then flip and coat the other.
- Bubble check: Remove any bubbles with your heat tool or breath.
- Patience pays off: Let cure completely. These preserved beauties can become magnets, pendants, bookmarks, or decorative pieces!
Tips for Preserving Perfection
- Moisture warning: I cannot stress this enough – items MUST be dry!
- Thin is in: Multiple thin coats look better than one thick, drippy coat
- Level obsession: Keep checking that your surface is level while curing
- Plan: If making pendants from wood slices, drill holes before coating
Project Idea 4: Mini Abstract Art on Canvas or Wood Panels
Your First Foray into Resin Painting (No Molds!)
Get ready to channel your inner artist! For beginners, resin on canvas opens up a world of vibrant, glossy abstract art. Working on small canvases or wood panels makes this an accessible and exciting form of no-mold resin crafts. Every pour is an adventure – you never know exactly how the colors will flow and blend!
Materials You’ll Need
- Prepared epoxy resin
- Small canvases (4×4 or 6×6 inches are perfect starters) or thin wood panels
- Acrylic paints or resin pigments
- Multiple mixing cups (one per color, plus clear if desired)
- Stir sticks
- Heat gun (super helpful in creating effects here!)
- Painter’s tape for edges (optional)
- Props to elevate canvas (plastic cups work great)
Step-by-Step: Pouring Your Abstract Creation
- Canvas prep: If needed, prime your canvas/panel. Apply painter’s tape to the edges if you want clean sides. Elevate on cups for drip freedom!
- Color mixing station: Mix your base resin, then divide it into smaller cups. Add different colors to each cup – remember, a tiny bit of pigment goes far!
- Pour your heart out: Try different techniques:
- Individual pours: Pour colors one at a time in different spots
- Dirty pour: Layer colors in one cup, then pour all at once
- Puddle pour: Create separate color puddles that touch and blend
- Tilt and swirl: Gently tilt your canvas to encourage flow and blending. This is where magic happens!
- Heat gun artistry: Use your heat gun to warm the resin gently. This creates amazing cells and movement. Keep it moving, and don’t get too close – think hairdryer distance!
- Level cure: Place on a perfectly level surface to cure. Resist the urge to keep tilting!
Tips for Stunning Abstract Pours
- Don’t overmix on the canvas – muddy colors aren’t pretty!
- Embrace the unexpected – resin has a mind of its own, and that’s the beauty!
- Try different techniques – swipes, rings, and puddles all create different effects
- This is one of the most creative no-mold resin ideas – there’s no wrong way!
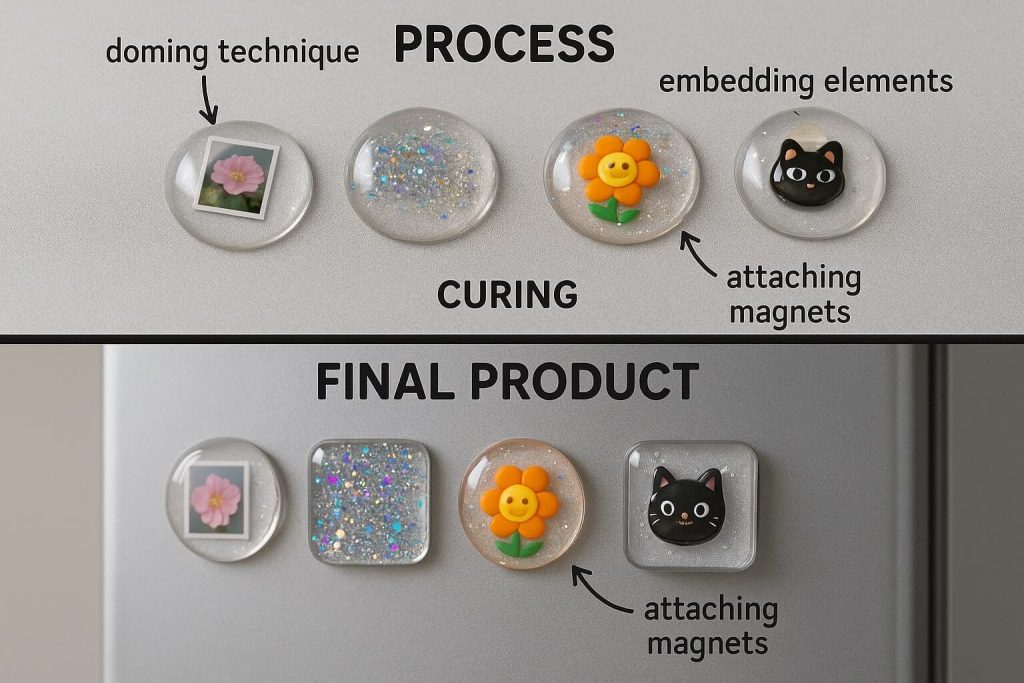
Project Idea 5: Fun & Functional Resin Magnets
Creating Custom Resin Magnets DIY Style
Resin magnet DIY projects are perfect for beginners—quick, satisfying, and make great gifts! These little beauties can brighten up any fridge or filing cabinet and are an excellent way to practice different techniques on a small scale.
Materials You’ll Need
- Prepared epoxy resin
- Colorants, glitter, microbeads
- Small sealed photos or paper designs
- Silicone mat or parchment paper
- Strong craft magnets
- Strong adhesive (E6000 works great)
- Optional: Bottle caps, flat glass cabochons
Step-by-Step: Making Your Own Magnets
- Mix your resin – small batches work best for magnets.
- Choose your style:
- Method 1 (Doming): Place a sealed image face-up on your mat. Carefully drip resin on top, letting it self-level into a dome. The doming resin technique creates professional-looking pieces!
- Method 2 (Bottle Caps): Clean bottle caps make perfect tiny molds! Fill with resin and add embellishments.
- Method 3 (Freeform): Create small, thick puddles of colored/glittered resin directly on your mat.
- Embellish away: Add glitter, colors, or tiny objects while the resin is still liquid.
- Bubble removal: A quick pass with heat or gentle breath pops those bubbles.
- Cure time: Let cure completely before handling.
- Magnet attachment: Once cured, use a strong adhesive to attach magnets to the back. Let adhesive cure thoroughly before use.
Tips for Magnetic Appeal
- Seal paper items with Mod Podge first to prevent resin absorption
- Test magnet strength – ensure they can hold their weight plus some paper
- Make sets – they make wonderful gifts!
- Size wisely – smaller, thicker pieces are sturdier than large, thin ones.
Bonus Project Ideas: Quick & Creative No-Mold Fun
Ready for more? Here are additional simple resin ideas for beginners to keep your creativity flowing:
Resin-Coated Buttons: Transform plain buttons into glossy, colorful treasures. Place buttons face-up on your work surface and apply a thin coat of colored resin. Perfect for crafts or unique clothing accents!
Decorated Phone Grips: Personalize a plain phone grip with a thin layer of resin mixed with ultra-fine glitter or mica powder. Just be sure to mask off the functional parts first!
Resin Paperweights: This is advanced freeform resin art! Pour thicker resin layers onto a silicone mat, embedding objects between layers. Gradually build up height for impressive desk accessories.
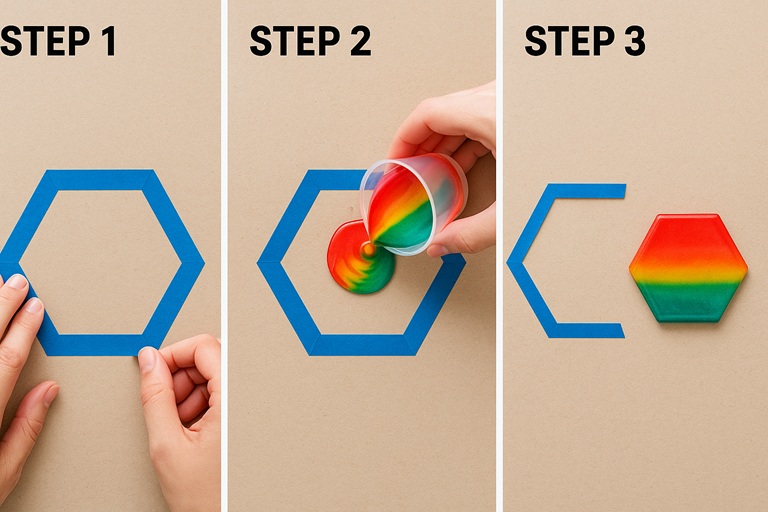
Geometric Shapes with Tape: Using tape for resin barriers opens up endless possibilities! Create temporary “walls” with strong adhesive or specialized resin tape on your silicone mat. Pour resin inside to create geometric shapes – triangles, hexagons, or abstract designs. Remove tape after curing for crisp edges!
Top Tips for No-Mold Resin Success
Read Your Resin Instructions: Every brand has quirks – know yours!
Accurate Mixing is CRUCIAL: Mix exactly as directed (usually 1:1 by volume for beginner resins). Mix thoroughly but gently for 2-3 minutes, scraping sides and bottom. Poor mixing = a sticky disaster!
Temperature Matters: Work in a warm (70-75°F), dry room. Cold resin is thick and bubble-prone, and humidity can cause cloudiness.
Level, Level, Level: I sound like a broken record, but this is SO important! If needed, check with a spirit level.
Pop Those Bubbles: Use your heat gun on low, a mini torch (quick passes from a distance), or your warm breath for tiny pieces. Don’t overheat—you’re popping bubbles, not cooking resin!
Clean Up Smart: Wipe tools immediately with paper towels, then clean with isopropyl alcohol. Let any drips on silicone cure so they peel off easily. Never pour resin down the drain—it will cure and clog pipes!
Embrace Imperfection: Your first projects might not be Pinterest-perfect, and that’s okay! Every “oops” teaches you something. These easy resin projects are about learning and having fun!
Key Safety Reminders for Happy Crafting (Basic Resin Safety for Beginners)
Safety isn’t scary – it’s empowering! Follow these simple rules for worry-free creation:
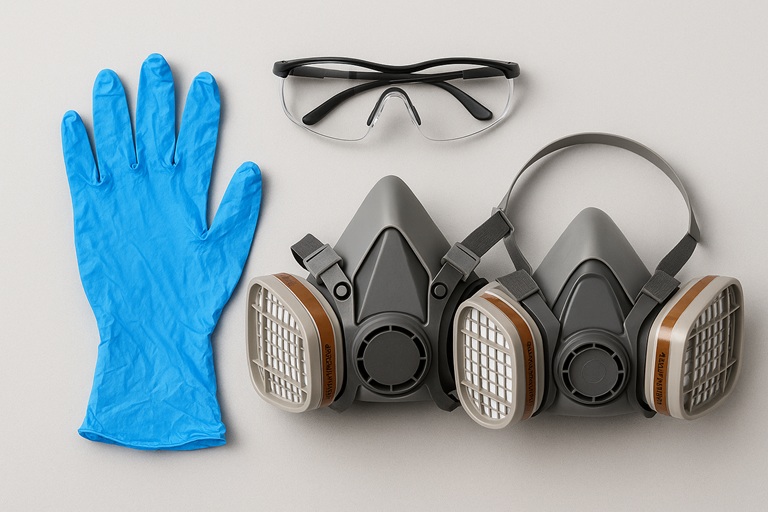
Always wear NITRILE GLOVES. Not latex, not vinyl – nitrile. Skin contact can cause irritation or sensitization over time.
Protect your EYES with safety glasses. Resin splashes happen to the best of us.
Work in a well-ventilated area. Open windows and use a fan blowing outward. Your lungs will thank you! A respirator is a worthy investment if you’re sensitive or crafting often.
Keep resin away from food, drinks, kids, and pets. Designate resin-only tools and workspace.
Read the Safety Data Sheet (SDS) that comes with your resin. Knowledge is power!
Wash hands thoroughly after crafting, even with gloves. Better safe than sorry!
This is non-negotiable for safe and enjoyable resin art! Following these guidelines means you can craft with confidence for years to come.
Your Creative Journey Starts Now!
Congratulations! You’re equipped with over 10 fantastic resin projects without molds to kickstart your creative journey. From stunning coasters to whimsical jewelry, preserved nature treasures, to abstract art, you have a whole world of easy resin projects at your fingertips.
Remember, every expert resin artist started exactly where you are now. By following these guides and embracing basic resin safety for beginners, you’re setting yourself up for success. Each project you complete builds your skills and confidence. Before you know it, you’ll create pieces that amaze your friends and family!
The beauty of no-mold resin crafts is their accessibility and endless possibilities. You don’t need expensive equipment or years of training – just enthusiasm, basic supplies, and a willingness to experiment. Your unique vision and creativity are all you need to make something special.
So gather your supplies, set up that workspace, and dive into your first DIY resin no-mold adventure! Whether you start with simple magnets or jump into abstract canvas art, remember this is YOUR creative journey. There’s no rush, no competition—just the joy of making something beautiful with your own hands.
Welcome to the wonderful world of beginner resin art. Your creative adventure starts now – and we can’t wait to see what you create! Happy crafting!
Other Articles

Resin Art Safety Guidelines: Your Complete Guide
