
")
Safe & Fun Resin Art Projects for Kids (Adult-Led Guide)
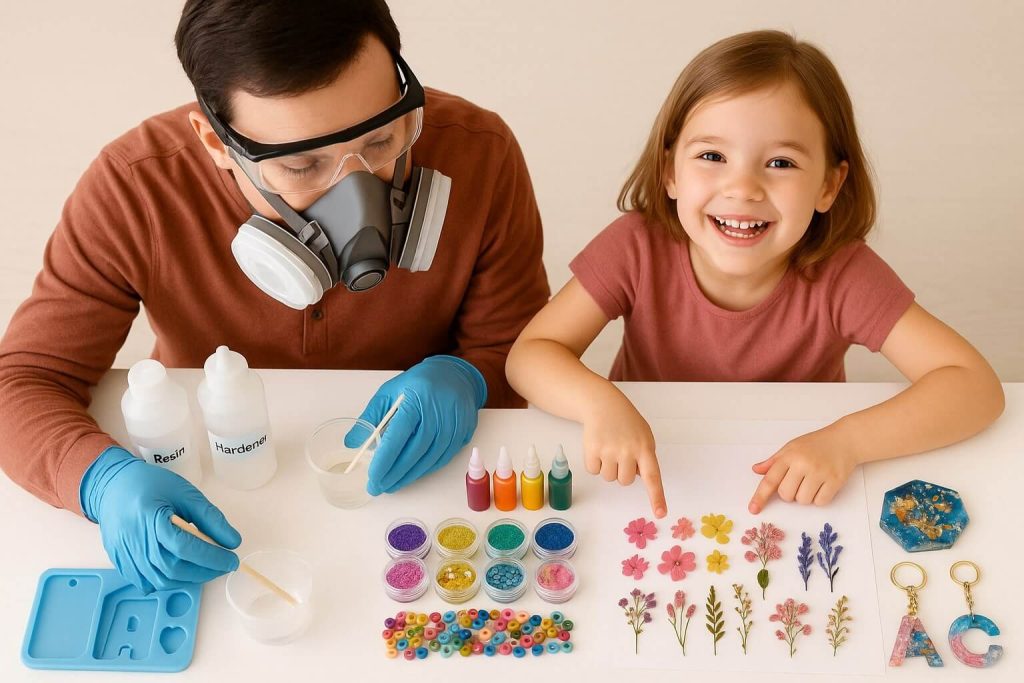
Picture this: Your child’s eyes light up as they watch a plain mold transform into a sparkling treasure filled with their favorite trinkets, glitter, and memories. The magic of creation is one of childhood’s greatest joys, and resin art offers a unique way to capture that wonder in lasting keepsakes. But here’s the thing – and we need to be crystal clear about this from the start – resin art projects for kids fundamentally differ from typical children’s crafts.
This guide exists for one crucial purpose: to show adults how to safely involve children in the joy of resin art while maintaining absolute control over all hazardous materials. This is an ADULT-LED activity where children participate only in specific, carefully controlled steps that pose no chemical risks.
CRITICAL SAFETY DISCLAIMER: Liquid resin (epoxy and UV types) and associated chemicals (hardeners, solvents) are hazardous materials children MUST NOT handle. All mixing, pouring, and chemical cleanup is an adult-only responsibility. No exceptions. Ever.
But don’t let that scare you away! With careful planning, strict adherence to safety protocols, and clear boundaries, you can share a modified, safe version of the resin art experience with children. Think of it like cooking together – kids can help choose ingredients and decorate the final product, but adults handle the hot stove and sharp knives. The same principle applies to safe resin art with children.
While this guide focuses on working safely with standard craft resins (epoxy and UV), you might also want to explore specialized “kid-specific resin craft kits” or “water-based resins” that may offer different safety profiles. However, adult control over all materials remains vital even with these alternatives.
Why Share Resin Art with Kids? The Joys (and Crucial Boundaries)
There are excellent reasons to involve children in children’s resin projects, always with proper supervision:
Sparking Creativity & Imagination: Children love choosing colors, picking out special items to preserve, and designing unique pieces. This creative decision-making is where they truly shine.
Developing Fine Motor Skills: Age-appropriate tasks like carefully placing dried flowers or small treasures (using tweezers, under close supervision) help build coordination and patience.
Creating Lasting Keepsakes: There’s something magical about making something permanent together – a tangible memory of time spent creating side by side.
Quality Bonding Time: Parent-child crafts activities like these spark meaningful conversations and create opportunities for shared accomplishments.
But let’s be clear about the non-negotiable boundaries:
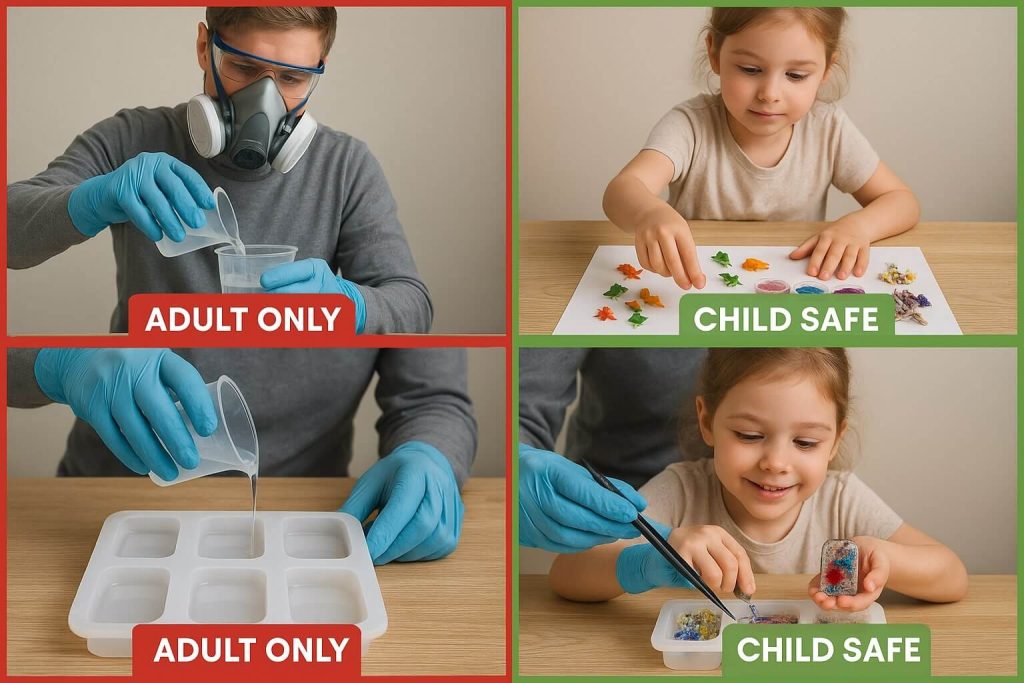
Adults Handle ALL Chemicals: This cannot be stressed enough. Mixing resin and hardener, pouring resin, adding liquid pigments, using UV lamps, and handling solvents for cleanup are all adult-only tasks. Period.
Children Participate Safely: Kids focus on the fun parts: choosing colors and decorations, arranging designs on paper first, placing items before resin is poured (with supervision), and decorating fully cured pieces.
This is NOT Independent Play: Adult supervised resin art means constant, active supervision. This isn’t a craft kids can do while you’re in another room. You’re the captain of this ship from start to finish.
The Golden Rules: INDISPENSABLE Safety for Resin Crafting with Children
These aren’t suggestions or guidelines—they are essential, non-negotiable rules for kid-friendly resin crafts. Consider this section your safety bible.
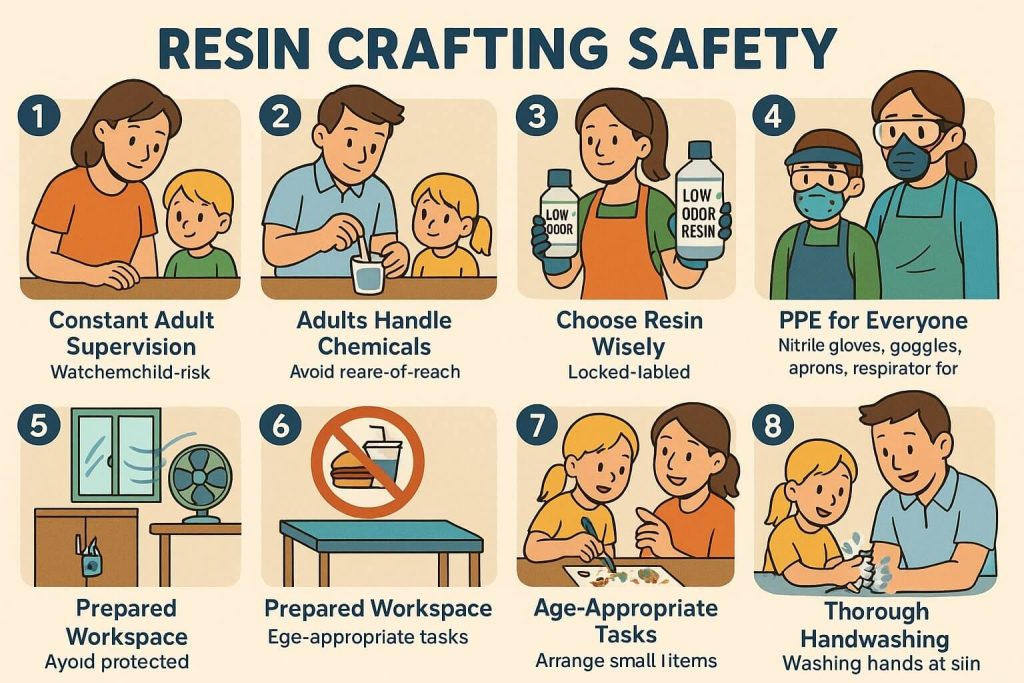
Rule #1: Constant, Active Adult Supervision – ALWAYS!
An adult must be present and attentive from setup to the final cleanup. Not just “nearby,” but actively supervising every moment children are involved or even near resin supplies.
Rule #2: Adults ONLY Handle Resin & Chemicals
Adult-only tasks include:
- Opening resin and hardener containers
- Measuring and mixing resin components
- Pouring liquid resin into molds
- Adding pigments or dyes to liquid resin
- Operating UV lamps for curing
- Using isopropyl alcohol or other solvents
- Disposing of all chemical waste
Why is this so crucial? Uncured resin can cause skin irritation, allergic reactions, and eye damage. The fumes can irritate respiratory systems, and some people develop severe sensitivities with repeated exposure.
Rule #3: Choose Your Resin Wisely (Adult Task)
While all resins require full safety precautions, adults should select products with the lowest possible odor and VOCs (Volatile Organic Compounds) when available. If using UV resin, remember that UV lamps pose additional hazards – children must never look directly at the light and should be kept at a safe distance during curing.
Rule #4: PPE is a MUST!
For the Supervising Adult:
- Nitrile Gloves: Essential protection. Why nitrile? They’re more resistant to chemicals than latex or vinyl alternatives.
- Respirator with Organic Vapor Cartridges: These are strongly recommended when mixing, pouring, and using solvents. They filter harmful fumes that simple dust masks cannot stop.
- Safety Glasses/Goggles: Protect against splashes and fumes.
- Apron/Old Clothes: Resin doesn’t wash out of fabric.
For Child Participants (during their limited, safe involvement):
- Well-fitting Nitrile Gloves: Even when only handling dry items, this prevents accidental contact with any residue.
- Safety Glasses (child-sized): Protects eyes from all hazards, not just chemicals.
- Apron or Old Clothes: Because accidents happen, and resin is permanent on fabric.
Rule #5: Excellent Ventilation is Key
Work in a well-ventilated area—open windows with cross-ventilation and an exhaust fan if possible. Keep children upwind of any fumes. Never work in small, enclosed spaces like bathrooms or closets.
Rule #6: NO Food or Drink in the Crafting Area
Absolutely no eating or drinking by anyone in the designated resin crafting zone. This prevents accidental ingestion of harmful materials.
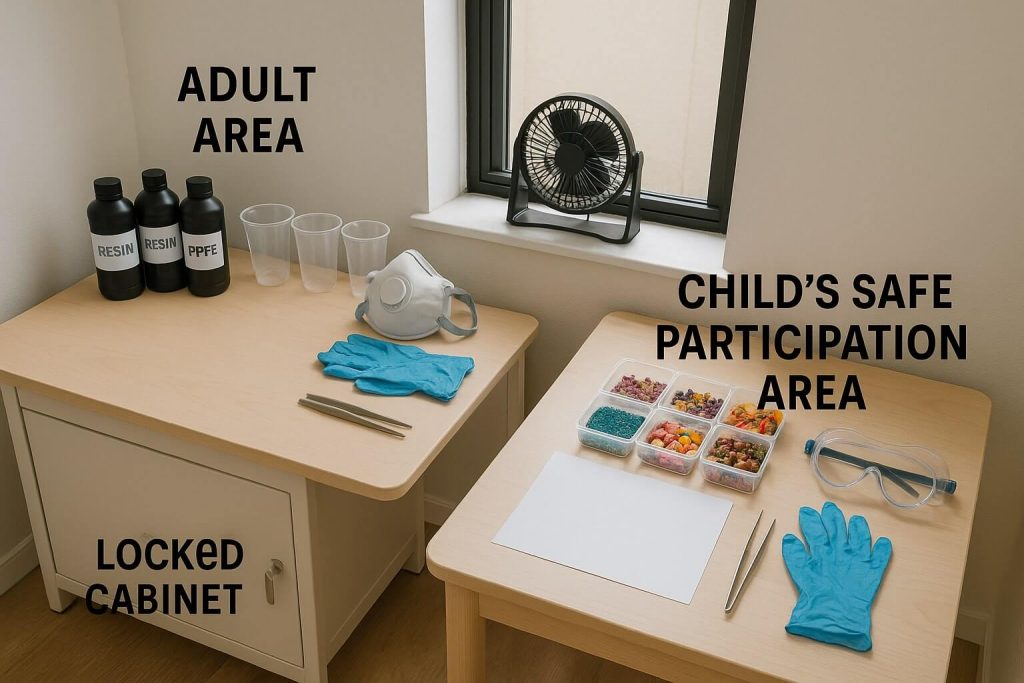
Rule #7: Prepare Your Workspace (Adult Task)
Cover all work surfaces with silicone mats, plastic sheeting, or parchment paper. Keep all resin supplies, mixing tools, and waste containers completely out of children’s reach when not in immediate supervised use. Secure storage is vital – think of a locked cabinet or high shelf.
Rule #8: Age-Appropriate Task Delegation
Adults must realistically assess what each child can safely do based on their age, maturity, and dexterity. A 6-year-old might only choose glitter colors, while a 12-year-old could carefully place flowers with tweezers under direct guidance.
Rule #9: Clear Communication & Safe Habits
Explain what’s happening in age-appropriate terms. Use precise language about “adult jobs” and “kid jobs.” Teach children never to touch their faces while crafting, even with gloves. Make safety habits part of the fun!
Rule #10: Thorough Handwashing Post-Crafting
Everyone must wash hands thoroughly with soap and water after crafting, even if gloves were worn. Make it a ritual – sing a handwashing song to ensure it’s long enough!
Kid-Friendly Resin Project Ideas (Adults Lead ALL Chemical Steps!)
Now for the fun part! Here are some fantastic easy resin ideas for kids that allow safe participation while adults handle all hazardous materials.
Project Example 1: Sparkling Treasure Embeds (Paperweights or Decorative Tiles)
Description: This clear resin block captures small toys, shells, dried flowers, or glitter—perfect for preserving special memories!
Materials:
- Epoxy resin & hardener (adult use only)
- Silicone molds (geometric shapes, hearts, stars)
- Small “treasures”: plastic figurines, clean shells, smooth pebbles, buttons, thoroughly dried flowers/leaves
- Glitter in various colors
- Mixing cups and stir sticks (adult use)
- Full PPE sets
Step-by-Step Instructions:
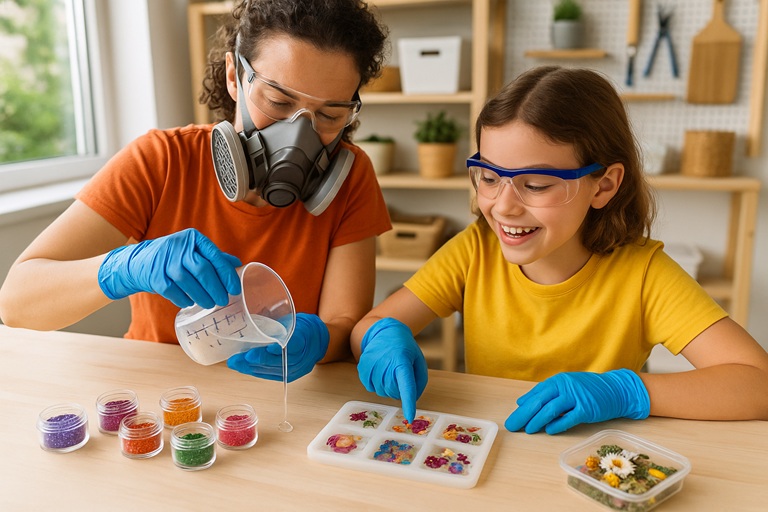
Adult: Put on your full PPE (gloves, respirator, safety glasses) and set up in your well-ventilated workspace, with all surfaces protected.
Child: Choose which treasures you want to preserve! Arrange them on a piece of paper to plan your design. This is where creativity blooms!
Adult: Mix the resin according to the manufacturer’s instructions. Remember to do this away from the child’s immediate area.
Adult: Pour a thin base layer of resin into the mold. Use a toothpick to pop any bubbles.
Child: Under close adult supervision, gently place your treasures onto the base layer with tweezers. The adult ensures no direct contact with wet resin occurs.
Adult: Carefully pour the remaining resin to cover all items completely. Move the mold to a secure curing location away from children’s reach.
Child (Once entirely cured – typically 24-48 hours later): Admire your treasure! If needed, help the adult gently clean the cured piece with soap and water.
Project Example 2: Personalized Keychains or Bag Tags
Description: Create a fun resin keychain project for kids with names, initials, or tiny embedded items—perfect for backpacks and lunch boxes!
Materials:
- Epoxy or UV resin (adult use only)
- Keychain molds (letters, simple shapes like hearts or stars)
- Glitter in favorite colors
- Mica powder for coloring (adult handles)
- Small plastic beads or alphabet beads
- Keychain hardware and jump rings (adult assembly)
- Full PPE sets
Step-by-Step Instructions:
Child: Pick out the letters to spell your name or choose your favorite glitter colors! Arrange them on paper to visualize your design.
Adult: Mix the resin. If adding mica powder for color, do this now while wearing full PPE.
Adult: Pour resin carefully into the keychain molds, filling them halfway.
Child: Tell the adult exactly where you want each letter or bead placed. Watch as they carefully position each item according to your design.
Adult: Pour the final layer of resin to cover all items. Cure according to instructions (UV lamp for UV resin, time-based for epoxy).
Adult: Remove from molds and attach keychain hardware securely once fully cured.
Child: Now you can help design extra decorations! With adult help, add beads or tassels to the keychain ring.
Project Example 3: Colorful Coasters with Natural Inclusions
Description: Design beautiful, functional coasters using pressed flowers and leaves – bringing nature indoors!
Materials:
- Epoxy resin (adult use only)
- Round or square coaster molds
- Thoroughly pressed and dried flowers/leaves (adult verifies dryness)
- Small polished pebbles or glass gems
- Optional: Glitter for extra sparkle
- Felt pads for coaster bottoms
- Full PPE sets
Step-by-Step Instructions:
Child: Help collect and choose the prettiest dried flowers and leaves! Arrange them on paper to plan each coaster’s design.
Adult: Prepare workspace and don PPE. Mix resin according to instructions.
Adult: Pour a thin base layer of resin into each coaster mold.
Child: Working alongside the adult, point out where each flower should go. The adult uses tweezers or a toothpick to position items precisely according to your design.
Adult: Pour the final resin layer, covering all plant elements comprehensively. Then, move to the curing area.
Child (After complete curing): Help stick felt pads on the bottom of each coaster to protect furniture. Admire how the flowers are preserved forever!
A Note on Decorating CURED Pieces
Once resin pieces are fully cured (completely hard with no tackiness or fumes – an adult must verify), children can often safely add extra decorations:
- Acrylic paints for adding details
- Permanent markers for drawing or writing (use in a ventilated area)
- Gluing on additional embellishments with child-safe craft glue
- Adding ribbon or string for hanging
This extends the creative fun while maintaining safety!
Setting Up Your Kid-Friendly (Adult-Controlled) Resin Station
Creating a proper workspace is crucial for safe resin art with children:
Dedicated Zone: Choose an area with excellent ventilation – near windows or in a garage with open doors. Avoid high-traffic areas where accidents are more likely.
Surface Protection: Layer your defenses! Start with plastic sheeting over tables and floors, then add silicone mats or parchment paper on top for easy cleanup.
Organized Supplies (Adult Responsibility):
- Store all chemicals in a locked cabinet or high-shelf
- Label everything clearly
- Keep mixing supplies separate from decorating supplies
- Have designated waste containers ready
Child’s Participation Area: Set up a spot where children can safely participate – close enough to see the magic happening but far enough from active chemical use. A small table adjacent to your work area works well.
Cleanup: An Adult-Only Responsibility (with Kid-Helper Options for Non-Hazardous Tasks)
Proper cleanup is just as important as safe crafting:
IMMEDIATE WET RESIN CLEANUP (ADULT ONLY):
- Wipe uncured resin from tools immediately with paper towels
- Use isopropyl alcohol (IPA) on paper towels for final cleaning – always wearing gloves and respirator
- Work in a well-ventilated area during chemical cleanup
DISPOSAL OF RESIN WASTE (ADULT ONLY):
NEVER pour liquid resin or solvents down the drain!
Paper Towels with Uncured Resin: Collect them in a plastic-lined bin. Allow the resin to fully cure before disposing of it in regular trash.
Leftover Mixed Resin: Pour into a disposable container and allow to cure completely solid before disposal.
Contaminated Solvents: Treat as hazardous waste. Check local regulations for proper disposal methods.
Empty Resin Bottles: Scrape out residue, attempt to cure any remainder, then dispose of it according to local regulations.
Child-Friendly Tidying:
Kids can help with safe cleanup tasks:
- Putting away dry embellishments
- Wiping down protected surfaces with damp cloths (after the adult removes all chemicals)
- Throwing away non-contaminated paper waste
- Organizing completed projects

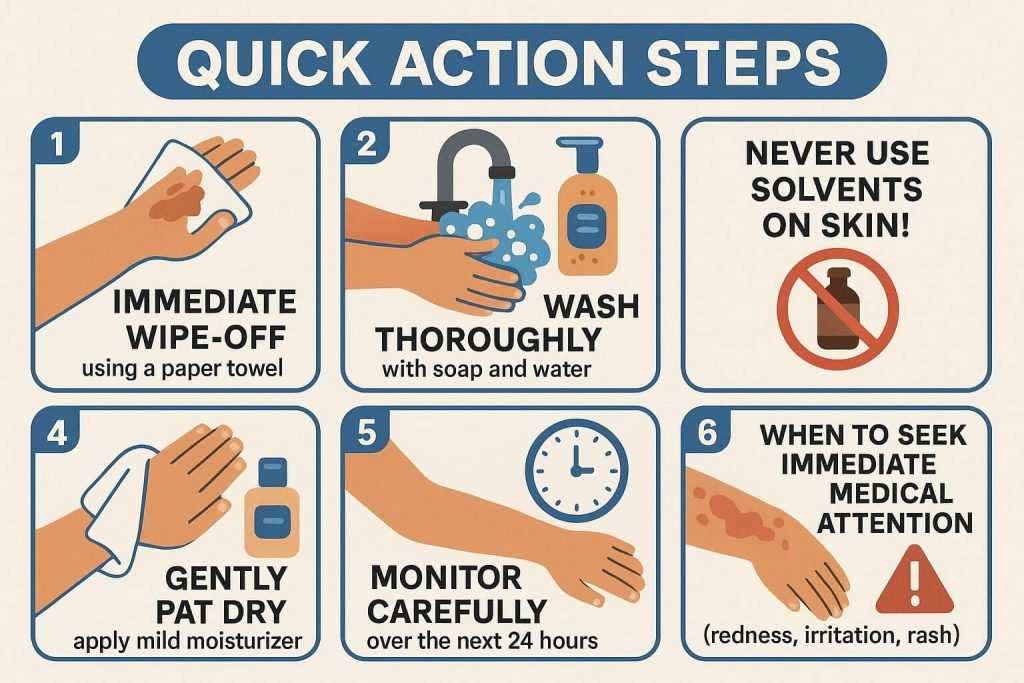
Uh-Oh! If Uncured Resin Touches a Child’s Skin (Adult Action Plan)
Despite the best precautions, accidents can happen. Here’s your action plan:
Stay Calm, Act Quickly.
Step 1: Immediately wipe off uncured resin using a clean paper towel or baby wipe.
Step 2: Wash the affected area thoroughly with soap and lukewarm water. Use an exfoliating soap or gentle scrub (sugar mixed with soap works well) to lift residue. Rinse extensively.
Step 3: CRITICAL: NEVER use solvents like isopropyl alcohol, acetone, or other harsh chemicals directly on a child’s skin. This can worsen irritation and increase the absorption of harmful substances.
Step 4: Gently pat the skin dry. Apply a mild, fragrance-free moisturizer if the skin seems dry or irritated.
Step 5: Monitor the area closely over the next 24 hours for any signs of redness, rash, itching, or irritation.
Step 6: If irritation develops or persists, if a large area is exposed, or if you have any concerns, contact a doctor or poison control center immediately. Have the resin product information available.
Prevention is Best: Diligent supervision and clear boundaries prevent most accidents. When in doubt, err on the side of caution!
Pro Tips for Happy & Safe Kid-Involved Resin Crafting
“Adults Prepare, Kids Participate” Mantra: Make this your guiding principle for every project.
Start Simple: Choose fundamental projects for your first adventures. Success builds confidence!
Embrace Imperfection: The goal is creative exploration and fun, not gallery-worthy perfection. Wobbly placement and color mixing “mistakes” often create the most cherished pieces.
Protect Clothing Thoroughly: Resin is permanent on fabric. Those old clothes? Make them your official “resin crafting outfit.”
Have the Adult’s Cleaning Kit Ready BEFORE Starting: paper towels, IPA, and a waste bin—all within arm’s reach but out of children’s reach.
Work in Stages: Pour resin one day and let kids decorate the cured piece another day. This reduces exposure time and maintains interest.
Talk About the Science (Age-Appropriate): Older kids love learning how resin “transforms” from liquid to solid through chemical reactions (that adults carefully manage).
Make it a Story: “This shell came from our beach vacation!” or “This flower is from Grandma’s garden!” Stories make projects more meaningful.
Conclusion
Resin art can be a delightful activity to share with children when approached with absolute dedication to safety, led entirely by a responsible adult who manages all hazardous materials and processes. The magic isn’t in letting kids do everything – it’s in finding safe, meaningful ways for them to participate in creating something beautiful together.
Remember, the joy comes from the shared creative process and the excitement of seeing ideas transform into lasting treasures, all within strict safety boundaries. Your careful preparation and constant supervision make these creative activities for children possible.
With these safety-first strategies, you’re ready to guide your little artist on some sparkling resin adventures! Your dedication to doing this right—prioritizing safety while nurturing creativity—transforms a potentially hazardous craft into an excellent opportunity for making memories. Here’s to many happy (and safe) crafting sessions ahead!
Remember: When it comes to DIY resin for kids, the “yourself” in “do-it-yourself” means the adult does all the hazardous parts while kids do the creative, safe parts. That’s the secret to success!
Happy (and safe) crafting! ✨
Other Articles
")
")