

Welcome to the mesmerizing world of resin art, where liquid transforms into glossy treasures, and your creative vision comes to life in stunning, three-dimensional form! If you’ve ever admired those gorgeous resin coasters, ethereal jewelry pieces, or vibrant art pieces and wondered, “Could I make that?” The answer is a resounding YES!
Starting a new craft—especially one involving chemicals like resin—can feel intimidating. Maybe you’re worried about getting the measurements wrong, dealing with sticky disasters, or wondering if you need a chemistry degree to understand all those technical terms. Take a deep breath and relax! This guide is your friendly companion to mastering basic resin art techniques, demystifying the process for both epoxy and UV resin basics.
With clear guidance and practice, anyone can master these foundational skills and enjoy the creative journey. Think of this as your trusted friend who’s been there made the mistakes, and is now excited to share all the secrets to success!
A Note on Epoxy vs. UV Resin for Basic Techniques: While many principles apply to both resin types throughout this guide, I’ll highlight the critical differences a beginner should know. For example, when discussing mixing resin, remember that epoxy requires mixing two parts, while UV resin is a single-part system ready to use. When discussing curing resin, epoxy cures through a chemical reaction over 24-72 hours, while UV resin cures in minutes under UV light. For resin casting for beginners, epoxy is often used for larger projects or deeper pours (in layers), while UV resin is ideal for small pieces, jewelry, and thin layers that need a fast cure.
Why Choose Resin Art? The Magic of a Creative Hobby
Resin art offers something truly special that sets it apart from other crafts:
- Incredible Versatility: From delicate jewelry to stunning decorative objects and abstract art, resin adapts to virtually any creative vision.
- Glossy, Glass-Like Finish: Creates pieces with a professional and elegant look that never fails to impress. That mirror-like shine is addictive!
- Endless Customization: By coloring resin with pigments, mica powders, and alcohol inks and embedding objects in resin (dried flowers, glitter, photos, shells, and more), every piece becomes uniquely yours.
- A Satisfying Process: From the meditative mixing to watching bubbles disappear to the magical moment of demolding, it’s a captivating experience that engages all your senses.
- Unique, Personalized Gifts are perfect for creating memorable presents that show you’ve put real thought and effort into something special.
Your Essential Creative Toolkit: Gearing Up for Resin Art!
Before we dive into creating, let’s discuss the beginner resin supplies that will make your resin journey smooth and enjoyable. Don’t worry—you don’t need everything at once! Start with the basics and build your collection as you grow.
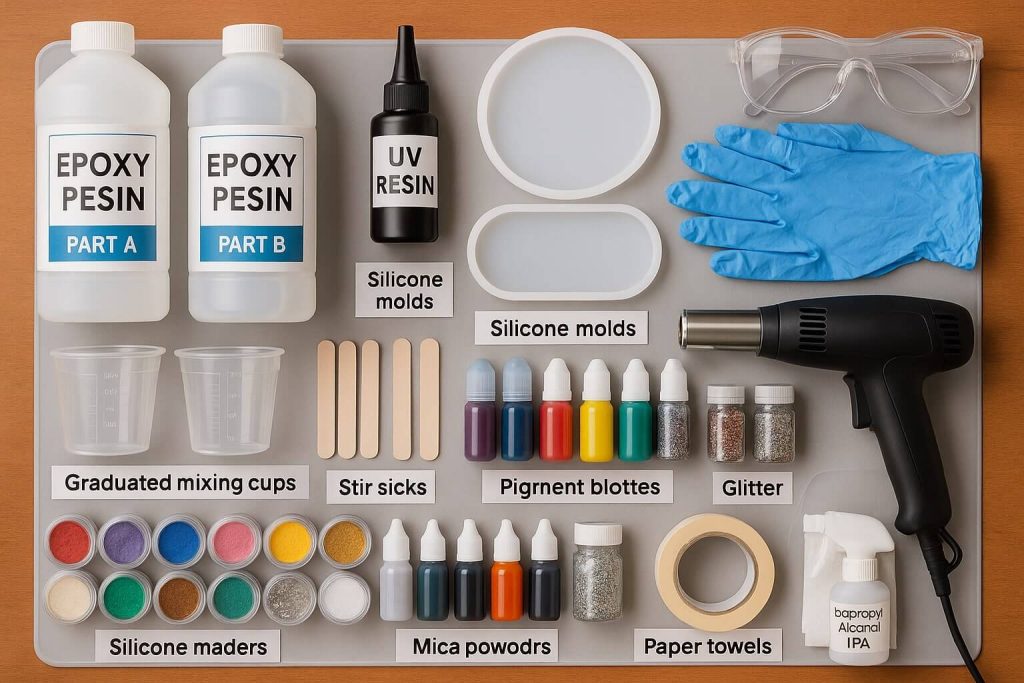
Types of Resin:
- Epoxy Resin: This is a two-part system consisting of resin (Part A) and hardener (Part B) that must be mixed in specific ratios (like 1:1 or 2:1). Different types exist for different purposes—casting resins for molds, coating resins for resin doming, and deep-pour resins for thick projects. For beginners in resin art, I recommend starting with a medium-viscosity casting resin with a 30-45-minute working time.
- UV Resin: This single-part resin comes ready to use and cures quickly under UV light (either from a UV lamp or strong sunlight). It’s perfect for small jewelry-making projects and situations where you want immediate results. No mixing is required!
Resin Colorants:
- Opaque and Transparent Liquid Pigments: These give you solid colors (opaque) or stained-glass effects (transparent). A few drops go a long way!
- Mica Powders: These magical powders create pearlescent, metallic, and shimmering effects that catch the light beautifully.
- Alcohol Inks create stunning “petri dish” effects, cells, and vibrant, translucent colors. Warning: Use very sparingly—too much can prevent proper curing!
- Pigment Pastes: Highly concentrated for intense opaque colors. A toothpick’s worth can color an entire batch.
- (Optional) Glitter, Metallic Flakes: These are used to add texture and special sparkly effects.
Molds:
- Silicone Molds: Silicone molds are the most popular resin molds due to their flexibility and ease of demolding. Choose simple shapes like coasters, keychains, or basic geometric forms for your first resin project.
- (Optional) Tapes and Open-Backed Bezels: Great for creating pendants and free-form jewelry shapes.
Mixing & Measuring Tools:
- Graduated Mixing Cups: Use plastic (polypropylene/PP) or reusable silicone cups with clear measurement markings. These cups are essential for accurately measuring resin.
- Stir Sticks: Wood, plastic, or silicone sticks for thorough mixing.
- Digital Scale (Optional but Recommended): For resins measured by weight or when you want extra precision.
Application & Manipulation Tools:
- Silicone or Plastic Spatulas: Perfect for spreading resin or creating artistic effects.
- Toothpicks or Needles: Your best friends for guiding resin into small details and removing bubbles from the surface.
- Pipettes (Optional): Handy for precisely dosing small amounts of resin or colorants.
Safety Gear (Never Skip This!):
- Nitrile gloves: Mandatory! Protect your skin from uncured resin.
- Safety glasses: Shield your eyes from splashes.
- Respirator mask with organic vapor cartridges: Strongly recommended for proper ventilation, especially with epoxy resin.
Other Useful Supplies:
- Silicone Mat or Plastic Sheeting: Protect your work surface—cured resin is nearly impossible to remove!
- Heat Gun or Long-Lighter: This heat gun removes bubbles (use with extreme caution).
- UV Lamp: Essential for curing UV resin basics projects.
- Paper Towels and Isopropyl Alcohol (IPA): For cleaning tools and spills of uncured resin.
- Masking Tape: To protect edges or create clean lines.
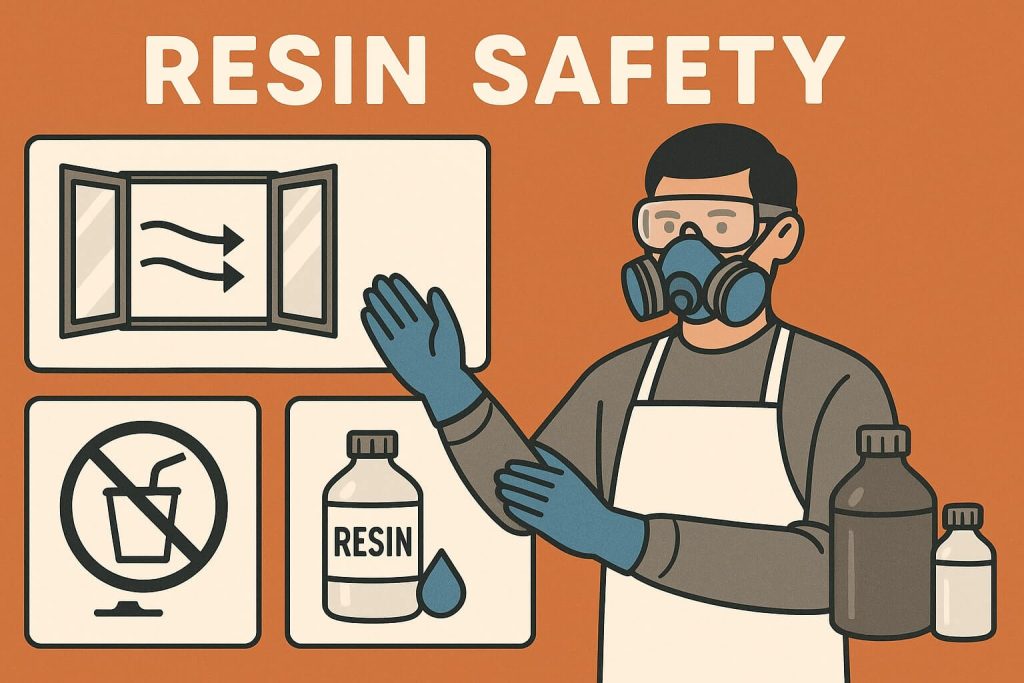
Safety First: The Golden Rules of Resin Crafting!
Remember that resin safety isn’t optional—it’s the foundation of enjoyable crafting! These aren’t scary rules to discourage you; they are your roadmap to years of happy, healthy creating.
Personal Protective Equipment (PPE) – Your Best Friends:
- Nitrile Gloves: MANDATORY! Not latex, not vinyl—nitrile. They provide the best chemical resistance. Change them if they tear or after prolonged contact with solvents. Think of them as your magical barrier against sticky situations!
- Safety Glasses: Your eyes are precious! Protect them from accidental splashes of resin or cleaning agents.
- Respirator Mask with Organic Vapor Cartridges: This is strongly recommended, especially when working with epoxy resin. It isn’t a dust mask—it’s specifically designed to filter chemical vapors. Your lungs will thank you!
- Protective Clothing: Wear long sleeves and clothes you won’t cry over if they get resin on them. An apron is your wardrobe’s best friend.
Proper Ventilation – Clean Air, Clear Mind:
- Always work in a well-ventilated space. Open those windows, use a fan to direct fumes away from you, and let fresh air be your crafting companion.
- Avoid working in small, enclosed spaces like closets or tiny bathrooms. Your craft room should breathe as freely as your creativity!
Safe Material Handling:
- Always read the Safety Data Sheets (SDS/MSDS) that come with your resins and colorants. They’re not bedtime reading, but they contain vital information!
- Keep resin and hardener containers tightly sealed when not in use. Treat them like delicate perfume—precious and potent.
- Avoid skin contact with uncured resin. If it happens, clean immediately with soap and water. Never use solvents directly on your skin!
- No snacking or sipping in your workspace. Keep food and drinks far away from your resin area.
- This is an adults-only zone—keep materials away from children and pets.
Resin Waste Management:
Responsible disposal of resin waste (liquid resin, contaminated wipes, empty containers) is part of being a conscientious crafter. Follow local regulations and manufacturer instructions. Mother Earth appreciates your efforts!
The Creative Process: From Idea to Finished Object
Understanding Resin Types: Epoxy vs. UV – What to Choose as a Beginner?
Let’s demystify these two resin types so you can choose the perfect partner for your projects!
Epoxy Resin – Essential Basics:
Key Characteristics: Epoxy is like a dynamic duo—resin (Part A) and Hardener (Part B)—that must be mixed in precise ratios. Typical ratios are 1:1 or 2:1 by volume or weight. Always read the label! Getting this wrong is like baking a cake with the wrong amount of flour—it just won’t work.
Pot Life (Working Time): This is your window of opportunity—when your mixed resin stays liquid and workable. For beginners, choose a resin with a 30-45-minute pot life. This gives you breathing room without feeling rushed.
Curing Process: Epoxy cures through an exothermic reaction (fancy term for “it creates heat”). Full cure takes 24-72 hours, depending on temperature, humidity, and pour thickness. Patience is your virtue here!
Typical Beginner Applications: Coasters, small decorative trays, jewelry in resin molds, coating small surfaces, resin casting for beginners in thin layers.
UV Resin – Essential Basics:
Key Characteristics: UV resin is the “instant gratification” option—it comes ready to use, and no mixing is required! It only cures when exposed to UV light, giving you unlimited working time in standard lighting.
Working Time: You can perfect your piece if you keep it away from UV light.
Curing Process: Lightning fast! A few minutes under a UV lamp and voilà—solid resin. Perfect for layering resin in thin applications.
Typical Beginner Applications: small jewelry-making projects (pendants, earrings), resin doming on cabochons, sealing small items, and quick fixes. Remember: UV resin needs a transparent mold if casting so the light can reach all areas.
Beginner Recommendation: Both have their superpowers! Epoxy with a medium pot life is forgiving for first resin casting for beginners’ experiments in molds, while UV resin is fantastic for fast, small projects. Why not try both?
Prepping Your Workspace: A Clean and Organized Studio
A well-prepared workspace is half the battle won! Here’s how to set yourself up for success:
Choose the Right Location: Find a space with proper ventilation, away from high-traffic areas, curious kids, and pets. Aim for a stable temperature (ideally 70-77°F / 20-25°C)—resin can be a diva about temperature!
Protect Your Surfaces: Cover your worktable with a silicone mat or heavy-duty plastic sheeting. Scraping cured resin off your grandmother’s antique table is not how you want to spend your weekend!
Level Your Surface: This is CRUCIAL! Use a bubble level to ensure your surface is perfectly flat. A level surface prevents your resin from creating an unwanted slope in your masterpiece.
Organize Your Materials: Before mixing, lay out all your beginner resin supplies and tools within easy reach. Include your safety gear, paper towels, and waste container. Think of it as a mise en place—but for resin artists! Having everything prepped and ready makes the whole process smoother and more enjoyable.
Good Lighting: You need to see those sneaky bubbles! Ensure adequate lighting to catch every detail.
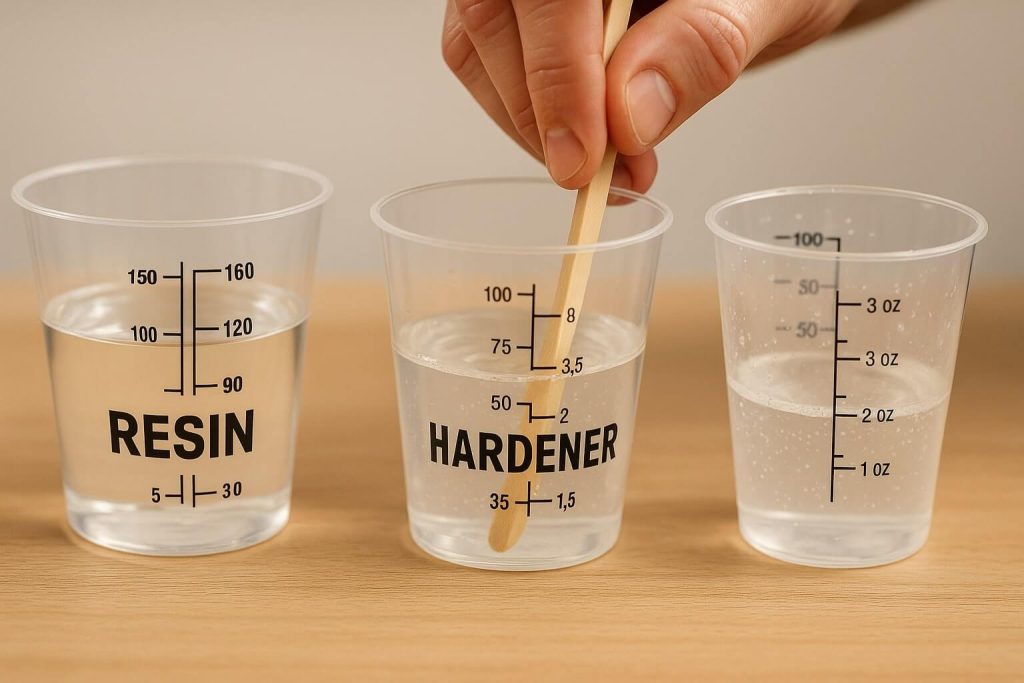
Measuring & Mixing Epoxy Resin Correctly: The Secret to a Perfect Project
This is THE MOST IMPORTANT STEP for success with epoxy resin basics. No pressure, but get this right, and you’re set up for success!
Step 1: Read the Manufacturer’s Instructions! I know I know—reading instructions isn’t thrilling. But every resin is unique, like a fingerprint. Check that mix ratio by volume or weight and note the pot life.
Step 2: Measure Precisely (Measuring Resin):
- Use clean, dry mixing cups with clear markings.
- Pour Part A (resin) first, then Part B (hardener) in exact amounts
- For volume measurements, read at the bottom of the meniscus (the curve of the liquid)
- Pro tip: Some artists measure components in separate cups and then combine them in a third cup for mixing—extra insurance against mistakes!
Step 3: Mix Thoroughly (Mixing Resin):
- Combine the two parts and start stirring slowly—this isn’t a race!
- Scrape the sides and bottom repeatedly. Unmixed resin = sticky disaster
- Mix continuously for 3-5 minutes until completely clear with no streaks.
- “Double Potting” Tip: Pour your mixed resin into a fresh cup and mix again for another minute. This eliminates any unmixed resin clinging to the sides.
Step 4: Waiting Time (Optional): Some resins benefit from a 5-10 minute rest after mixing to let bubbles rise. Check your manufacturer’s recommendation.
Note for UV Resin: Skip all this mixing drama—it’s ready to use straight from the bottle!
Intro to Coloring Resin: Bringing Your Creations to Life!
It’s time for the fun part—adding color! Remember to use resin-compatible colorants only and not exceed 2-6% of the total resin volume. Too much colorant can prevent proper resin curing.
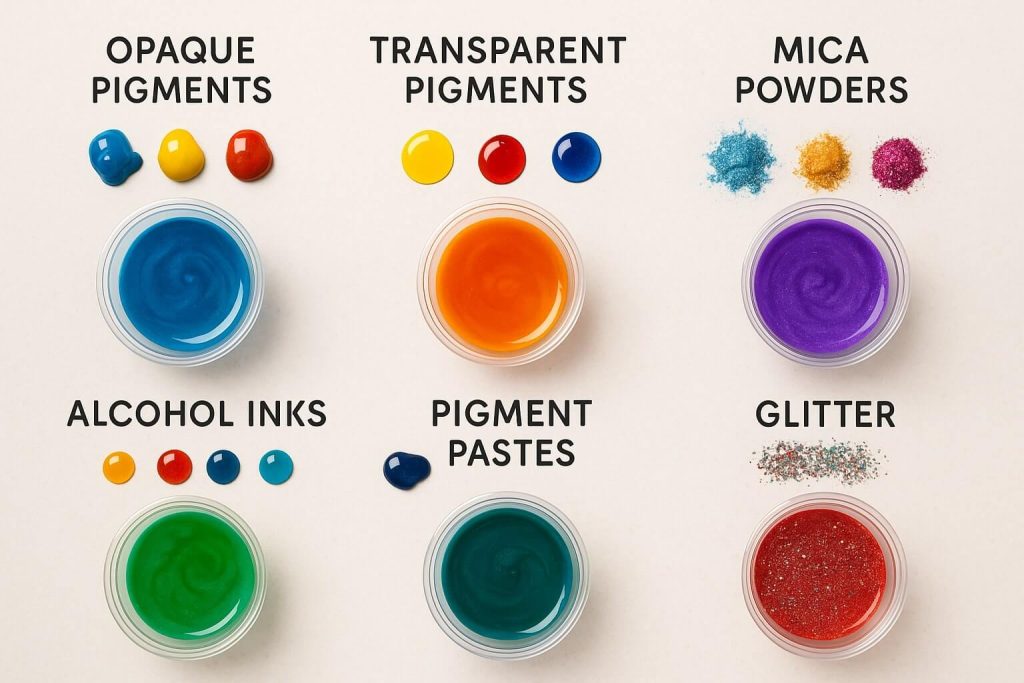
Basic Types of Colorants and How to Use Them (Coloring Resin):
Liquid Pigments (Opaque & Transparent):
- Add drops to mixed resin and stir well
- Start small—you can always add more!
- Opaque = solid colors; Transparent = stained glass effect
Mica Powders:
- Add small amounts to mixed resin
- Mix thoroughly to avoid clumps
- Creates gorgeous metallic, pearlescent effects
Alcohol Inks:
- Drop directly into poured resin for “petri dish” effects
- Or mix tiny amounts for vibrant, translucent colors
- WARNING: Use very sparingly—too much prevents curing!
Pigment Pastes:
- Super concentrated—a toothpick tip is often enough
- Mix very well for rich, opaque colors
(Optional) Glitter, Flakes, Dried Flowers (Embedding Objects in Resin):
- Add to mixed resin or directly to the mold
- Ensure items are dry to avoid bubbles
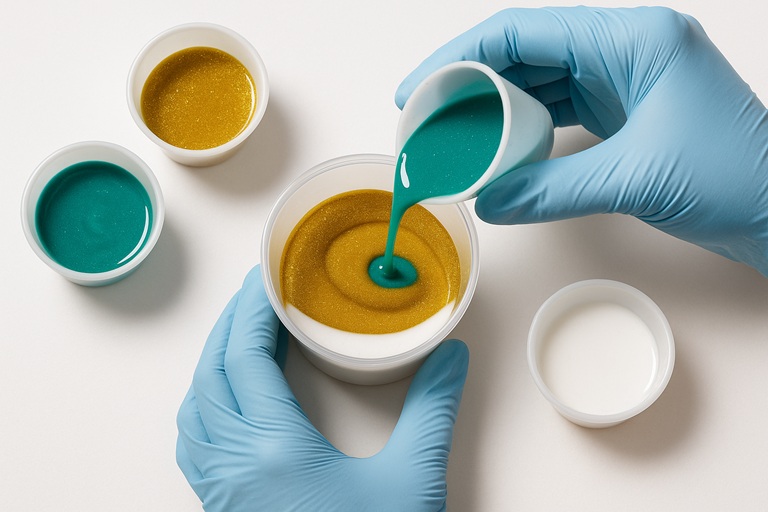
Simple Color Mixing Techniques:
- Single Color: Perfect for your first resin project—simple and elegant
- Separate Colors: Pour different colors into different mold sections
- Simple Marble Effect: Pour colors next to each other and gently swirl with a toothpick. Don’t overmix!
Pro-Tip: Always test colorants on a small resin batch first. Better safe than sorry!
Fundamental Pouring Techniques: Giving Shape to Your Ideas (Resin Casting for Beginners)
Now we’re getting to the heart of resin art for beginners—the pour!
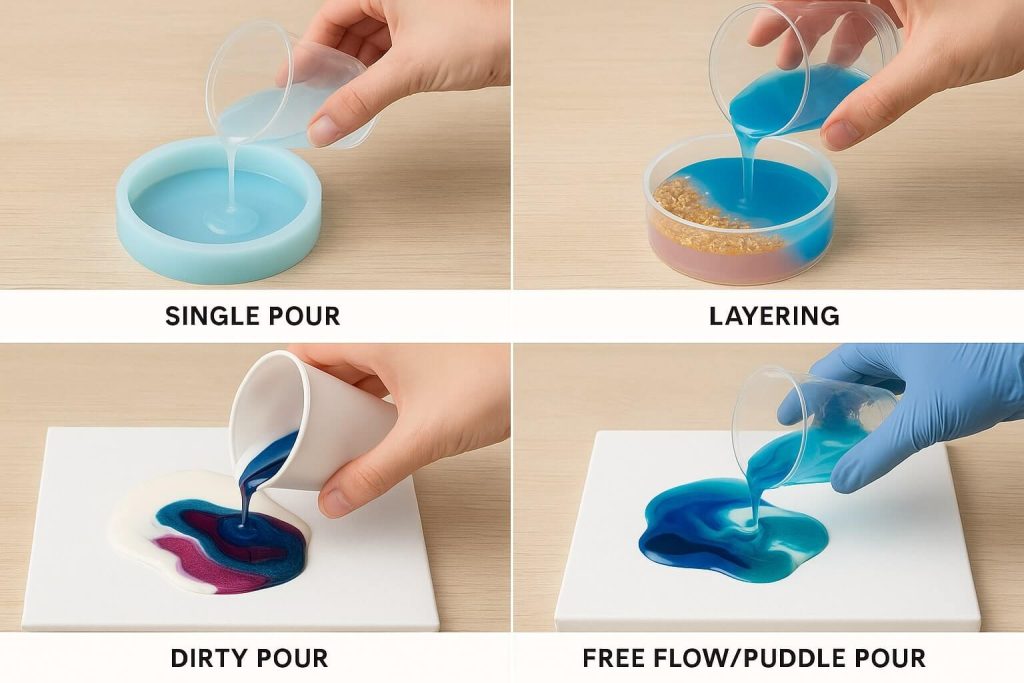
Single Pour into a Mold: This is the most straightforward technique for beginners. Pour your mixed resin slowly into resin molds, starting at one spot and letting it self-level. Fill to the desired level without overfilling.
Layering Resin: Perfect for creating depth and embedding objects in resin:
- Pour a thin first layer
- Let it reach the “gel” stage (tacky but not liquid)
- Add objects or the next color layer
- For UV resin basics, cure each layer under the lamp
- For epoxy resin basics, wait the recommended time between layers
Intro to Dirty Pour (Simplified):
- Prepare several cups with different colored resin
- Pour colors one by one into a larger cup WITHOUT stirring
- Pour the combined colors into your mold for organic patterns
Free Flow / Puddle Pour: Great for epoxy art on canvas or wood:
- Pour colors directly onto a prepared surface
- Tilt or use air movement to blend colors
- Use raised edges or tape to control the flow
Pro-Tip: Always pour slowly from a low height to minimize bubbles in the resin.
The Beginner’s Nightmare: Eliminating Air Bubbles
Don’t panic! Every resin artist battles bubbles. Here’s your arsenal for removing bubbles:
Prevention is Key:
- Mix resin slowly and deliberately
- Warm sealed resin bottles in warm water before mixing (reduces viscosity)
- Ensure embedded objects are bone-dry
- Pour slowly and close to the surface
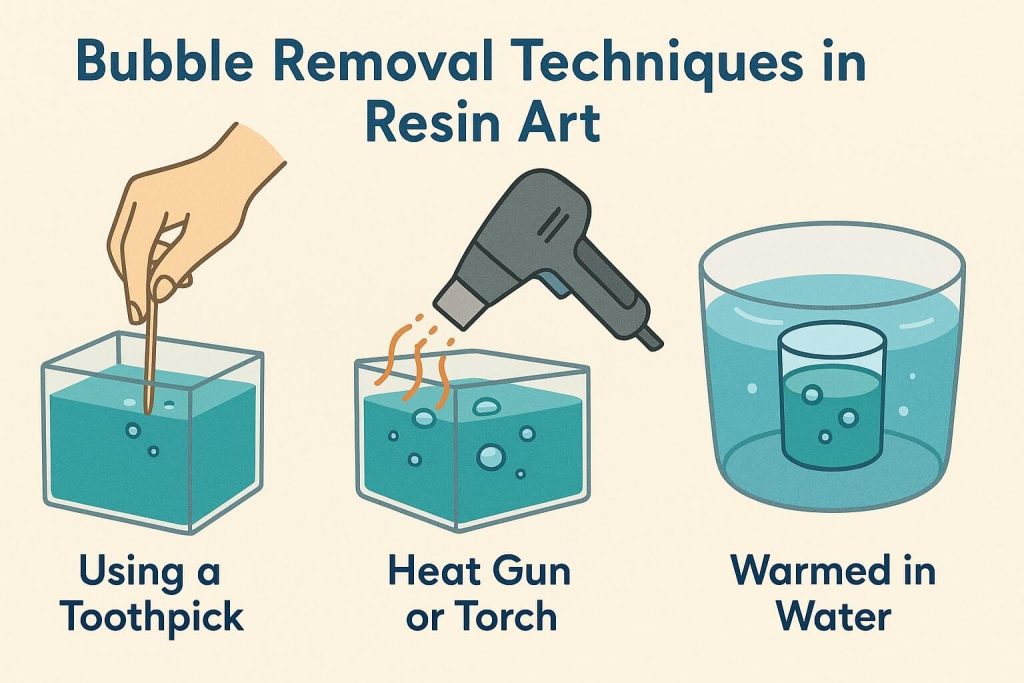
During and After Pouring:
- Toothpick or Needle: Pop large surface bubbles manually
- Heat Gun: Use with EXTREME CAUTION! Quick passes only; keep several inches away. Don’t use on thin plastic molds!
- Torch Lighter: Even more caution is needed! Move quickly to avoid burning
- Bubble Remover Spray: Follow manufacturer instructions carefully
- For UV Resin: Take advantage of unlimited working time to remove bubbles before curing
Pro tip: Check your piece after 5 minutes and again after 15-20 minutes—sneaky bubbles keep rising!
Patience & Resin: The Curing Process
The waiting game begins! But good things come to those who wait.
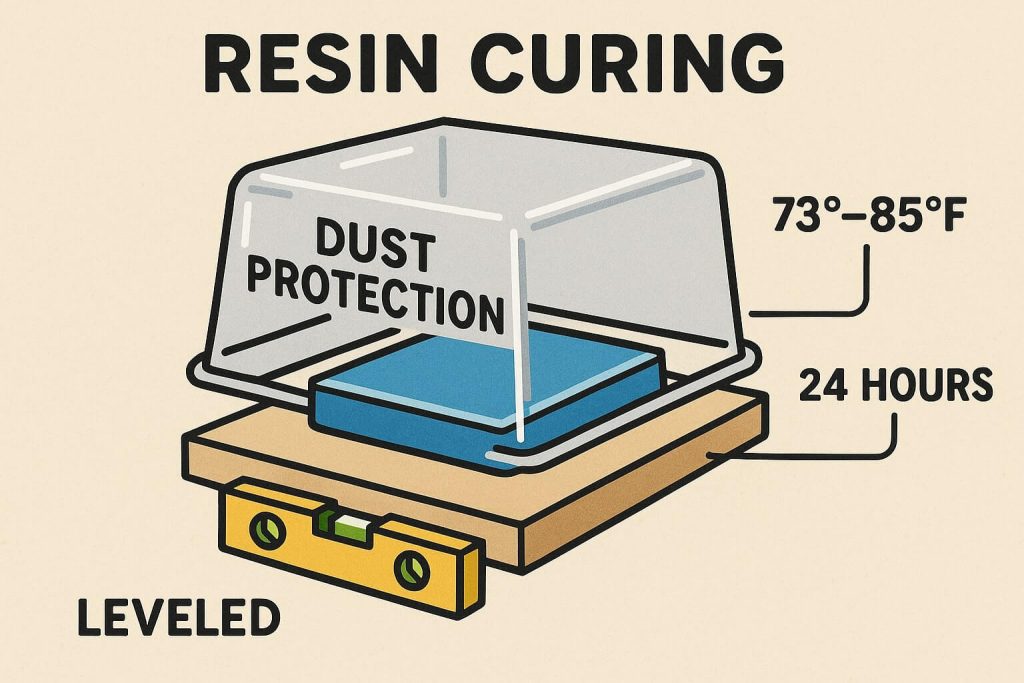
For Epoxy Resin (Curing Resin):
- Cure Time: 24-72 hours for complete cure (check your resin’s instructions)
- Optimal Conditions: Steady temperature (70-77°F), low humidity, level surface, dust-free environment
- Covering the Piece: Use a clean box or makeshift cover to protect from dust. Don’t let the cover touch the resin!
- Demolding: Wait for FULL cure time before removing from resin molds. Premature demolding = fingerprints and warping
For UV Resin (Curing Resin):
-
- Proper UV Lamp Use: Position the lamp close without touching
- Cure in stages for thick pieces
- Some pieces need curing on both sides.
- Cure Time: Usually 1-5 minutes per layer
- UV Lamp Safety: Never look directly at UV light. Use UV-blocking glasses if recommended.
Your First Masterpieces: Simple and Satisfying Project Ideas
Ready to create? Start with these confidence-building projects using basic resin art techniques:
- Coasters are perfect for experimenting with resin coloring and simple effects. For classic shapes, use square or round molds.
- Keychains: Small molds in letters, shapes, or themes. Quick projects with usable results!
- Simple Pendants and Earrings: Try embedding objects in resin like fine glitter or tiny dried flowers. UV resin excels at resin doming for jewelry.
- Fridge Magnets: Similar to keychains—add a magnet to the back after curing.
- Simple Bookmarks: Long, thin molds decorated with alcohol inks or mica powders.
Pro tip: Your first attempts might not be perfect—that’s fine! Every “oops” teaches you something valuable.

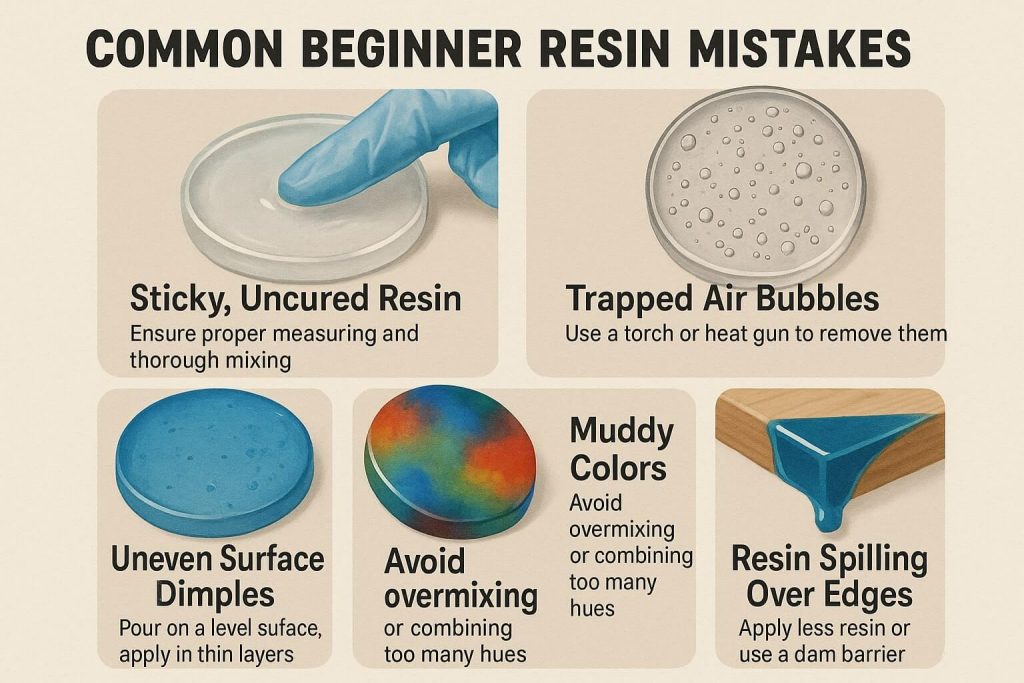
Resin SOS: Troubleshooting Common Beginner Issues (Fixing Resin Mistakes)
Mistakes happen to everyone—even pros! Here’s how to handle common issues:
Problem: Sticky or Uncured Resin
Possible Causes: Wrong ratio, insufficient mixing, temperature too low, high humidity, too much colorant, expired resin Solutions:
- Double-check measurements and mixing for future projects
- Move the piece to a warmer location
- Apply a thin top coat of properly mixed resin if only the surface is tacky
- Learn and move forward if severely compromised
Problem: Too Many Trapped Air Bubbles (Bubbles in Resin)
Possible Causes: Vigorous mixing, cold/thick resin, fast pouring, unsealed porous objects Solutions: Review bubble prevention techniques, warm resin before mixing, pour slowly, use a heat gun carefully
Problem: Uneven Surface, Dimples, or Blemishes
Possible Causes: Unlevel surface, dust during cure, uneven shrinkage Solutions: Check surface level, always cover curing pieces, try light sanding resin and recoating for minor issues
Problem: Unintentionally Mixed “Muddy” Colors
Possible Causes: Over-mixing in mold, incompatible colors, resin too fluid Solutions: Use lighter touch for effects, let layers partially cure for separation, choose harmonious colors
Problem: Resin Spilling Over Mold Edges
Possible Causes: Overfilling Solutions: Fill gradually, leave space below rim—resin self-levels and can be deceptive!
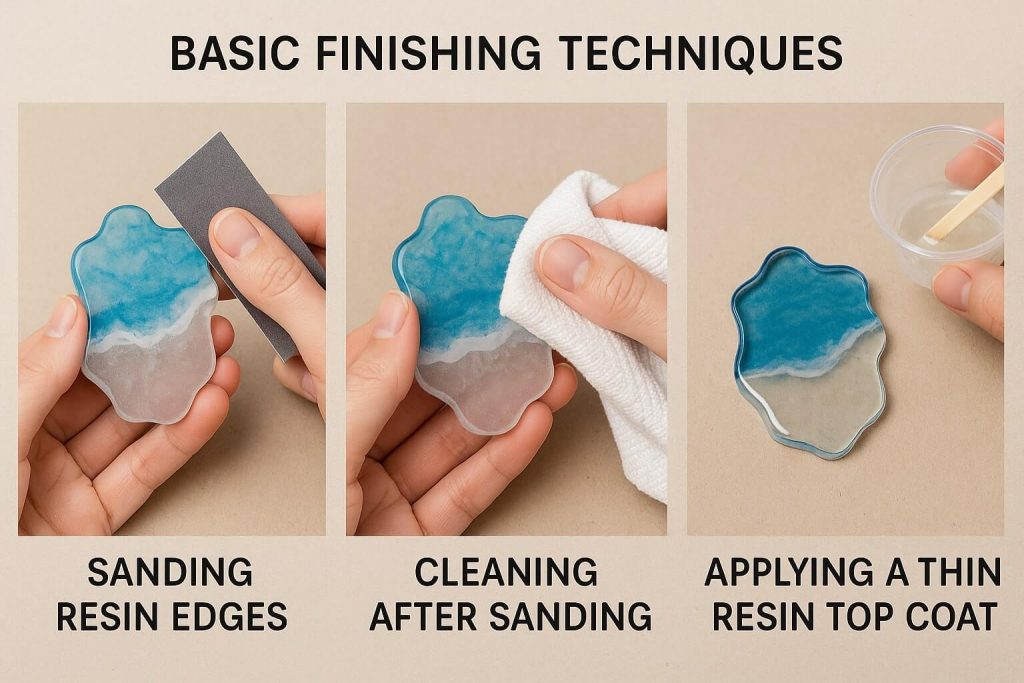
A Touch of Perfection: Basic Finishing (Optional)
Many beginner pieces are perfect straight from the mold, but for extra polish:
Sanding Sharp Edges (Sanding Resin):
- Use fine-grit sandpaper (wet or dry)
- Start coarse, finish fine
- Clean thoroughly after sanding
Applying a Top Coat or Doming:
- Restores shine after sanding
- Creates professional dome effect on jewelry
- Apply a thin layer of fresh resin
- UV resin excels at resin doming for control
Pro Tips for a Successful Start in Resin Art
Here’s my accumulated wisdom to smooth your learning curve:
- Start Small and Simple: Rome wasn’t built in a day, and neither are resin skills. Master basics before attempting complex projects.
- Don’t Fear Mistakes: They’re not failures—they’re lessons! Fixing resin mistakes is a valuable skill.
- Experiment Gradually: Slowly add new elements once you’ve mastered basic resin art techniques.
- Keep a Resin Journal: Document resin type, ratios, colorants, temperatures, and results. Your future self will thank you!
- Watch Tutorials and Get Inspired: Join the online resin community! Search for resin art and resin casting for beginners for endless inspiration.
- Invest in Quality Supplies (As You Progress): Start affordable with beginner resin supplies and upgrade as you grow.
- Clean Your Tools Immediately: Uncured resin cleans easily—cured resin requires a chisel!
Conclusion
You’ve just absorbed a treasure trove of knowledge about resin safety, proper measuring and mixing, bubble control, and curing resin. These basic resin art techniques are your foundation for endless creative adventures.
Remember, every expert was once a beginner who refused to give up. You’re now equipped with the knowledge to begin your fascinating journey into the world of resin art. Embrace the learning process, celebrate small victories, and don’t be afraid to get messy (safely, of course!).
You are now ready to create magic with resin. Have fun, experiment boldly, and let your creativity flow as freely as the resin! Craft with confidence and enjoy every unique piece you bring to life!
Happy creating, resin artist!
Other Articles
Resin Art in a Small Space: The Complete Guide
