

How to Start Resin Art for Beginners: A Comprehensive Guide
This guide will show you exactly how to start resin art for beginners. We will cover everything from essential supplies and safety to mastering your first pour, ensuring you can create beautiful pieces right from the start.
Resin art has become popular among beginners because it offers achievable results with endless creative freedom. Unlike many crafts that require years to master, resin art provides that “wow factor” relatively quickly, making it perfect for those seeking immediate gratification in their creative pursuits. Whether you are drawn to the therapeutic process or just excited about creating unique, functional art, this guide will show you how to start resin art confidently.
As a beginner, you can create beautiful and functional items like glossy coasters that protect your furniture in style, personalized keychains that make perfect gifts, simple jewelry pieces rival boutique finds, and decorative magnets that brighten any space. Once you understand the basics of epoxy resin, the possibilities are endless.

This comprehensive guide will cover everything you need to know to begin your resin art journey safely and successfully. From understanding what resin is and gathering essential supplies to mastering your first pour and troubleshooting common mistakes, consider this your roadmap to becoming a confident resin artist.
Understanding Resin: The Basics
What is Epoxy Resin? (Part A & Part B Explained)
At its core, epoxy resin is a two-component system that creates magic through chemistry. Part A is the resin itself—a thick, honey-like liquid that contains the polymer base. Part B is the hardener (also called catalyst)—the component that triggers the chemical reaction. When you combine these two parts in the correct ratio, they undergo an exothermic reaction (meaning they generate heat) and transform from a liquid into a durable, crystal-clear solid.
This transformation isn’t just mixing—it’s a molecular-level change where the components cross-link to create a robust, glossy material. The beauty of this process is that once fully cured, the resin becomes waterproof, heat-resistant (to a degree) and maintains its brilliant shine for years.

Key Resin Terminology for Beginners
Before diving into your first project, let’s decode some essential resin vocabulary:
- Curing is the hardening process where liquid resin transforms into solid plastic. It’s not drying—it’s a chemical reaction that continues even after the resin feels solid to the touch.
- Working Time (Pot Life): Once you mix Parts A and B, you can work with the resin before it thickens and becomes unusable. This timeframe typically ranges from 20 to 45 minutes, depending on the resin type and temperature.
- Viscosity refers to how thick or thin your resin flows. Low-viscosity resin is thinner and flows easily (great for coating), while high-viscosity resin is thicker (better for doming or controlled applications).
- Demolding is the satisfying moment when you remove your fully cured resin piece from its mold. Timing is crucial—too early, and it might bend or stick; too late isn’t harmful but can make removal more difficult.
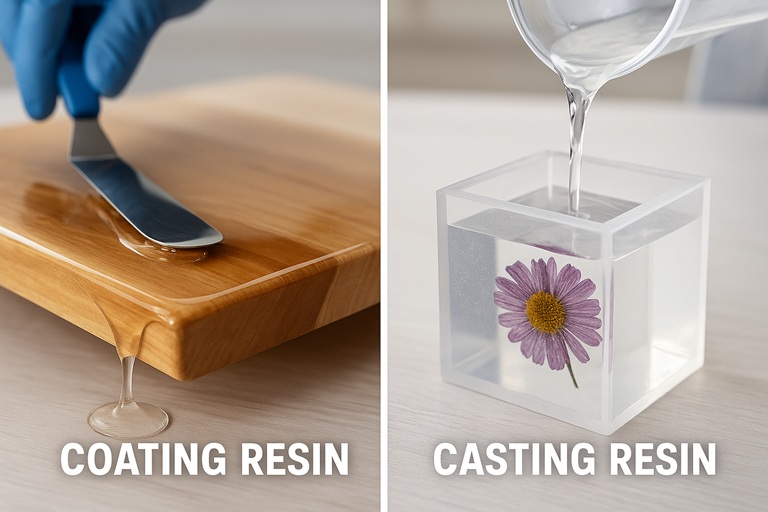
Types of Resin for Art: Coating vs. Casting Resin – Which to Choose?
Understanding the difference between coating and casting resins is crucial for beginner resin crafts success:
Coating Resins are designed for thin layers (typically up to 1/8 inch per pour). They cure quickly, self-level beautifully, and are perfect for covering surfaces like artwork or tabletops or creating a protective layer over photos. They usually have a 1:1 mixing ratio, making them beginner-friendly.
Casting Resins are formulated for deeper pours (1/4 inch to several inches). They cure more slowly to prevent overheating and cracking in thick applications. These are ideal for molds, river tables, or embedding objects. Their mixing ratios can vary (often 2:1 or 3:1).
For most DIY resin projects, a good-quality “Art Resin” or general-purpose epoxy resin that can handle both shallow coating and moderate depth casting (up to 1/2 inch) is your best bet as a beginner. Always check product descriptions to ensure the resin matches your project type—coating resin for deep pours can result in overheating, yellowing, or cracking.
Safety First: Essential Precautions for Resin Art
Is Resin Toxic? Understanding the Risks
Let’s address the elephant in the room: resin safety tips are not optional but essential. While liquid resin components can be irritants and sensitizers, understanding and respecting these materials ensures a safe crafting experience.
Uncured liquid resin and hardener can cause skin irritation, allergic reactions, and respiratory issues if handled carelessly. During mixing and curing, resins emit volatile organic compounds (VOCs)—the fumes you might smell. The good news? Once fully cured, resin is generally considered non-toxic and inert, similar to hard plastic.
The key is to treat the liquid resin with the same respect you’d give any chemical product in your home—with proper precautions; it’s perfectly safe to use.
Must-Have Safety Gear: Your Protective Shield
Your safety equipment is not just an option—it’s your first line of defense:
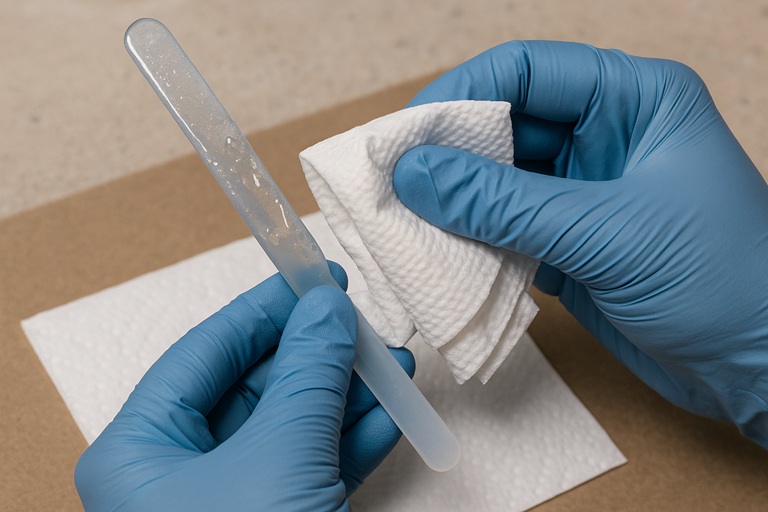
- Nitrile Gloves: These are crucial and non-negotiable. Nitrile offers superior chemical resistance to latex, which can degrade when exposed to resin. Buy a box and change them frequently during your work session.
- Respirator: An organic vapor respirator (not just a dust mask) protects you from fumes, especially when working indoors or for extended periods. Look for one rated for organic vapors with replaceable cartridges.
- Safety Glasses/Goggles: Resin can splash unexpectedly when pouring or mixing. Protect your eyes with proper safety glasses—regular prescription glasses aren’t enough.
- Protective Clothing: Wear an apron or designate “resin clothes” that you don’t mind potentially ruining. Long sleeves protect your arms from splashes.

The Importance of a Well-Ventilated Workspace
Ventilation is your invisible safety partner. Even “low-odor” or “non-toxic” resins benefit from good airflow. Open windows on opposite sides of your room for cross-ventilation, use fans to circulate air (but not blow directly on your project) and consider working in a garage with the door open.
Poor ventilation can lead to headaches, dizziness, or respiratory irritation—symptoms that proper airflow completely prevents.
Oops! What to Do in Case of Skin Contact
Accidents happen, but quick action minimizes issues. If resin contacts your skin:
- Immediately wash the affected area with soap and warm water.
- Use an exfoliant cleanser or pumice-based hand cleaner for stubborn resin.
- Pat dry and apply a gentle moisturizer.
Critical warning: NEVER use solvents like alcohol, vinegar, or acetone on your skin. These can increase the absorption of resin components through your skin, worsening the situation. Stick to soap and water—it’s safer and surprisingly effective when used promptly.
Gathering Your Supplies: What You’ll Need to Get Started
Essential Materials Checklist
Starting your resin art supplies collection doesn’t have to break the bank. Here’s what you need:
- Epoxy Resin and Hardener: Choose a beginner-friendly brand with a 1:1 ratio by volume for easier measuring. Look for ASTM-D-certified products when available—this certification ensures quality standards.
- Measuring Cups: Graduated plastic cups with clear measurement markings. You’ll need separate cups for Parts A and B to ensure accurate ratios.
- Mixing Cups: Clear disposable plastic cups work well for single use. For eco-conscious crafters, invest in reusable silicone cups that cured resin peels right off.
- Stir Sticks: Popsicle sticks are perfect and inexpensive. Silicone stirrers are reusable and worth the investment if you continue with resin art.
- Molds (Optional for casting): Silicone molds are ideal for beginners—they’re flexible, reusable, and release cured resin easily. Start with simple shapes like coasters or jewelry pieces.
- Safety Gear: All items mentioned in the safety section—no exceptions!
- Protective Covering: Protect your workspace with plastic sheeting, a silicone mat, or even taped-down garbage bags. Once cured, resin doesn’t stick to these materials.
Optional but Fun: Adding Color and Sparkle
Once you’re ready to move beyond clear resin, these additions open up creative possibilities:
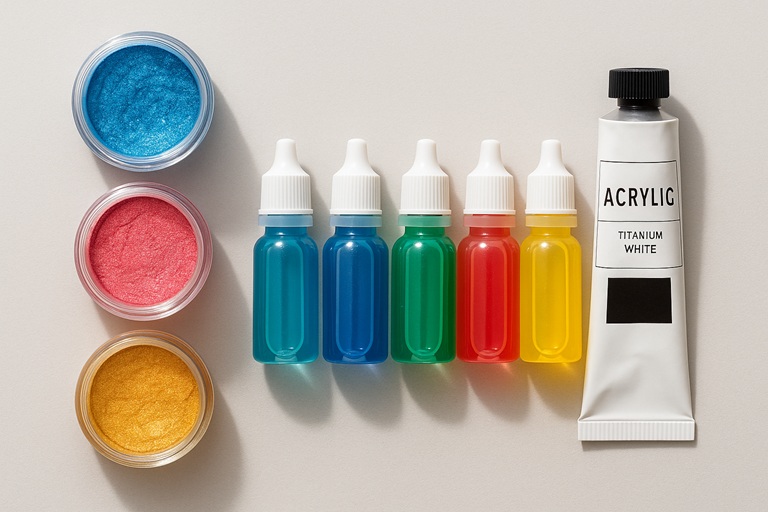
Colorants transform your clear resin into vibrant art:
- Mica Powders create stunning shimmer and pearlescent effects. Mix thoroughly to avoid graininess.
- Alcohol Inks offer vibrant, transparent colors perfect for abstract effects. Caution: they’re flammable and affect food safety
- Acrylic Paints are budget-friendly and widely available. Use high-quality, high-pigmented paints sparingly.
- Resin Tints/Opaque Pigments are specifically formulated for resin, providing reliable, bold colors.
Glitters add sparkle and dimension. Fine glitters suspend well, while chunky glitters may sink—both effects can be beautiful when used intentionally.
Embedments like dried flowers, beads, shells, or small charms personalize your pieces. Ensure all items are dehydrated to prevent clouding or curing issues.
Golden Rule: Never add more than 5-6% colorant to your mixed resin volume. Too much additive interferes with curing, resulting in sticky or soft resin.
Tools for a Smooth Process
These tools elevate your resin game from amateur to professional-looking results:
- Heat Gun or Propane Torch: These are essential for removing bubbles. Heat guns are safer for beginners, while torches work faster but require more caution.
- Level: Ensures even resin distribution. A small bubble level prevents lopsided pieces.
- Cleaning Supplies: Paper towels, isopropyl alcohol (for tools only), baby wipes for quick cleanups
- Toothpicks or Tweezers: Perfect for removing dust, positioning embedments, or popping stubborn bubbles
Choosing Your First Project Surface or Mold
For Coating Projects, suitable surfaces include:
- Wood (must be sealed/primed to prevent bubbles)
- Canvas (use canvas boards for stability)
- Ceramic tiles (clean and degrease first)
For Casting Projects, silicone molds reign supreme for beginners:
- Coaster molds for functional art
- Jewelry molds for wearable creations
- Small tray or dish molds for decorative pieces
Setting Up Your Resin Art Workspace
Creating a Clean, Level, and Protected Area
Your workspace setup directly impacts your results. A dust-free environment prevents those frustrating specks in your finished piece. Before starting:
- Clean your work surface thoroughly
- Check that your table is level using a bubble level
- Lay down a protective covering, securing edges with tape
- Remove pets from the area—cat hair in resin is heartbreaking!
- Have all supplies within reach but not directly over your project

Temperature and Humidity Considerations
Environmental conditions significantly affect the mixing of epoxy resin and curing:
Temperature: The ideal working temperature is 70-75°F (21-24°C). The cold resin becomes thick, traps bubbles, and may cure cloudy or incompletely. If your space is cold, put warm, sealed resin bottles in a warm water bath for 10-15 minutes before use.
Humidity: High humidity (above 85%) can cause clouding, poor adhesion, or incomplete curing. Use a dehumidifier in damp conditions or wait for a drier day for best results.
The Creative Process: Your First Resin Pour Step-by-Step
1. Prepare Your Surface or Mold
Success starts with preparation. Ensure your surface or mold is impeccably clean, completely dry, and sitting level. For wood surfaces, apply a sealant or primer first—raw wood releases air bubbles as resin soaks in, creating an effect you probably don’t want.
2. Accurate Measuring: The Key to Success
This step is crucial—incorrect ratios are the #1 beginner mistake. Always follow your specific resin’s instructions, but for typical 1:1 ratio resins:
- Pour Part A (resin) into one measuring cup
- Pour Part B (hardener) into a separate measuring cup
- Ensure amounts are exactly equal by volume
- Double-check measurements—”close enough” doesn’t work with resin

3. Thorough Mixing: Techniques to Avoid Issues
Proper mixing technique prevents 90% of curing problems:
- Pour Part B into Part A (or as directed by the manufacturer)
- Mix slowly and deliberately for at least 3-5 minutes (7 minutes for larger batches)
- Scrape the sides and bottom repeatedly—unmixed resin creates sticky spots
- Mix until completely clear with no visible streaks or swirls
Pro tip: The Two-Cup Method virtually guarantees proper mixing. After initial mixing, pour everything into a fresh cup and mix for another 1-2 minutes with a clean stick. Mixing this way ensures no unmixed resin from the first cup’s edges makes it into your project.

4. Adding Colorants and Embellishments (If Using)
Once your resin is thoroughly mixed and clear:
- Add colorants drop by drop or pinch by pinch
- Mix each addition thoroughly before adding more
- For multiple colors, divide mixed resin into separate cups first
- Remember the 5-6% rule—less is often more
5. Pouring Your Resin: Tips for Even Application
The pour is where the magic happens:
- Pour slowly to minimize bubbles
- Start in the center for self-leveling effects
- For specific patterns, pour strategically
- Use a stir stick to guide resin to edges if needed
- Work deliberately, but don’t dawdle—remember your working time
6. Banishing Bubbles: Using a Heat Gun or Torch Safely
After pouring, wait 3-5 minutes for bubbles to rise naturally. Then:
- Hold your heat gun 6-8 inches from the surface
- Sweep quickly across the resin—bubbles will pop instantly
- Don’t linger in one spot to avoid overheating
- Repeat every 10-15 minutes for the first half hour as new bubbles surface

Safety note: If using alcohol inks, use only a heat gun—torches can ignite alcohol vapors.
7. Curing Your Masterpiece: Patience is a Virtue
The waiting game begins:
- Cover your piece with a clean box or plastic tote (not touching the resin)
- Ensure your curing spot remains level and undisturbed.
- Maintain temperature around 70-75°F
- Most resins are touch-dry in 24 hours and fully cured in 72 hours.
- Resist the urge to poke or check—patience pays off!
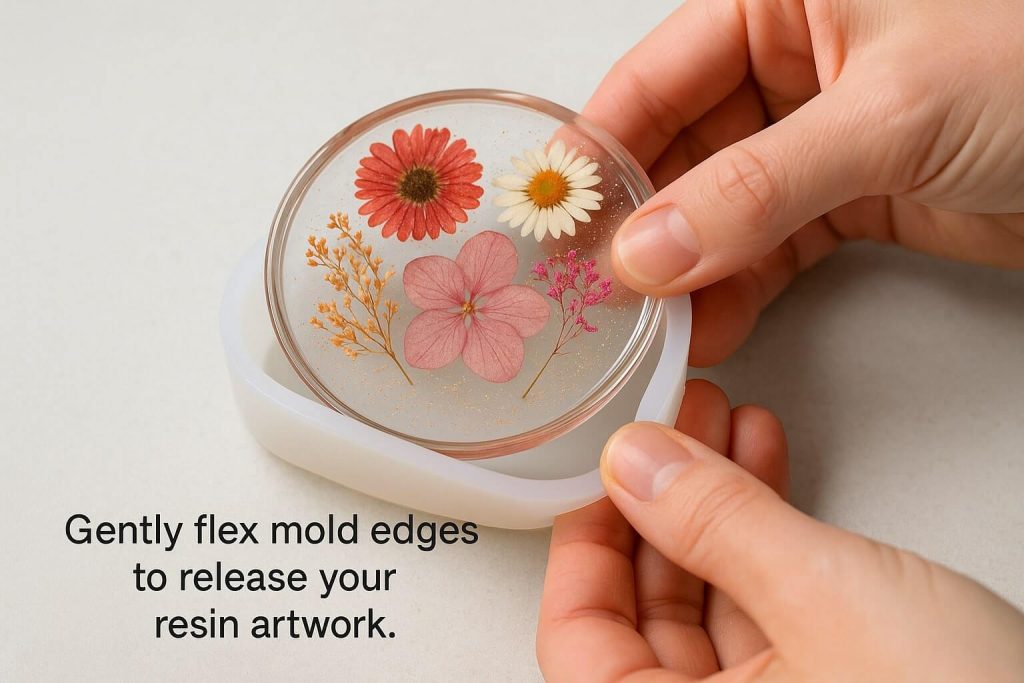
8. Demolding or Finishing Touches
Once fully cured:
- Gently flex silicone molds to release your piece.
- If edges are sharp, sand lightly with fine-grit sandpaper (wear a dust mask)
- Admire your creation—you did it!
Troubleshooting: Common Beginner Mistakes and How to Fix/Avoid Them
- Mistake 1: Inaccurate Measuring
- Consequences: Sticky, soft, or uncured resin that never properly hardens
- Avoid/Fix: Always measure precisely by volume. Invest in quality measuring cups. If the solution has already been poured and is sticky, it’s usually unfixable—chalk it up to learning.
- Mistake 2: Improper/Under-Mixing
- Consequences: Sticky spots, soft areas, or uneven curing
- Avoid/Fix: Time your mixing (use your phone timer!). Scrape thoroughly. Use the two-cup method. Prevention is your only real option here.
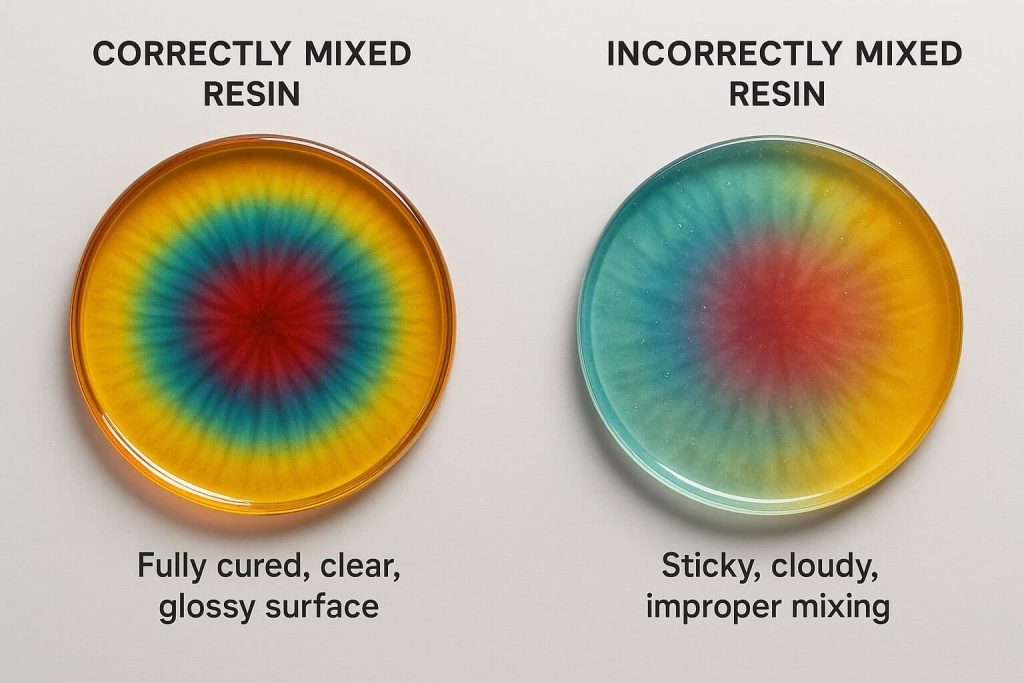
- Mistake 3: Sticky or Bendy Resin After Curing
- Causes & Consequences: Incorrect ratios, insufficient mixing, cold temperatures, high humidity, or too much colorant leave resin tacky or flexible
- Avoid/Fix: Address all variables. Thin pieces may need up to 7 days to cure fully. A thin coat of properly mixed resin might help with surface tackiness.
- Mistake 4: Too Many Bubbles
- Consequences: Cloudy appearance, visible bubble marks
- Avoid/Fix: Mix slowly, warm your resin, and use a heat gun properly. Pour from height to break surface tension.
- Mistake 5: Dust and Debris in Cured Resin
- Consequences: Bumpy, imperfect surface
- Avoid/Fix: Clean workspace obsessively. Cover while curing. Use tweezers to remove particles within the first 30 minutes.
- Mistake 6: Working in Cold Temperatures
- Consequences: Thick resin, poor mixing, slow/incomplete cure, cloudiness
- Avoid/Fix: Maintain 70-75°F workspace—warm resin bottles before use. Use a space heater if needed.
- Mistake 7: Using Too Much Colorant
- Consequences: Curing failure, muddy colors, excessive heat generation
- Avoid/Fix: Less is more. Keep the colorant ratio under 5-6%, and test color intensity in small batches.
- Mistake 8: Inadequate Surface Preparation
- Consequences: Poor adhesion, excessive bubbles, uneven coverage
- Avoid/Fix: Clean, dry, and seal porous surfaces. When in doubt, prime it
- Mistake 9: Not Testing Resin or Colorants First
- Consequences: Unexpected reactions, wasted materials, disappointment
- Avoid/Fix: Always do test pours with new materials. Keep a resin journal of what works.
- Mistake 10: Rushing the Curing Process
- Consequences: Fingerprints, smudges, permanently bendy pieces
- Avoid/Fix: Follow the manufacturer’s full cure times. When they say 72 hours, they mean it.
Easy & Fun Beginner Resin Art Project Ideas
Ready for your first epoxy resin project? Start with these beginner-friendly ideas:

- Resin Coasters are the perfect starter project using round or square silicone molds. Use them to practice color mixing, embed dried flowers, or create abstract alcohol ink effects. You’ll need coaster molds, resin, and your choice of colorants.
- Resin Keychains/Charms: These small-scale projects are perfect for gift-giving. Use alphabet molds for initials or small-shaped molds with added glitter. Don’t forget the keychain hardware for finishing.
- Simple Jewelry Pendants: Use bezel settings or pendant molds to create unique wearable art. Try embedding tiny dried flowers or mixing mica powders for shimmer. Add jump rings and chains to complete.
- Resin Magnets: Transform small decorative molds into functional fridge magnets. Pour shallow layers, add color, and glue strong magnets to the back once cured.
- Small Decorative Trays: Ring dishes and trinket trays make beautiful gifts. Use small geometric molds and experiment with color gradients or metallic effects.
Cleaning Up: Tools and Workspace Safely
Proper cleanup extends your tools’ life and maintains a safe workspace:
- Uncured Resin on Tools: Wipe immediately with paper towels. Clean thoroughly with isopropyl alcohol or acetone (wear gloves!). You can clean the silicone tools once the resin cures.
- Uncured Resin on Skin: Wash immediately with soap and water—no exceptions, no solvents!
- Workspace Spills: Wipe immediately with paper towels. Use alcohol on protected surfaces for sticky residue.
- Disposal: Let leftover mixed resin cure in cups before disposal. Follow local regulations for chemical waste. Never pour liquid resin down the drains.
Understanding the Costs: What to Expect as a Beginner
Starting resin casting for beginners requires some initial investment, but it’s more affordable than many assume:
Essential Starter Costs typically range from $50-$150, including:
- Basic resin kit (16-32 oz)
- Safety gear (gloves, respirator, glasses)
- Mixing supplies (cups, sticks)
- A few simple molds
Optional Additions enhance creativity:
- Colorant sets ($20-40)
- Heat gun ($20-30)
- Variety of molds ($15-50)
Money-saving tip: Once you’re committed to the hobby, buying resin in larger quantities significantly reduces per-project costs. A one-gallon kit costs less per ounce than starter sizes.
Conclusion
Congratulations on taking your first steps into the wonderful world of resin art! You’ve learned the fundamentals of working with epoxy resin, from understanding the chemistry to mastering safety protocols and troubleshooting common issues. Remember, every professional resin artist started exactly where you are now—with curiosity, basic supplies, and probably a few sticky mistakes.
The beauty of resin art for beginners lies in the stunning results and the journey itself. Each pour teaches you something new: how colors interact, how temperature affects your work, or the meditative joy of watching resin self-level into glossy perfection. Embrace the learning process, including the inevitable imperfect pieces—they’re stepping stones to mastery.
As you embark on your resin art adventure, remember that safety and patience are your best friends. Protect yourself adequately, measure accurately, and allow complete curing. Start small with simple projects like coasters or keychains, building your confidence and skills before tackling more ambitious pieces.
The resin art community is incredibly welcoming and supportive. Don’t hesitate to share your creations, ask questions, and learn from others’ experiences. Your unique perspective and creativity will add something special to this vibrant art form.
Now it’s time to put on those gloves, set up your workspace, and create something amazing. Your first pour awaits and, with it, the beginning of countless creative possibilities. Welcome to the magical world of resin art—we can’t wait to see what you create!
