

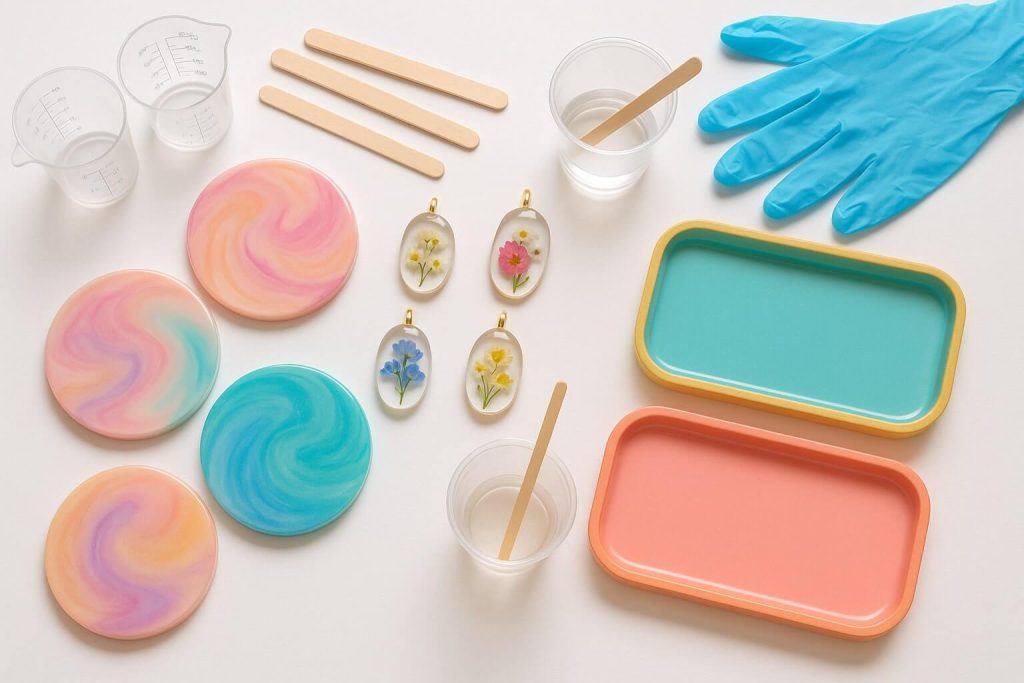
Introduction
Resin art has captured the hearts of crafters worldwide with its mesmerizing glossy finishes, vibrant color possibilities, and ability to preserve precious memories in crystal-clear beauty. From stunning jewelry pieces to breathtaking river tables, epoxy resin’s versatility makes it a very rewarding medium to explore.
As with any new craft, making mistakes is an inevitable—and valuable—part of your resin art journey. Every experienced resin artist has a story about their first sticky disaster or bubble-filled catastrophe. These early mishaps, while frustrating at the moment, become the foundation of expertise and confidence.
This comprehensive guide identifies the most common resin art mistakes beginners encounter and provides clear, actionable solutions for preventing and fixing them. Understanding these potential pitfalls before you pour your next project will save you time, materials, and frustration while creating more successful pieces from the start.
Remember, even professional resin artists occasionally face these challenges. The difference is they’ve learned how to avoid most problems and confidently address the ones that occur. With this guide, you’re already ahead of the learning curve.
Quick Summary Table: Top Resin Art Pitfalls
| Common Mistake | Primary Cause/Quick Explanation | Key Prevention Tip |
| Sticky/Uncured Resin | Incorrect resin/hardener ratio or insufficient mixing | Measure accurately & mix thoroughly (scrape sides!) |
| Bubbles in Cured Resin | Air introduced during mixing/pouring; cold resin; unsealed surface | Warm resin, mix slowly, pour carefully, use heat gun |
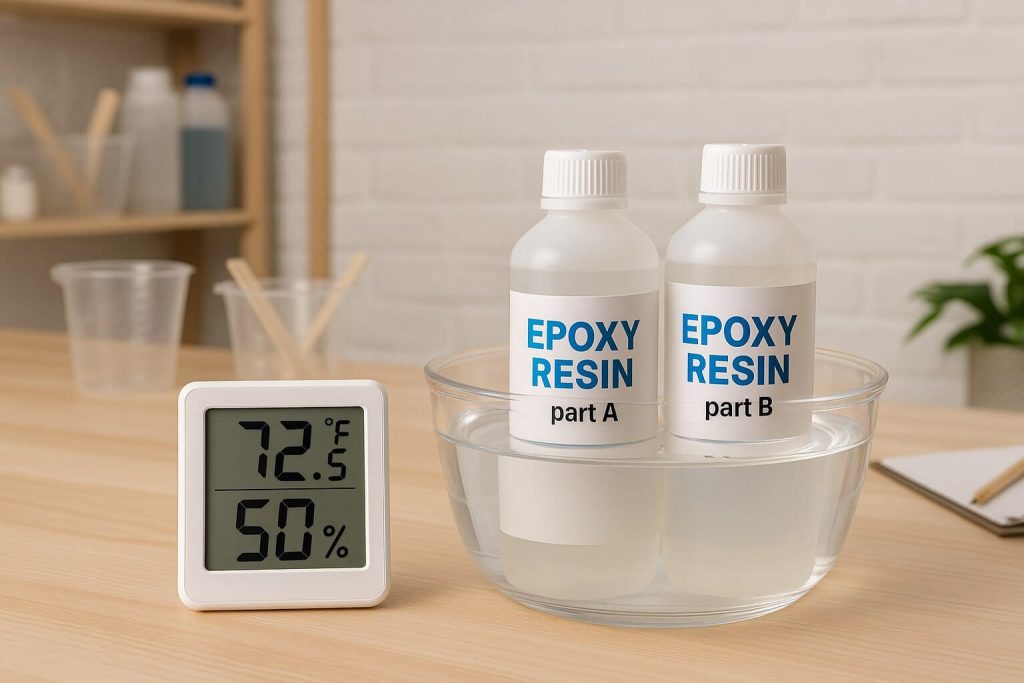
| Temperature Issues | Working below 70-75°F (21-24°C) | Maintain proper workspace temperature throughout cure |
| Exceeded Pot Life | Working with resin after it begins thickening | Mix small batches; work quickly once mixed |
| Poor Surface Prep | Contaminated or unsealed surfaces | Clean thoroughly; seal porous materials first |
| Excessive Colorant | Adding more than 5-6% colorant by volume | Less is more; add colorant gradually |
| Wrong Resin Type | Using coating resin for deep pours or vice versa | Research and select project-appropriate resin |
Detailed Breakdown: Common Resin Art Mistakes and Solutions
Mistake 1: Inaccurate Measuring of Resin and Hardener
The Mistake
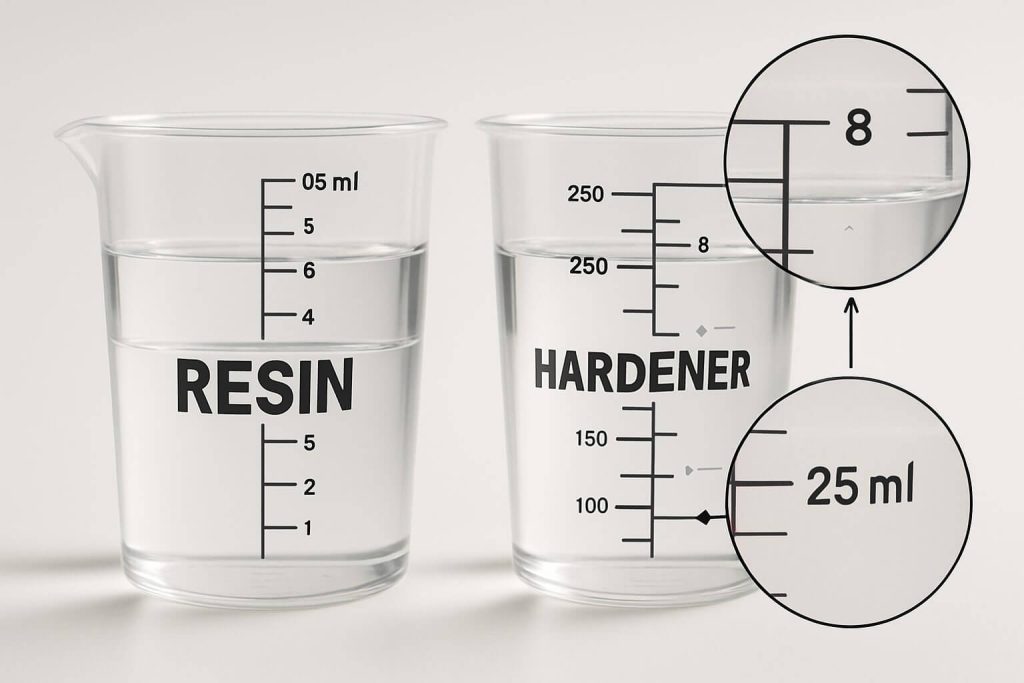
The most critical error beginners make is not precisely following the manufacturer’s recommended mix ratio (such as 1:1, 2:1 by volume or weight). Many newcomers estimate amounts or assume “a little extra hardener” will speed up curing.
Consequences
- Sticky or soft spots that never fully cure.
- Runny resin that won’t set properly.
- Bendy, flexible resin instead of a hard finish.
- Compromised durability and strength.
- Complete project failure requiring removal and restart.
How to Avoid
- ALWAYS read and follow the instructions for the mix ratio your specific resin manufacturer provided—these vary between brands and products.
- Use graduated measuring cups with clear, easy-to-read markings.
- The difference between volume and weight measurements is not interchangeable due to density differences.
- Measure components in separate cups before combining to ensure accuracy
- Never add an extra hardener. It will not speed up the curing process, disrupt the chemical reaction, and ruin the cure.
- Set up good lighting in your workspace to see measurement lines.
- Double-check your measurements before combining—adding more to a separate cup is much easier than correcting a wrong mixture.
How to Fix
- For slightly tacky surfaces after full cure time, move the piece to a warmer area (75-80°F) with low humidity for several additional days. Sometimes, this allows the cure to be complete.
- For small tacky spots on otherwise cured pieces: Lightly sand the cured areas around the tacky spot, then apply a thin topcoat of correctly mixed resin to seal the surface.
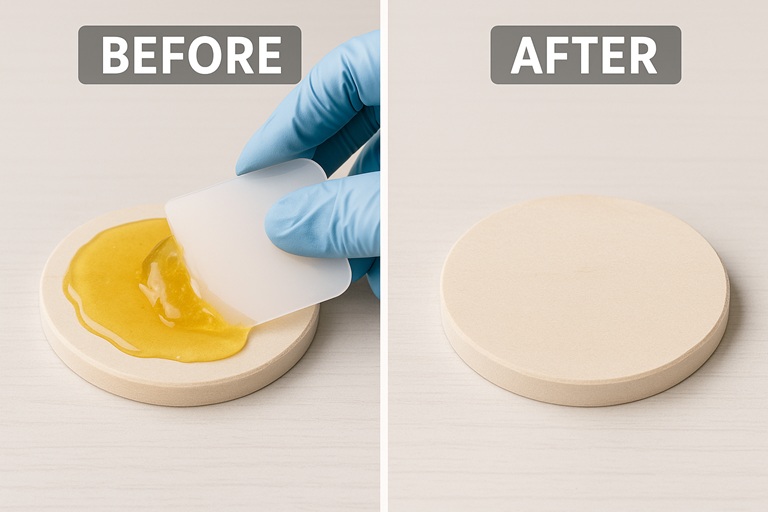
- For very sticky, gooey, or runny resin: Unfortunately, this won’t cure further. You’ll need to:
- Wear gloves and scrape off as much uncured resin as possible using a plastic scraper.
- Clean thoroughly with isopropyl alcohol on paper towels (dispose of properly).
- Sand any remaining residue once dry.
- Re-pour with correctly measured and mixed resin.
Mistake 2: Improper Mixing Technique
The Mistake
Failing to mix resin and hardener thoroughly or too vigorously creates inconsistent chemical reactions throughout your piece. Many beginners either rush through mixing or whip the mixture like cake batter.
Consequences
- Streaky or cloudy appearance in cured resin.
- Soft or sticky spots where components didn’t fully react.
- Uncured patches throughout the piece.
- Overall, it is a weak cure with poor clarity.
- Excessive bubbles from vigorous mixing.
How to Avoid
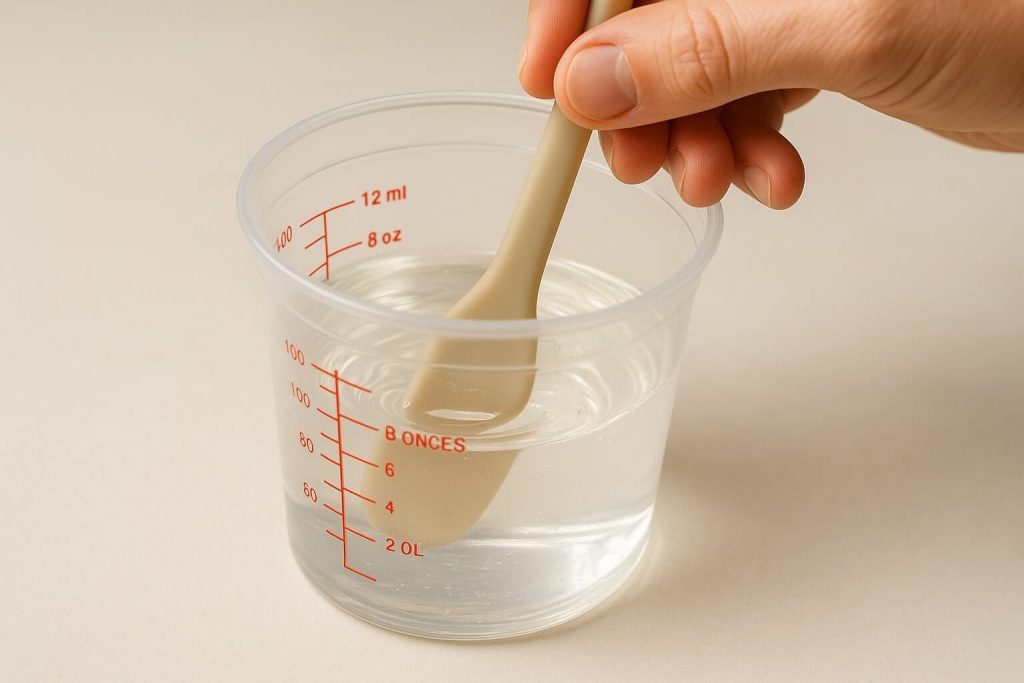
- Set a timer for the manufacturer’s recommended mixing time (typically 3-5 minutes)—don’t guess.
- Scrape the sides and bottom repeatedly during mixing to incorporate all material.
- Use a flat-edged stirring tool like a blade-shaped silicone stirrer for better scraping.
- Mix slowly and deliberately using figure-8 motions to minimize air incorporation.
- Employ the two-cup mixing method: Mix thoroughly in the first cup.
- Pour entire contents into a clean second cup.
- Mix again for 1-2 minutes to ensure no unmixed material transfers.
- Check for a uniform appearance with no streaks before pouring.
- Avoid using power mixers unless designed explicitly for resin—they introduce too much air.
How to Fix
- Widespread sticky areas from under-mixing: Unfortunately, this is mainly unfixable. The piece will need to be scraped clean and redone.
- Small isolated sticky spots: Refer to fixes for inaccurate measuring above.
- Cloudiness from poor mixing: This is typically permanent. A topcoat won’t fix underlying cure issues, though it may improve surface appearance slightly.
Mistake 3: Working in Cold Temperatures / Temperature Issues
The Mistake
Working with resin, hardener, workspace, or molds below the ideal temperature range (generally below 70-75°F or 21-24°C) affects both epoxy resin’s working properties and curing chemistry.
Consequences
- The resin becomes thick and honey-like, making it difficult to mix and pour.
- Increased air bubble formation and poor bubble release.
- Significantly slowed or incomplete curing process.
- Cloudy, weak, or bendy final cure.
- Surface imperfections like amine blush (oily film) in cold, humid conditions.
- Potential complete cure failure in extreme cold.
How to Avoid
- Maintain workspace temperature between 70-75°F (21-24°C) for at least the first 24 hours of curing.
- Pre-warm cold resin and hardener bottles: Keep caps tightly closed.
- Place in a warm (not hot) water bath for 10-15 minutes.
- Dry bottles thoroughly before opening to prevent water contamination.
- Use a space heater if necessary, but avoid placing projects directly before heat sources.
- Check mold temperature with an infrared thermometer—cold molds will chill resin.
- Avoid temperature fluctuations during curing, which can cause surface imperfections.
- Consider the season—many garages and basements are too cold in winter for resin work.
How to Fix
- Tacky surface due to cold: Move to a warmer environment (75-85°F) for several days to potentially complete curing.
- Amine blush removal: Wipe with warm, soapy water using a soft cloth.
- Rinse thoroughly with clean water.
- Dry completely.
- If persistent, light sanding and recoating may be necessary.
- Bubbles or cloudiness from the cold: Unfortunately, permanent once cured—prevention is key.
Mistake 4: Ignoring Resin’s Pot Life / Working Time
The Mistake
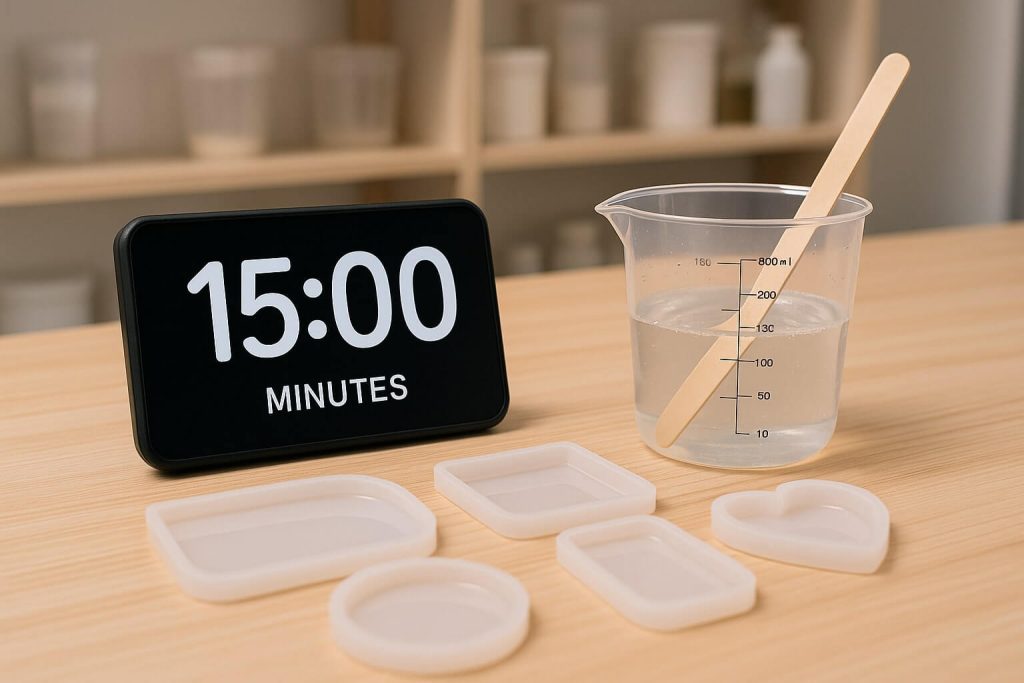
Continuing to work with mixed resin after its pot life (usable working time) has expired. Pot life varies dramatically between products, from 20 minutes to over an hour.
Consequences
- The resin becomes too thick to self-level or pour properly.
- It may start curing in the mixing cup with dangerous heat generation.
- Poor adhesion to surfaces.
- Surface defects like ripples, drag marks, or uneven thickness.
- Potential thermal cracking from overheated resin in mixing container.
How to Avoid
- Research your resin’s specific pot life before starting—this information is crucial.
- Understand factors affecting pot life: Ambient temperature (warmer = shorter pot life).
- Mixed volume (larger batches = more heat = shorter pot life).
- The container shape (deep/narrow holds more heat than shallow/wide).
- Mix only what you can use within the pot life—it is better to do multiple small batches.
- Prepare everything before mixing: Molds are cleaned and ready.
- Colorants pre-measured.
- Tools laid out.
- Workspace protected.
- Pour relatively quickly after mixing—don’t let resin sit in the mixing cup.
- For large amounts, pour into a shallow tray to dissipate heat and extend working time slightly.
How to Fix
- Thickened resin: Cannot be thinned or restored—must be discarded.
- Uneven surface from thick resin: Once fully cured, sand level and apply a fresh topcoat.
- The resin is cured in mixing cups: Silicone cups: Flex will remove the cured resin once it cools.
- Plastic cups: Usually ruined—this is why many artists use disposable cups.
Mistake 5: Bubble Troubles (Formation and Removal)
The Mistake
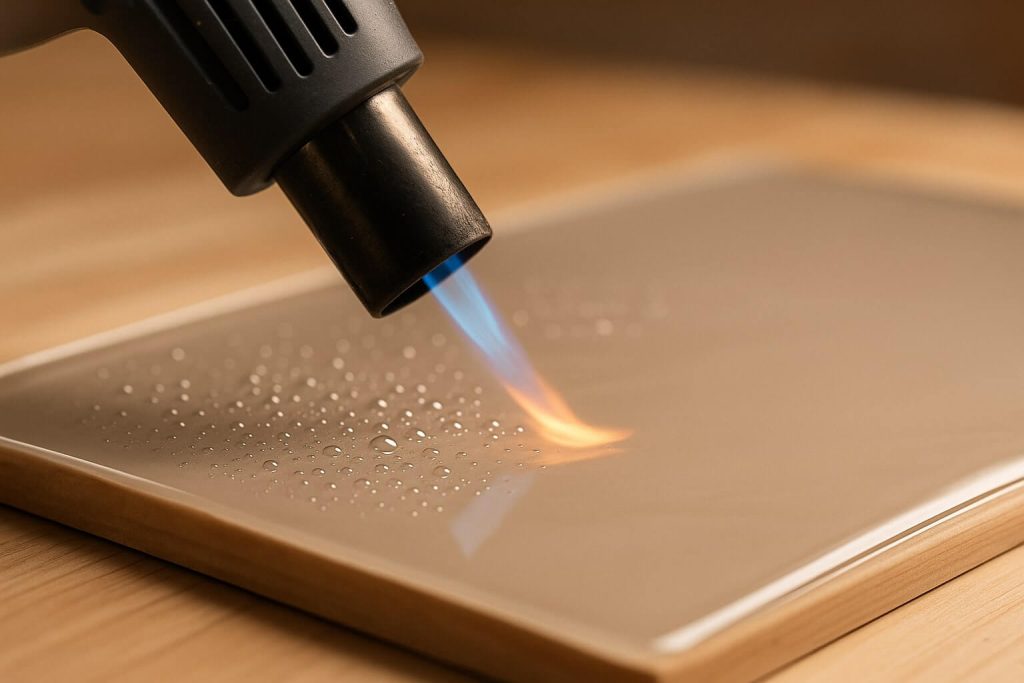
Excessive air bubbles are introduced during mixing or pouring and fail to be removed before the resin begins to gel. Bubbles are one of the most visible flaws in finished pieces.
Consequences
- Cured resin filled with tiny bubbles affects the clarity.
- Large bubbles create voids or craters.
- Cloudy or frosted appearance from micro-bubbles.
- Surface imperfections where bubbles popped late in curing.
How to Avoid Formation
- Warm cold resin before mixing—thinner resin releases bubbles more easily.
- Mix slowly and deliberately rather than whipping or vigorously stirring.
- Pour technique matters: Pour slowly from a low height.
- Pour down the side of the molds when possible.
- Use thin streams rather than dumping them.
- Let mixed resin rest for 5-10 minutes before pouring (watch pot life!).
- Seal porous surfaces first: Wood, paper, fabric, and unglazed ceramics all release air.
- Apply a thin seal coat and let cure before the main pour.
- Resting the mixed resin prevents bubbles from emerging during the cure.
How to Fix (Remove Bubbles Before Curing)
-
- Heat gun or torch method: Use the lowest setting
- Keep moving—never hold in one spot.
- Sweep 6-8 inches above the surface.
- Watch for bubbles rising and popping.
- Stop before the resin begins to ripple or smoke.
- A quick exhale of warm breath can pop surface bubbles into small pieces.
- Toothpick method: Manually pop individual bubbles in detailed areas.
- Vacuum chamber: For professional results (advanced technique).
- Pressure pot: Compresses bubbles to an invisible size (advanced).
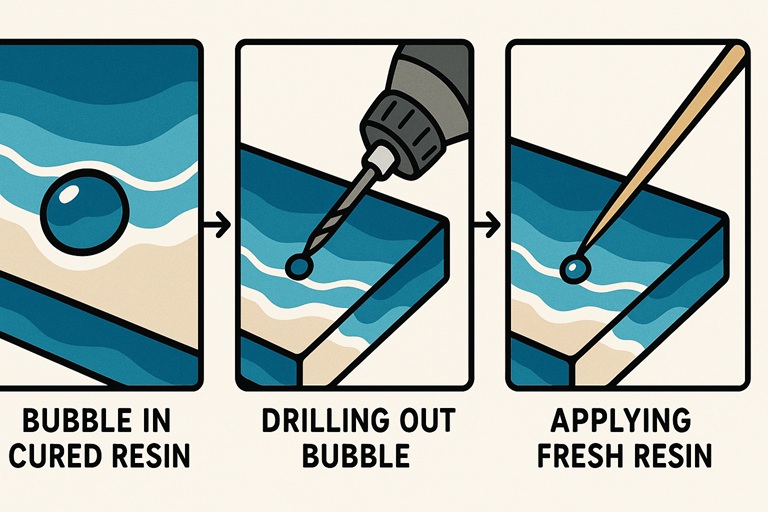
How to Fix (Bubbles in Cured Resin)
- Minor surface bubbles: Sand smooth and apply fresh topcoat.
- Deep bubbles in clear resin: Very difficult to fix invisibly.
- For opaque pieces, you can drill out large bubbles and refill them.
- Prevention is always better than attempting fixes.
Mistake 6: Surface Preparation Oversights
The Mistake
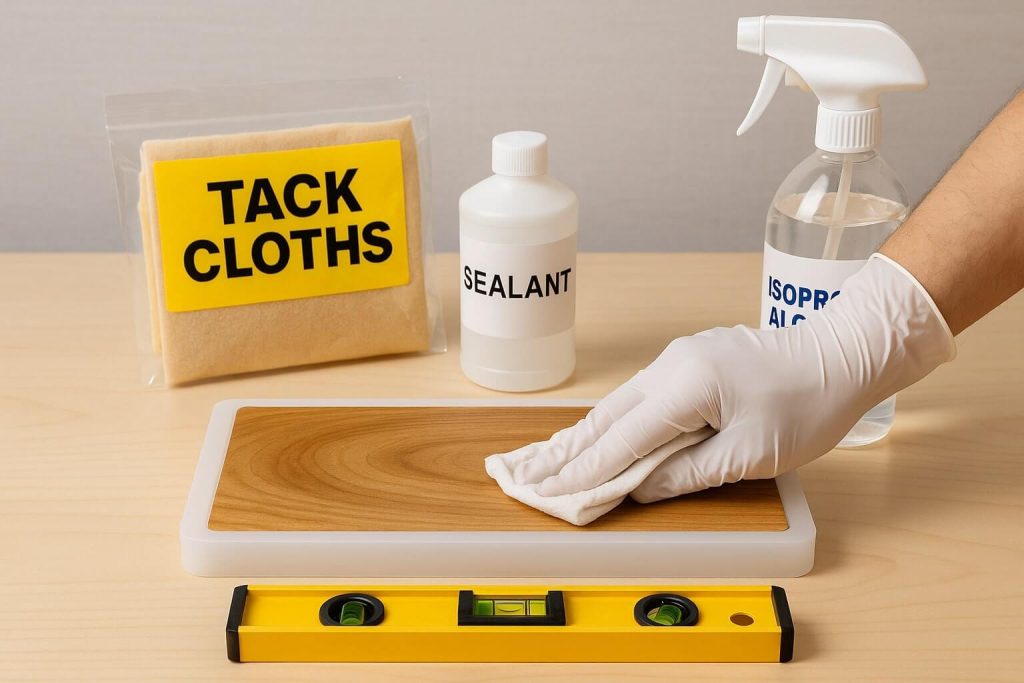
Failing to properly clean, seal, or prepare surfaces and molds before applying resin. This seemingly simple step has a significant impact on the final results.
Consequences
- Poor adhesion with resin pulling away from edges.
- Fisheyes (circular craters) from surface contamination.
- Bubbles continuously emerge from unsealed porous materials.
- Dust, hair, or debris permanently embedded.
- Uneven finish from unlevel surfaces.
- Resin absorption into porous materials, leaving divots.
How to Avoid
- Cleaning protocol: Remove all dust with compressed air or tack cloth.
- Wipe non-porous surfaces with isopropyl alcohol.
- Allow to dry completely.
- Check for any oils, waxes, or residues.
- Seal porous materials: Apply a thin coat of resin or compatible sealant.
- Allow to cure before pouring fully.
- Common materials needing sealing: wood, concrete, paper, fabric, and unglazed ceramics.
- Mold preparation: Ensure molds are completely clean.
- Use appropriate mold release for non-silicone molds.
- Check for any damage or imperfections.
- Level your work surface using a bubble level—self-leveling resin can’t fix a tilted surface.
- Create a dust-free environment as much as possible.
How to Fix
- Small dust specks can sometimes be picked out with a craft knife and spot-filled.
- Poor adhesion: Requires sanding and re-pouring in the affected area.
- Fisheyes from contamination: Sand the entire surface to remove the contaminated resin.
- Clean thoroughly with appropriate solvents.
- Re-seal if needed.
- Re-pour with fresh resin.
- Most surface prep mistakes require complete redo—prevention is crucial.
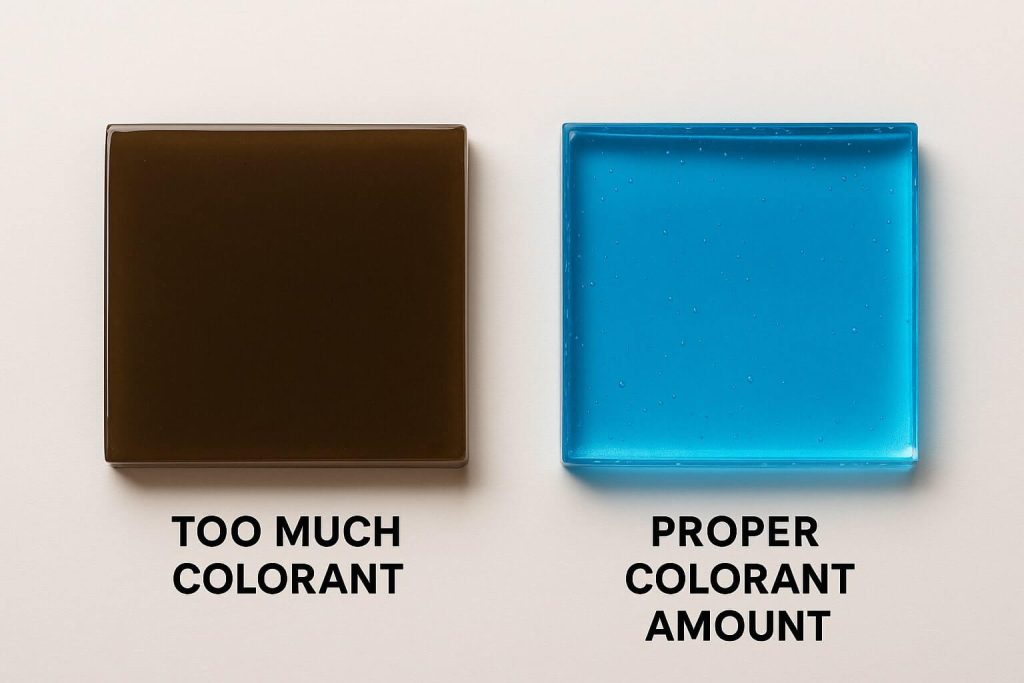
Mistake 7: Using Too Much Colorant
The Mistake
Adding excessive amounts of liquid pigments, acrylic paints, alcohol inks, or mica powders, thinking more color equals better results.
Consequences
- Interference with curing chemistry causes soft or sticky resin.
- Muddy, opaque colors instead of vibrant translucency.
- Clumping or separation of pigments.
- Weakened structural integrity of the cured piece.
- Extended cure times or complete cure failure.
How to Avoid
- Follow the “less is more” principle—once cured, most colors look richer than expected.
- Never exceed 5-6% colorant by volume of total mixed resin.
- Add colorant gradually: Start with a tiny amount.
- Mix thoroughly.
- Add more if needed.
- Test on a small area first.
- Use resin-specific colorants when possible—they’re formulated for compatibility.
- Understand your colorant type: Mica powders are generally safe at up to 5-6%.
- Alcohol inks: Very concentrated; use sparingly.
- Acrylic paints: Limit to 5% maximum due to water content.
- Resin pigments: Follow manufacturer guidelines.
- Always test new colorants on small batches first.
How to Fix
- Soft/sticky from too much colorant: Won’t cure further—must remove and redo.
- Muddy colors but hard cure: Aesthetic issue only.
- You can sand and pour a new layer on top.
- Or incorporate it into a mixed-media piece.
- Document your ratios for consistent results in future projects.
Mistake 8: Dust and Debris Contamination
The Mistake
Allowing airborne particles like dust, pet hair, or lint to settle onto wet resin during pouring or curing stages.
Consequences
- Visible specks and imperfections in the glossy surface.
- Rough texture where particles landed.
- Ruined mirror finish requiring fixes.
- Potential focal points for bubbles or cure issues.
How to Avoid
-
- Workspace Preparation: Vacuum and damp-mop floors before starting.
- Wipe down all surfaces.
- Remove or cover dusty items.
- Close windows to prevent drafts.
- Turn off ceiling fans.
- Personal preparation: Wear lint-free clothing.
- Tie back long hair.
- Remove fuzzy sweaters or fleece.
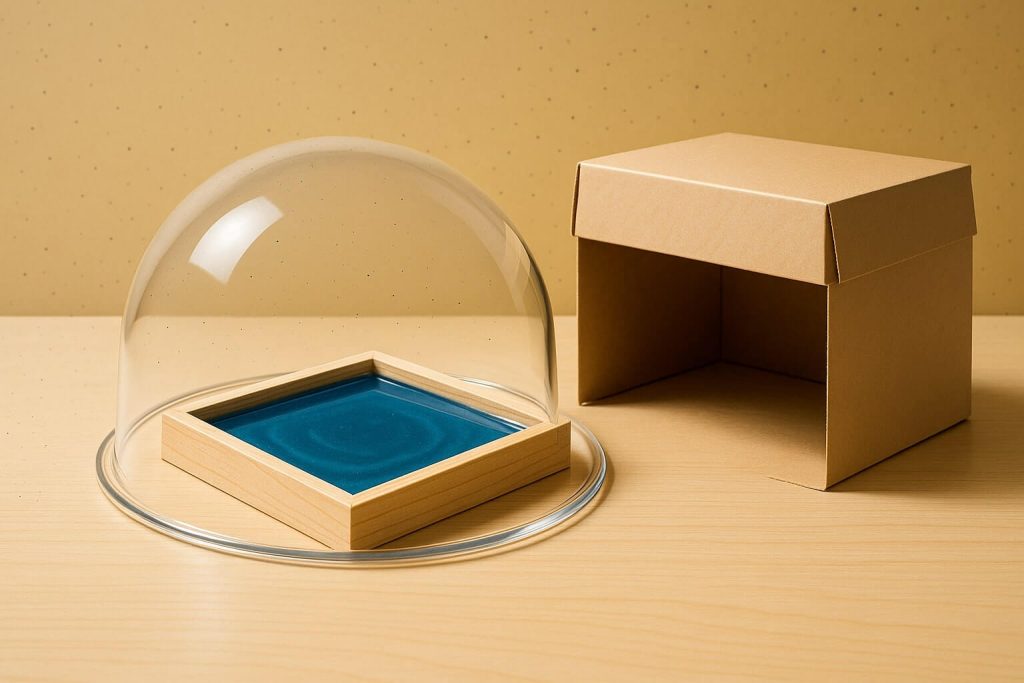
- Cover during curing: Use a clean cardboard box (check for dust inside first).
- Purpose-made dome covers.
- Ensure the cover doesn’t touch wet resin.
- Leave a small gap for air circulation.
- Quick removal: If you spot contamination immediately, remove it with tweezers.
How to Fix
- Still wet: Carefully remove particles with tweezers, and use a heat gun to self-level.
- Surface particles on cured resin: Sand-affected area with fine grit.
- Progress through grits to polish.
- Clean thoroughly.
- Apply a thin topcoat for a glass-like finish.
- Deep particles: Tough to fix invisibly—may need to incorporate into the design.
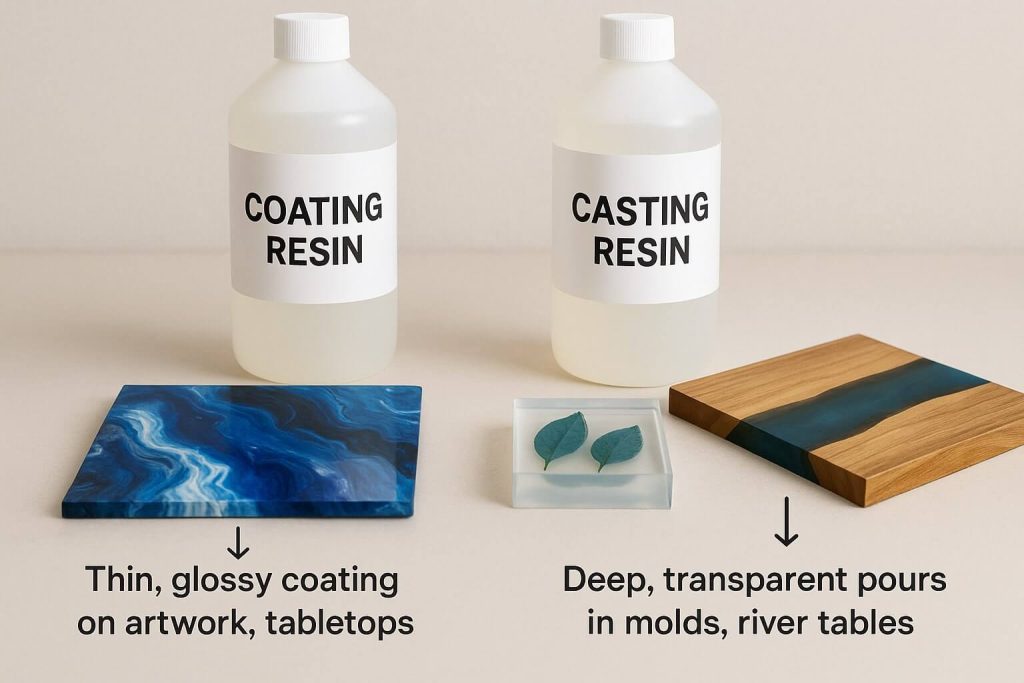
Mistake 9: Not Choosing the Right Resin for the Project
The Mistake
Using coating resin for deep pours, casting resin for thin coatings, or selecting resin without considering specific project requirements.
Consequences
Coating resin in deep pours:
- Overheats and potentially cracks.
- Yellows from excessive heat.
- Cures too fast trapping bubbles.
- May smoke or damage molds.
Casting resin for thin coats:
- It won’t self-level properly.
- It may create fisheyes or uneven surfaces.
- It takes excessively long to cure in thin layers.
- It might remain soft or flexible.
Wrong properties:
- Non-UV resistant resin yellows in sunlight.
- Non-food-safe resin is unsafe for functional items.
- Low-heat resistance resin fails on coasters.
How to Avoid
- Understand the fundamental differences:
- Coating/Doming Resins:
- Thicker viscosity for self-leveling.
- 1/8″ to 1/4″ maximum per layer.
- Shorter pot life (20-45 minutes).
- Harder final cure.
- Best for artwork sealing, countertops, and tumblers.
- Casting Resins:
- Thinner viscosity for bubble release.
- Can pour 1/2″ to 2″+ deep (check specifications).
- Longer pot life (45 minutes to hours).
- Slightly more flexible when cured.
- Best for molds, river tables, and embedding objects.
- Check specific properties needed:
- UV resistance for outdoor items.
- Food safety certification for functional pieces.
- Heat resistance for coasters or hot surfaces.
- Clarity requirements for crystal-clear pieces.
How to Fix
- Cracked piece from overheating: Generally unfixable—learning experience.
- Uneven casting resin surface: Sand level and topcoat with coating resin.
- Yellowed non-UV resistant resin: Irreversible—choose UV-stable resin next time.
- Research thoroughly before purchasing—quality resin costs more but saves frustration.
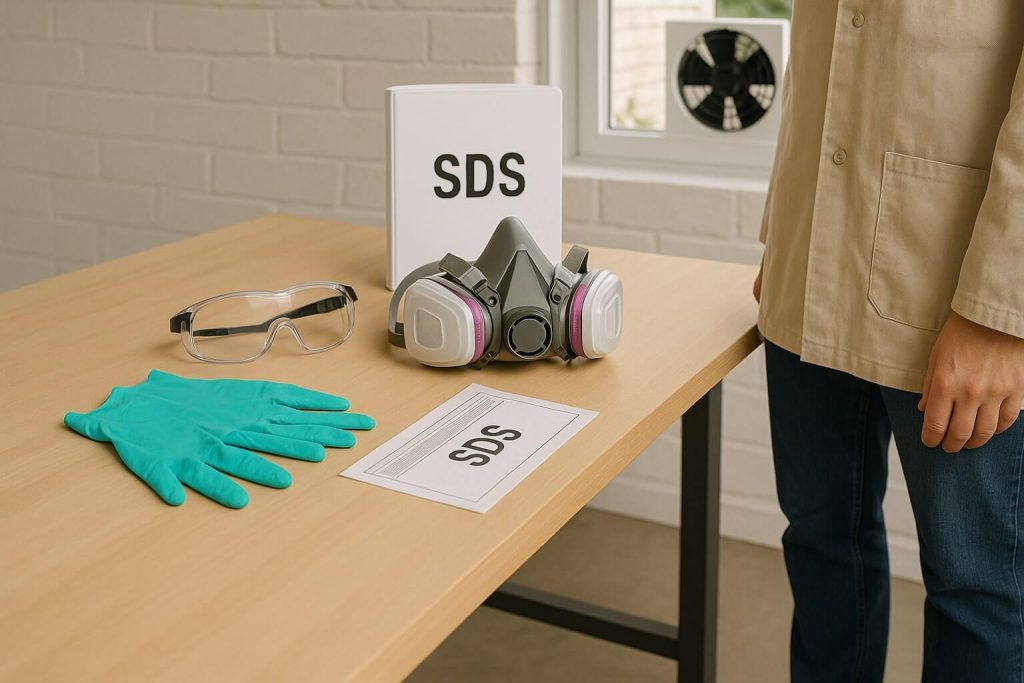
Mistake 10: Not Following Safety Precautions
The Mistake
Working without proper personal protective equipment (PPE) or in poorly ventilated areas, thinking resin is “just like glue” or completely safe.
Consequences
- Skin irritation and sensitization (allergies develop over time).
- Respiratory irritation from fumes.
- Eye irritation or damage from splashes.
- Long-term health effects from repeated exposure.
- Inability to work with resin due to developed allergies.
How to Avoid
- Essential PPE for every project:
- Gloves:
- ALWAYS wear nitrile gloves (latex degrades).
- Change if contaminated.
- Never touch resin with bare skin.
- Respiratory Protection:
- Work in well-ventilated area minimum
- Use a respirator with organic vapor cartridges for:
- Poor ventilation.
- Sensitive individuals.
- Sanding operations.
- Large projects.
- Eye Protection:
- Safety glasses or goggles.
- Eye protection is critical when using heat guns.
- Skin Protection:
- Long sleeves or apron.
- Closed-toe shoes.
- Hair tied back.
- Workspace safety:
- Read the Safety Data Sheet (SDS) for your products.
- Keep workspace separate from living areas.
- No food or drinks in the work area.
- Proper disposal of materials.
- Fire extinguisher accessible (resin is flammable).
- If resin contacts skin:
- Wash immediately with soap and water.
- NEVER use alcohol or acetone on the skin (it increases absorption).
- Remove contaminated clothing.
How to Fix
-
- Skin irritation: Wash thoroughly.
- Discontinue use until healed.
- Seek medical attention if severe.
- Skin irritation may indicate developing sensitivity.
- Respiratory issues: Move to fresh air immediately.
- Seek medical attention if severe.
- Improve ventilation before continuing.
- Once sensitized to epoxy, You may need to stop using resin entirely.
Conclusion
Mastering resin art is a journey filled with learning opportunities disguised as mistakes. Each sticky disaster and bubble-filled experiment teaches valuable lessons that tutorials alone can’t teach. The ten common mistakes covered in this guide represent the collective wisdom of countless resin artists who’ve faced these challenges before you.
Remember that every professional resin artist has stories of spectacular failures that led to breakthrough understanding. The difference between struggling beginners and confident creators isn’t the absence of mistakes—it’s knowing how to prevent most problems and calmly address the ones that inevitably occur. With practice, patience, and attention to the details outlined in this guide, you’ll make fewer mistakes and create more stunning pieces.
Don’t let early setbacks discourage your creative journey. Each project builds your skills, whether it turns out perfectly or teaches you what not to do next time. Keep your workspace organized, follow safety protocols, measure carefully, and always respect resin chemistry.
Mastering these fundamentals will reward you with the ability to bring your creative visions to life in glossy, glass-like permanence. Your future self will thank you for taking the time to understand these common pitfalls now. Happy creating, and remember—with the proper perspective and knowledge, even your mistakes can become part of beautiful, unique artwork!
Other Articles

